Looking to switch to Messegy from your current WhatsApp Business API provider? Check out the step-by-step process.
How to migrate to Messegy from your existing WhatsApp API Provider?
Looking to switch to Messegy from your current WhatsApp Business API provider? Check out the step-by-step process.
Pre-requisites for WhatsApp API migration
Here are three pre-requisites you must meet to migrate from your existing WhatsApp API provider to Messegy:
-
Ensure your WhatsApp Business API and WhatsApp Business Display name are verified by WhatsApp.
-
2-Factor Authentication must be disabled
-
Your WhatsApp Business API number should be available for OTP verification via SMS or voice call.
There are 2 parts to the migration process. You need to:
-
Disable 2-factor authentication of your current WhatsApp API provider
-
Migrate to Messegy from your current WhatsApp API provider
Let's discuss both of these parts in detail.
Pre-requisites for WhatsApp API migration
Here are three pre-requisites you must meet to migrate from your existing WhatsApp API provider to Messegy:
-
Ensure your WhatsApp Business API and WhatsApp Business Display name are verified by WhatsApp.
-
2-Factor Authentication must be disabled
-
Your WhatsApp Business API number should be available for OTP verification via SMS or voice call.
There are 2 parts to the migration process. You need to:
-
Disable 2-factor authentication of your current WhatsApp API provider
-
Migrate to Messegy from your current WhatsApp API provider
Let's discuss both of these parts in detail.
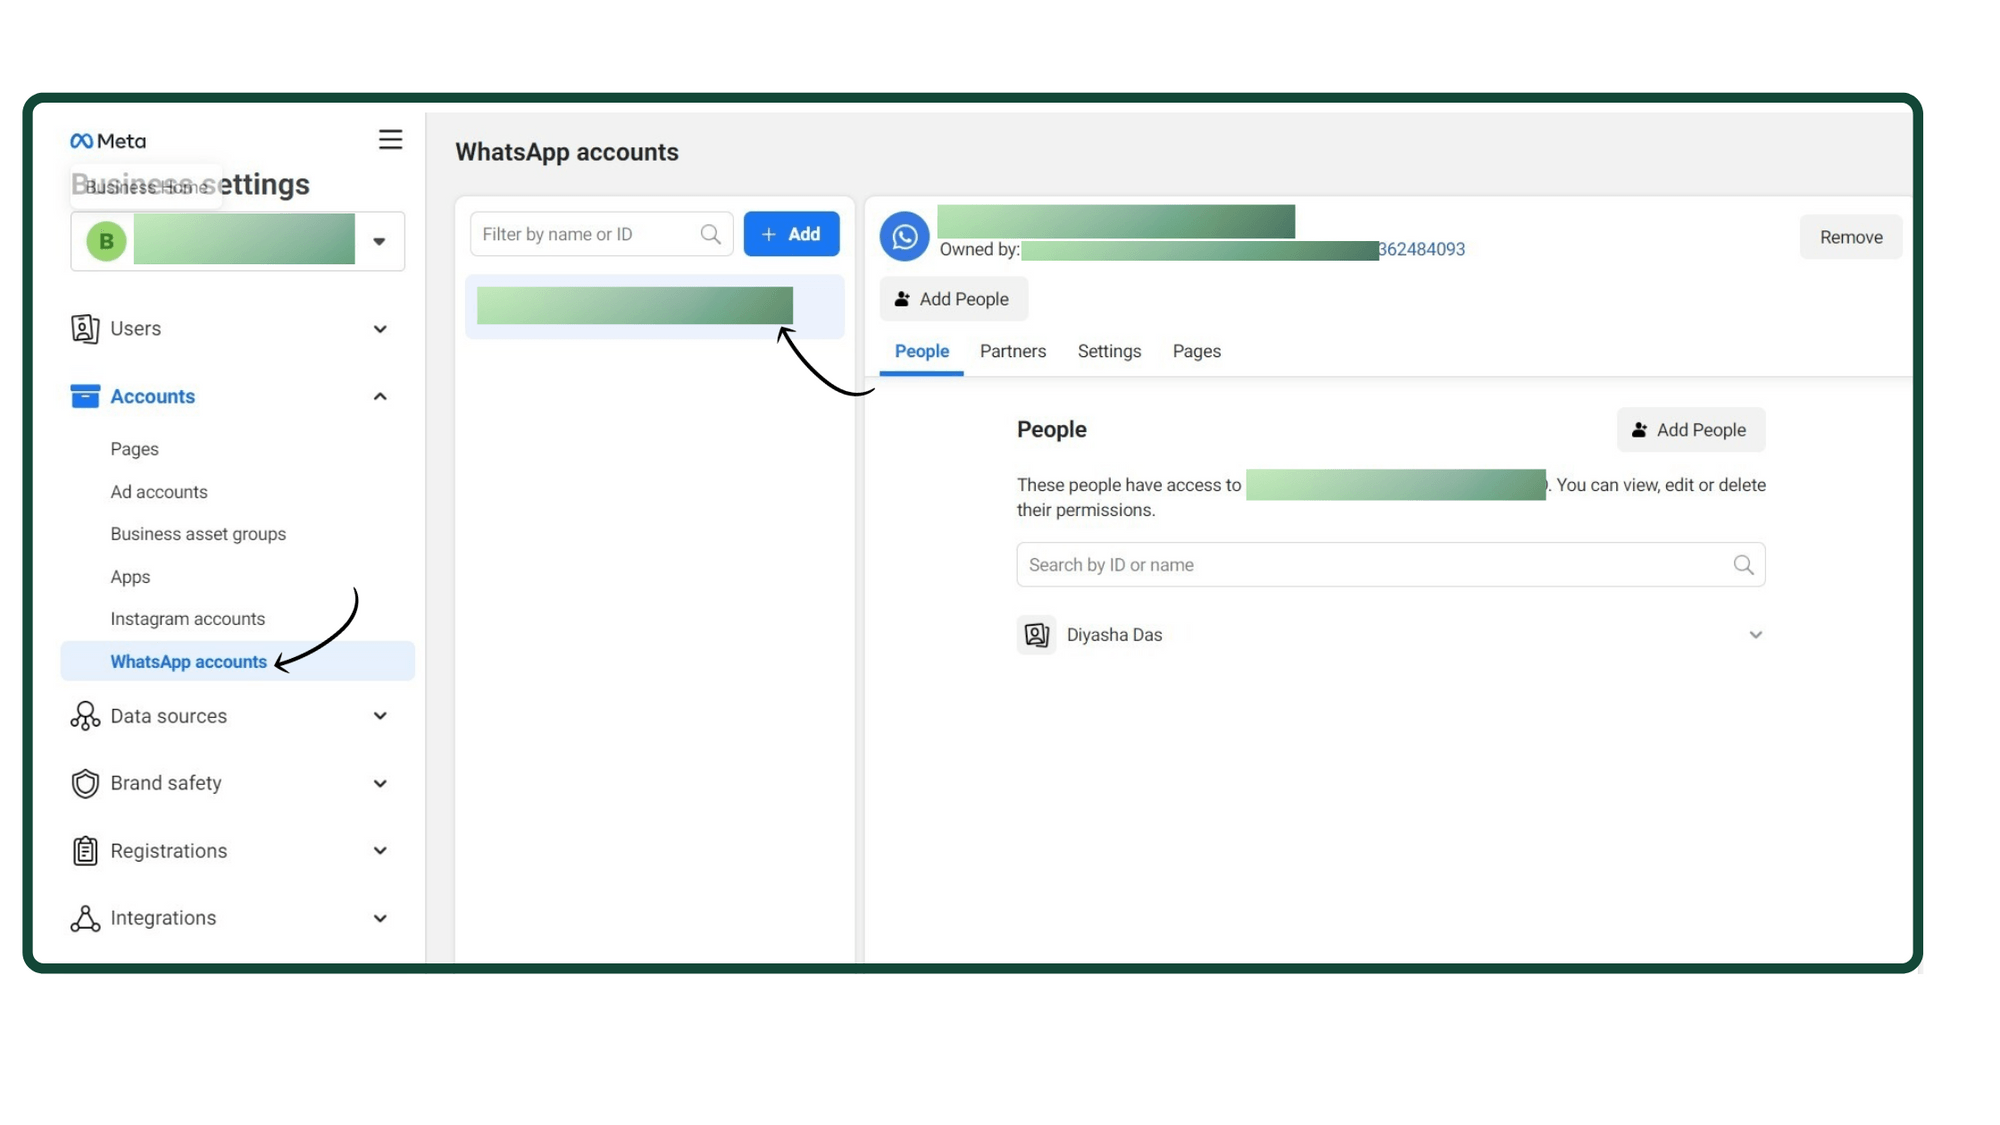
1. Go to Facebook Business Settings & click 'WhatsApp accounts'
First, go to Business Settings in your Facebook Business Manager by clicking this link - https://business.facebook.com/settings/
Now, click on WhatsApp accounts & choose the WhatsApp Business API account you wish to migrate to Messegy.
1. Go to Facebook Business Settings & click 'WhatsApp accounts'
First, go to Business Settings in your Facebook Business Manager by clicking this link - https://business.facebook.com/settings/
Now, click on WhatsApp accounts & choose the WhatsApp Business API account you wish to migrate to Messegy.
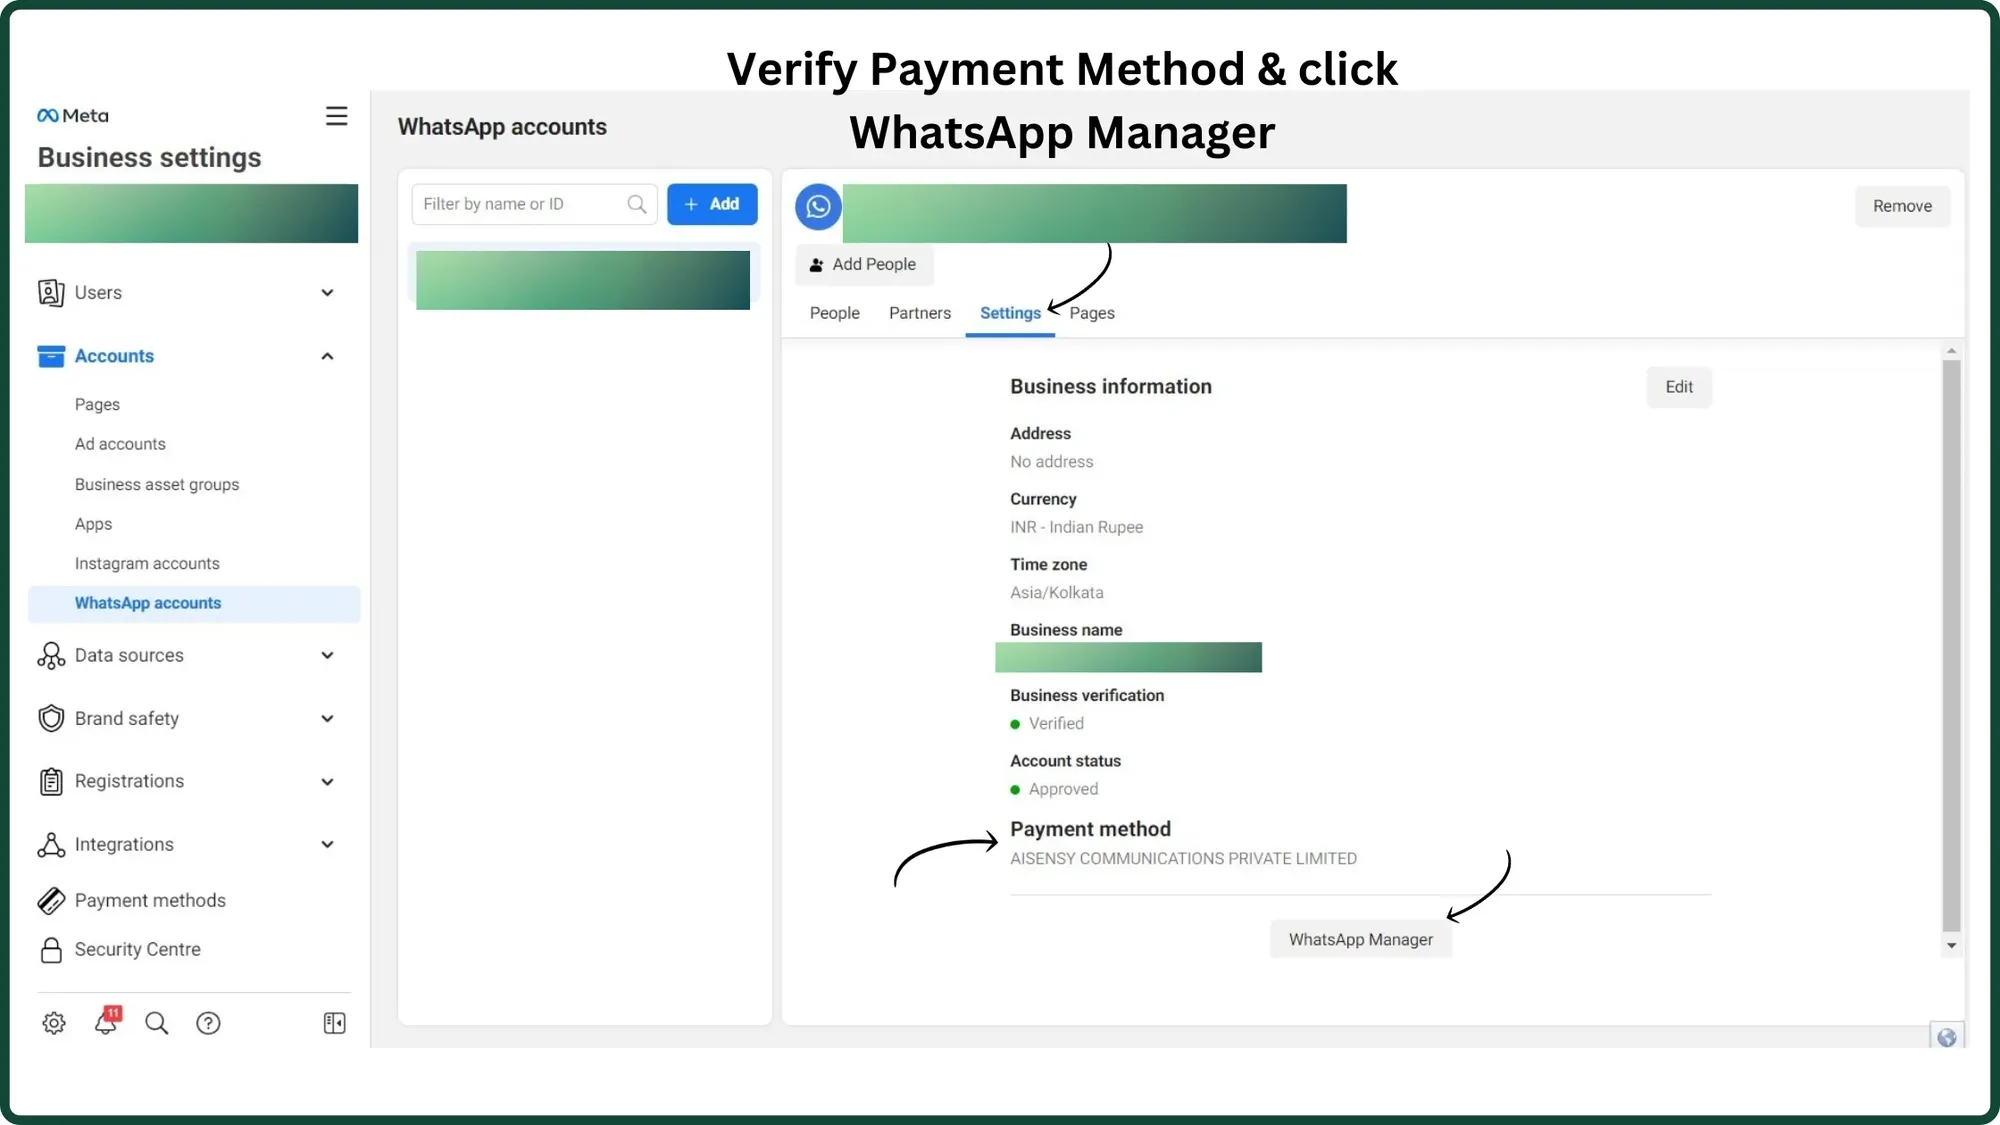
2. Go to Settings & click WhatsApp Manager
Next, in WhatsApp Accounts, go to settings as shown in the below image.
Here, you need to verify that your WhatsApp API provider is listed under the Payment Method.
If it's not there, don't worry! You can continue to the next step.
Now click on WhatsApp Manager.
2. Go to Settings & click WhatsApp Manager
Next, in WhatsApp Accounts, go to settings as shown in the below image.
Here, you need to verify that your WhatsApp API provider is listed under the Payment Method.
If it's not there, don't worry! You can continue to the next step.
Now click on WhatsApp Manager.
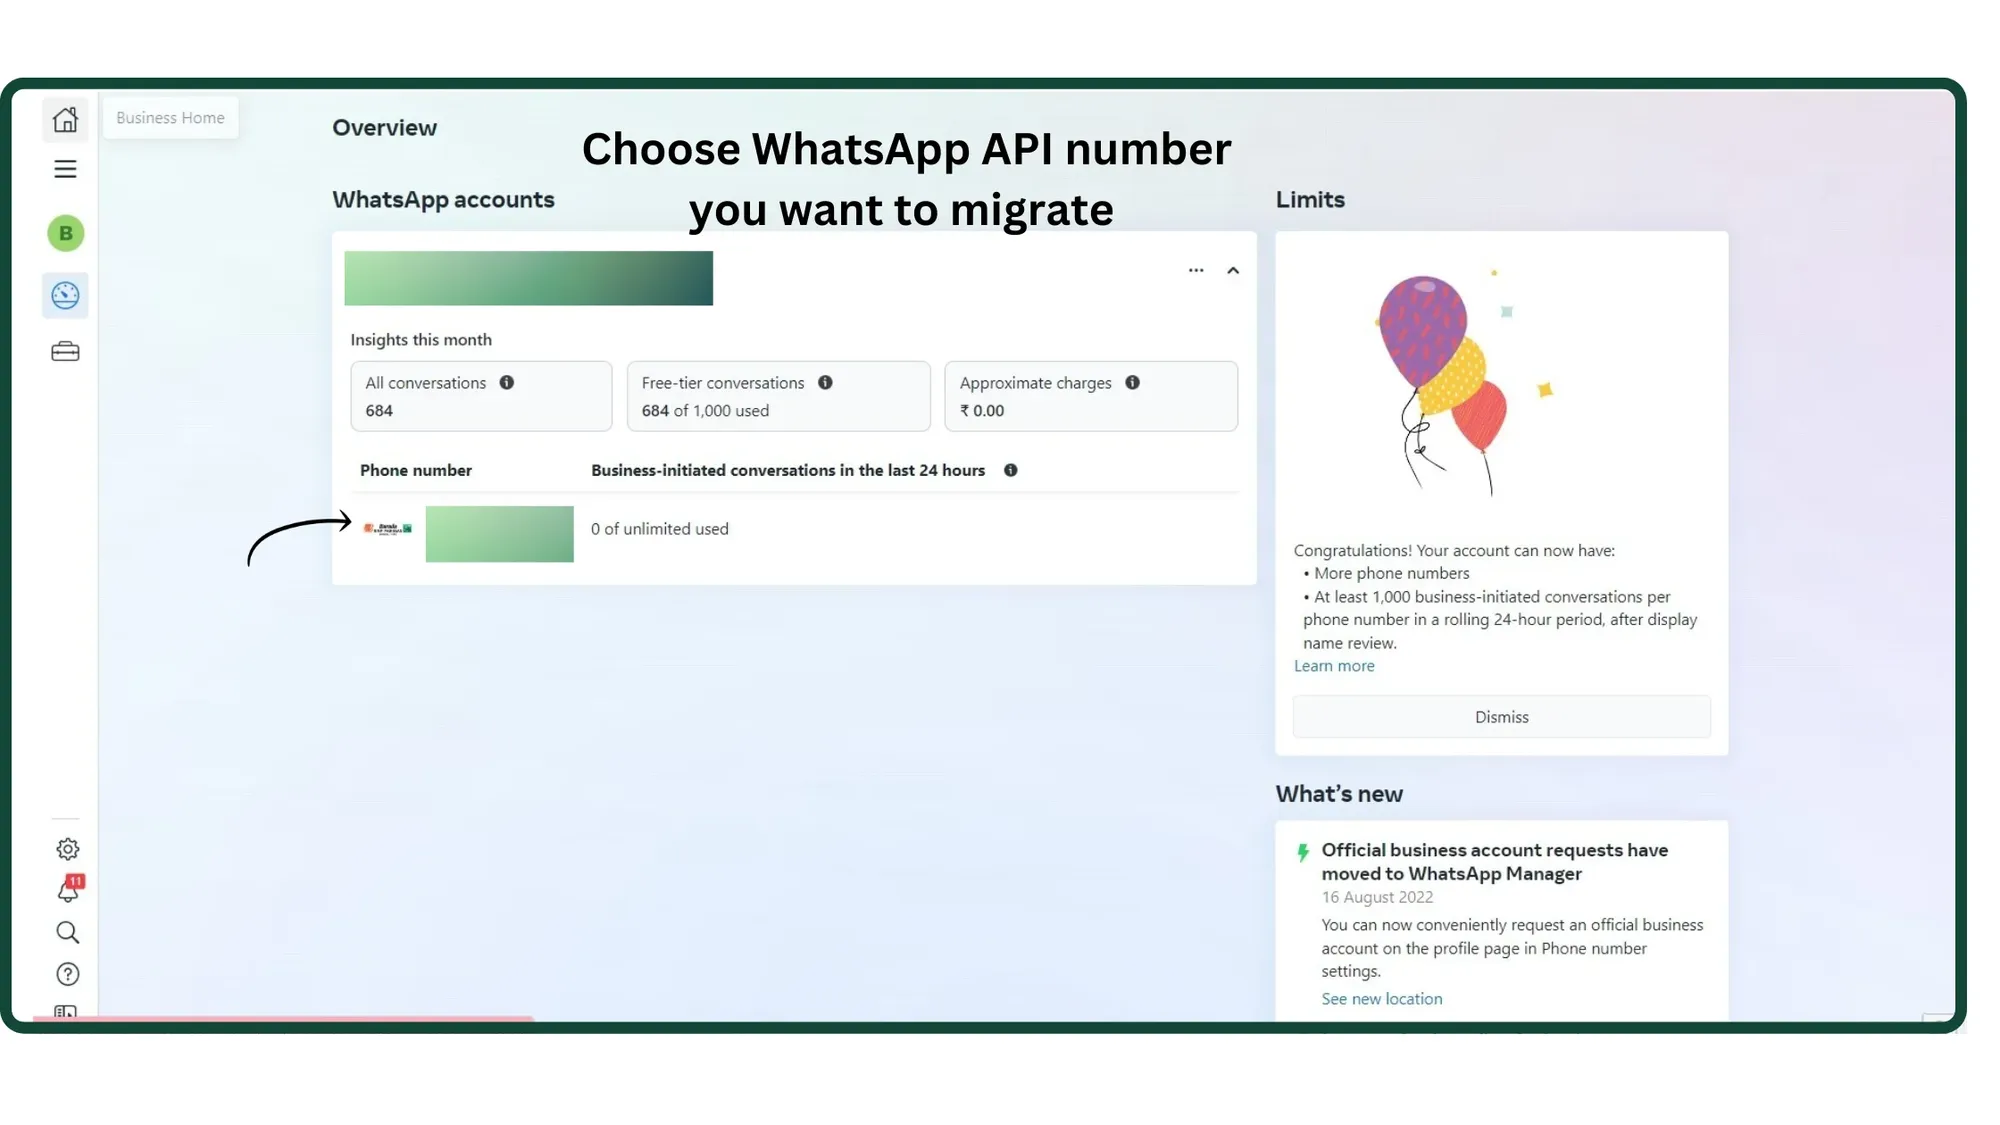
3. Click the link under the Phone number
Now, you need to choose the Phone number you wish to migrate.
If you have multiple WhatsApp Business API accounts, choose the one you wish to migrate to Messegy.
Note: If the phone number is not visible, go to your WhatsApp Business API provider & ask them to disable the 2-factor verification from their end.
3. Click the link under the Phone number
Now, you need to choose the Phone number you wish to migrate.
If you have multiple WhatsApp Business API accounts, choose the one you wish to migrate to Messegy.
Note: If the phone number is not visible, go to your WhatsApp Business API provider & ask them to disable the 2-factor verification from their end.
4. Verify your Profile
Next up, verify your profile & click Two-step verification to disable 2FA.
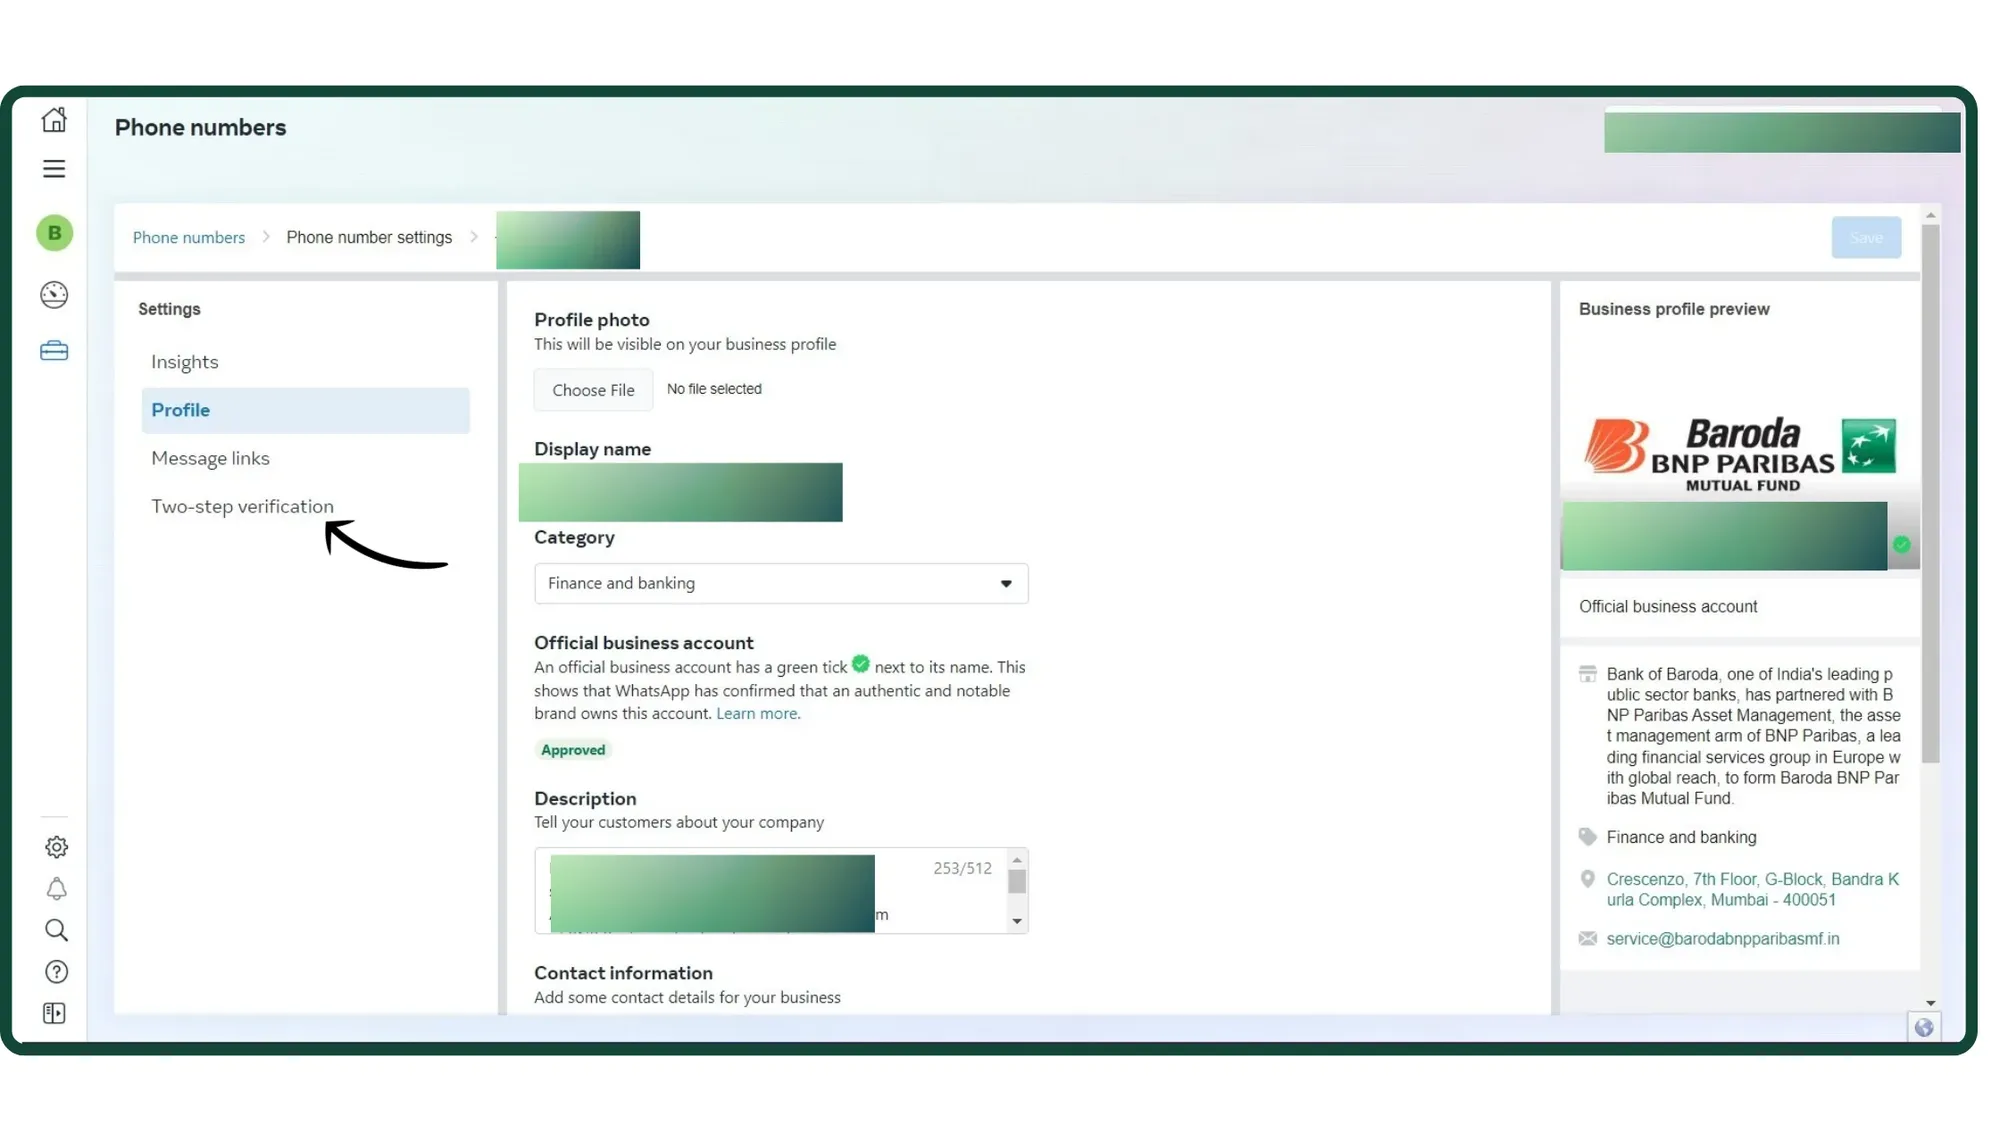
4. Verify your Profile
Next up, verify your profile & click Two-step verification to disable 2FA.
5. Turn off the Two-step verification
Under two-step verification, click Turn off two-step verification to disable the 2 FA.
In case the Turnoff two-step verification button is greyed out, follow the step mentioned in the next section.
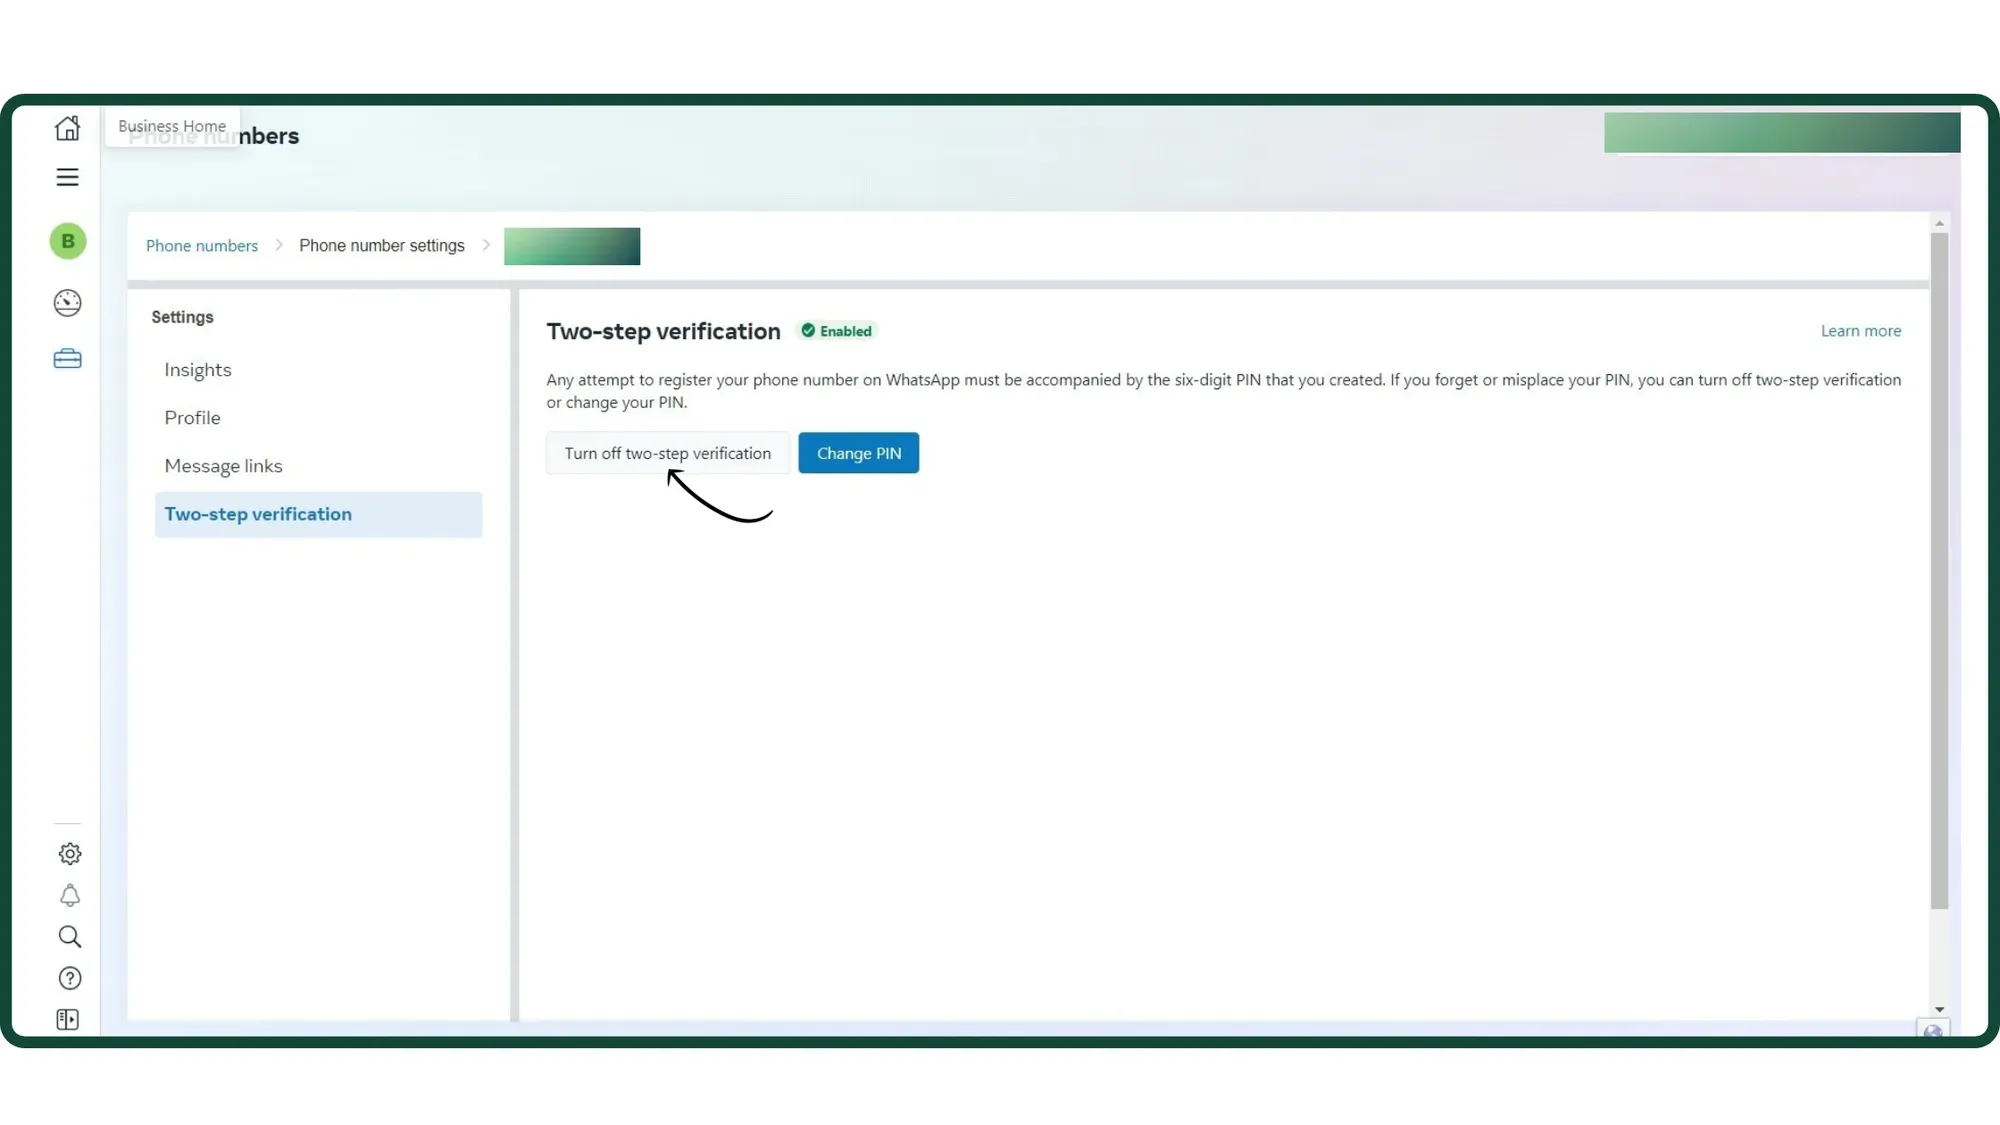
5. Turn off the Two-step verification
Under two-step verification, click Turn off two-step verification to disable the 2 FA.
In case the Turnoff two-step verification button is greyed out, follow the step mentioned in the next section.
6. Click the link received in your Business Mail
After clicking Turn off two-step verification, you'll receive an email on your registered email ID.
Find the link to disable 2-factor authentication in your registered email ID.
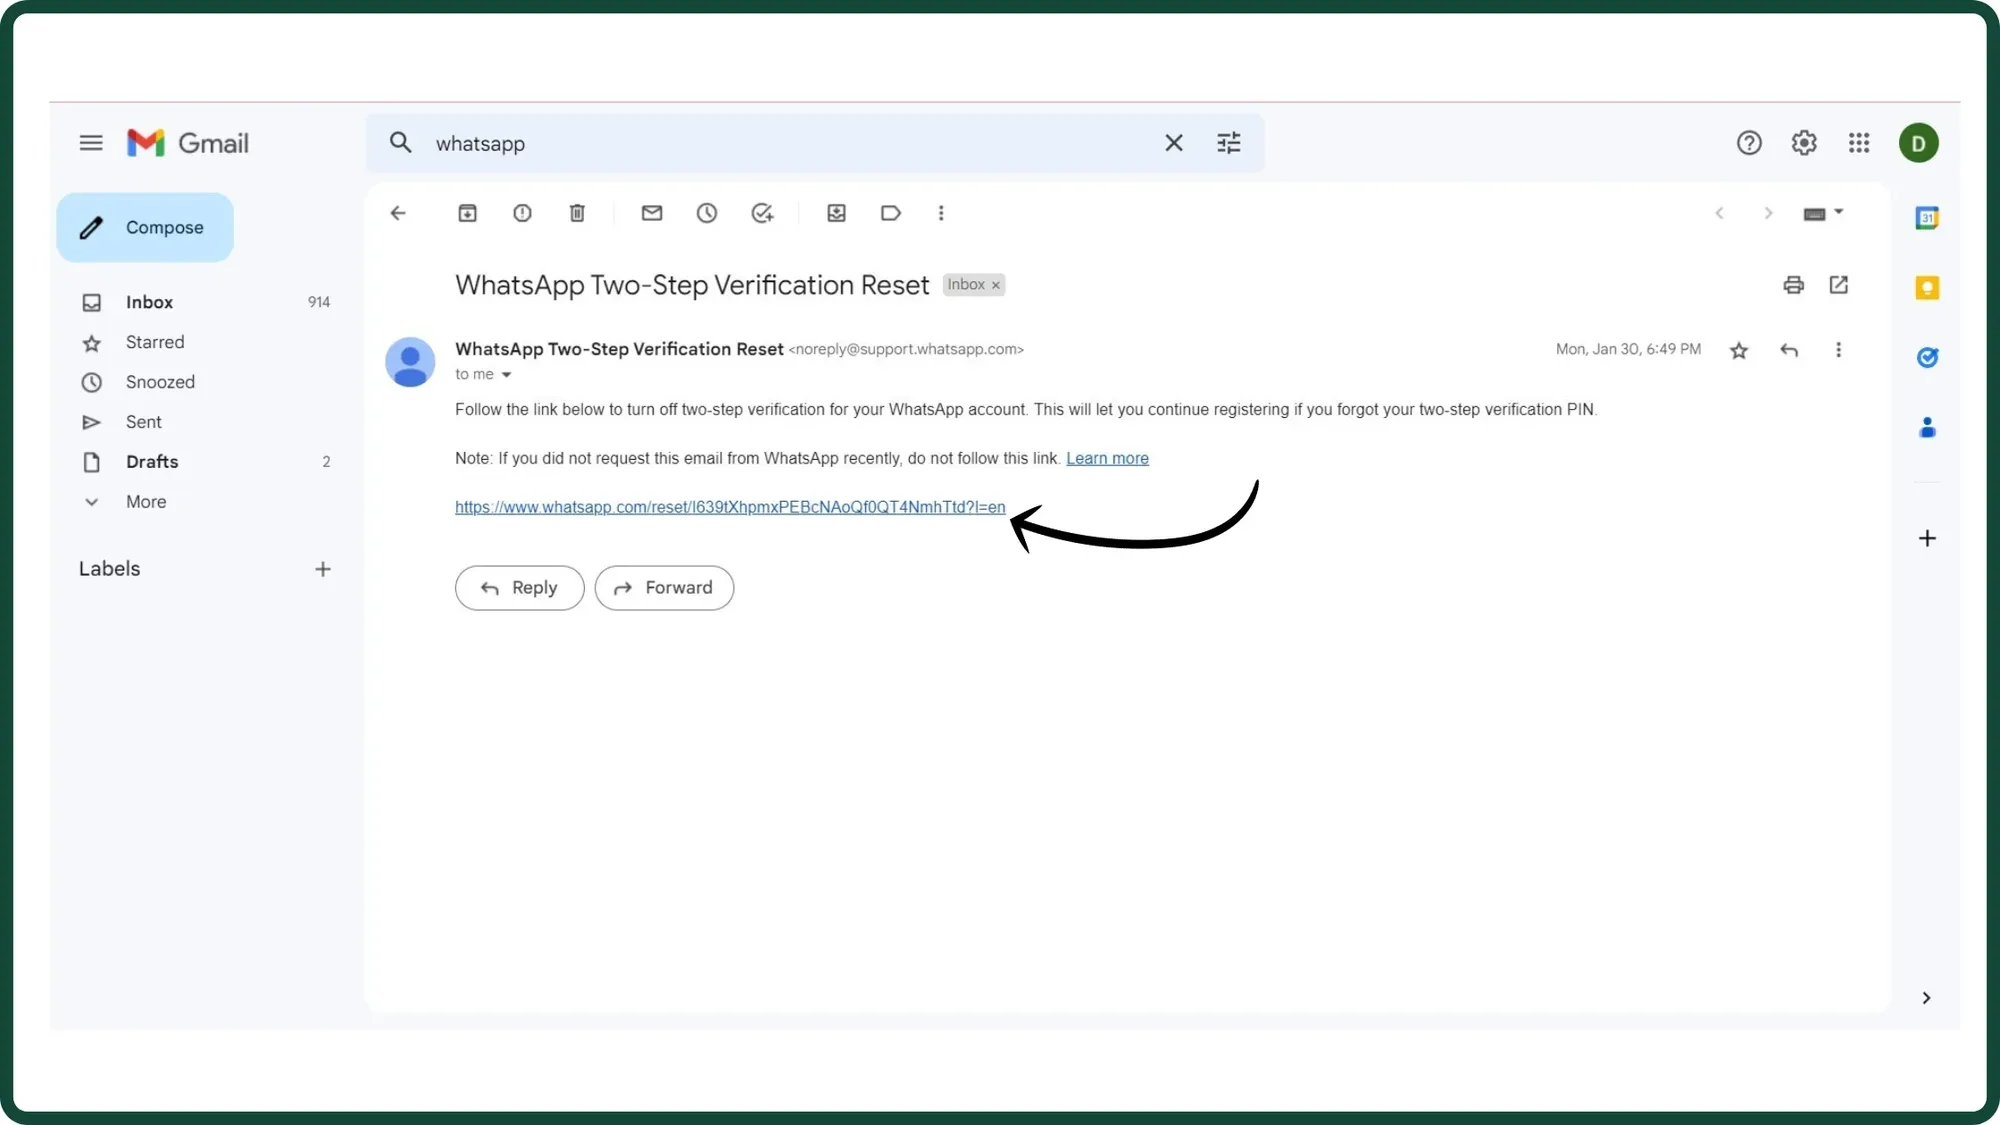
6. Click the link received in your Business Mail
After clicking Turn off two-step verification, you'll receive an email on your registered email ID.
Find the link to disable 2-factor authentication in your registered email ID.
7. Click disable 2FA
Disable the 2-factor authentication by clicking the button Turn off two-step verification.
Once the 2FA is disabled successfully, connect with Messegy support via Call, WhatsApp & email to complete the migration process.
Contact Us
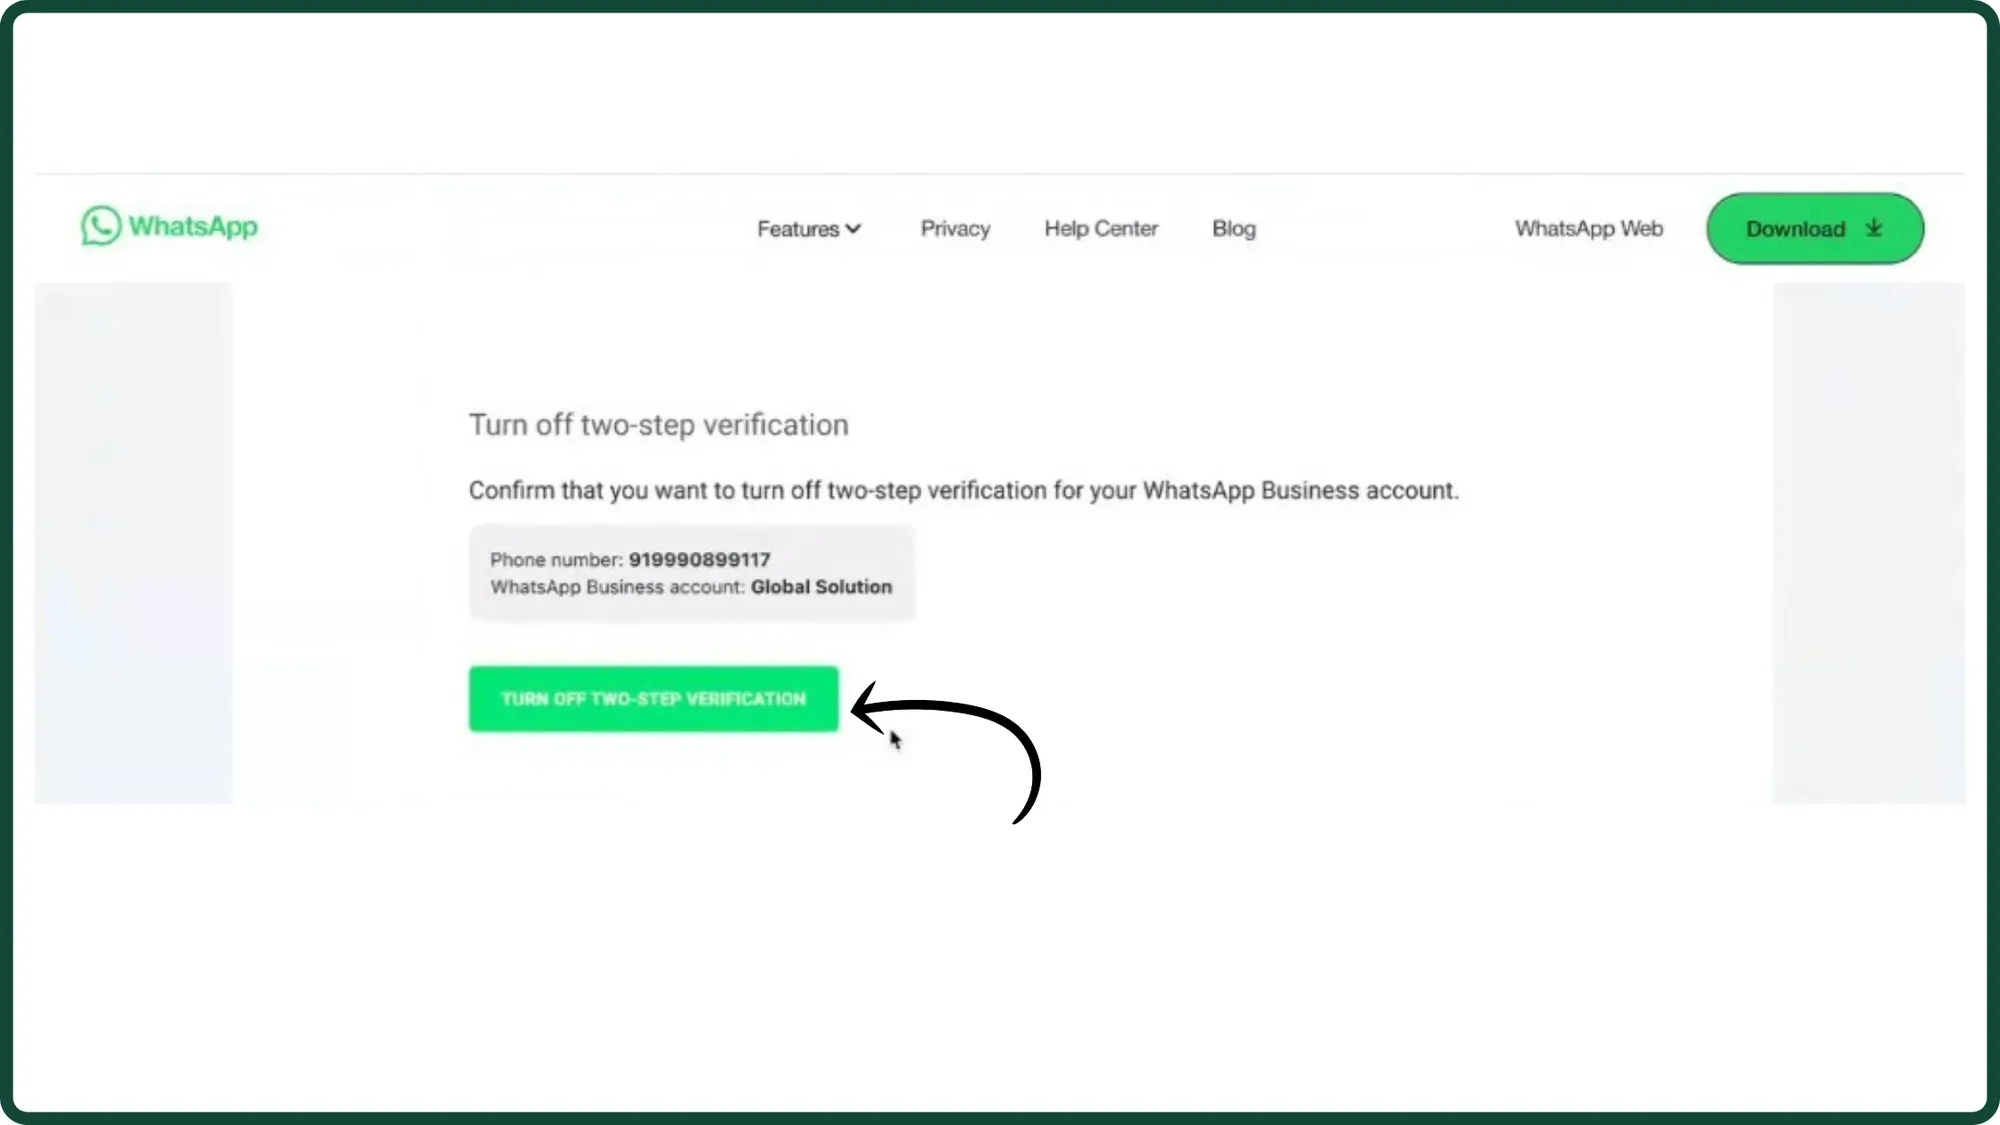
7. Click disable 2FA
Disable the 2-factor authentication by clicking the button Turn off two-step verification.
Once the 2FA is disabled successfully, connect with Messegy support via Call, WhatsApp & email to complete the migration process.
Contact Us
Steps to migrate to Messegy Platform from your existing WhatsApp API provider
Show step by step how to get started
Steps to migrate to Messegy Platform from your existing WhatsApp API provider
Show step by step how to get started
1. Signup on the Messegy App
Note: In case, you've already signed up, skip to step 4!
If you're new to Messegy, simply go to the Messegy signup page.
You can signup with your Google account or if you use a different business email, fill in the form.
Signup Page
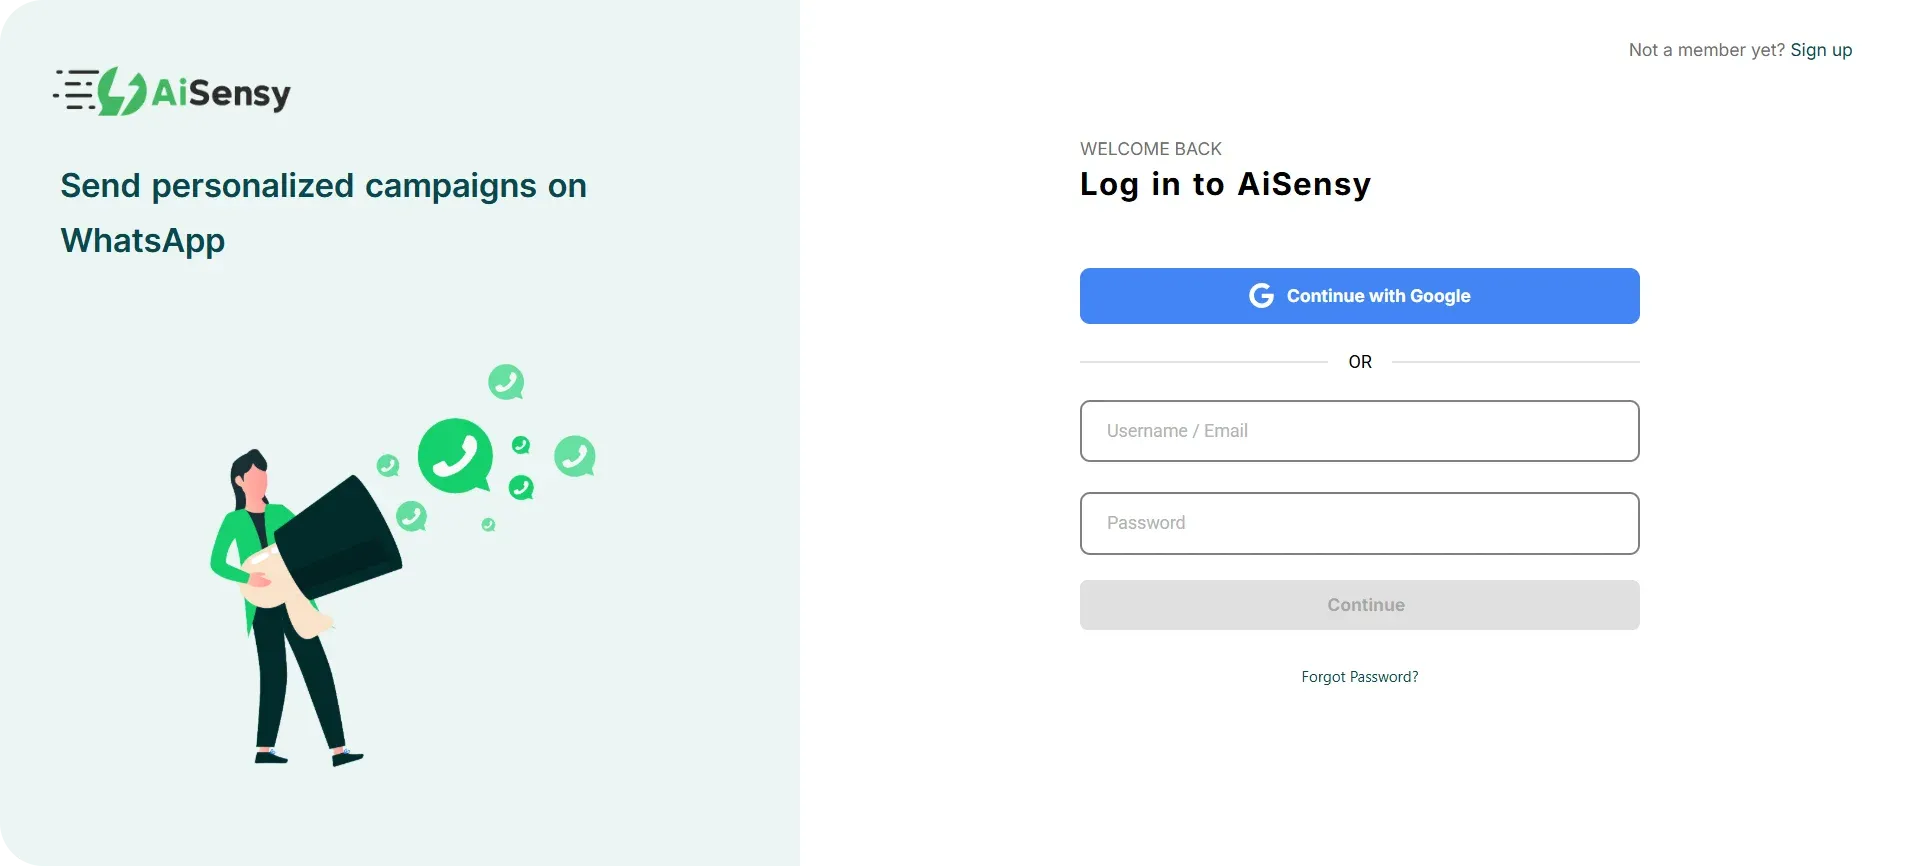
1. Signup on the Messegy App
Note: In case, you've already signed up, skip to step 4!
If you're new to Messegy, simply go to the Messegy signup page.
You can signup with your Google account or if you use a different business email, fill in the form.
Signup Page
2. Enter OTP (for Form signup only)
If you signed up by filling out the form, you'll receive an OTP on your registered email ID.
Enter it & press 'Submit' to proceed.
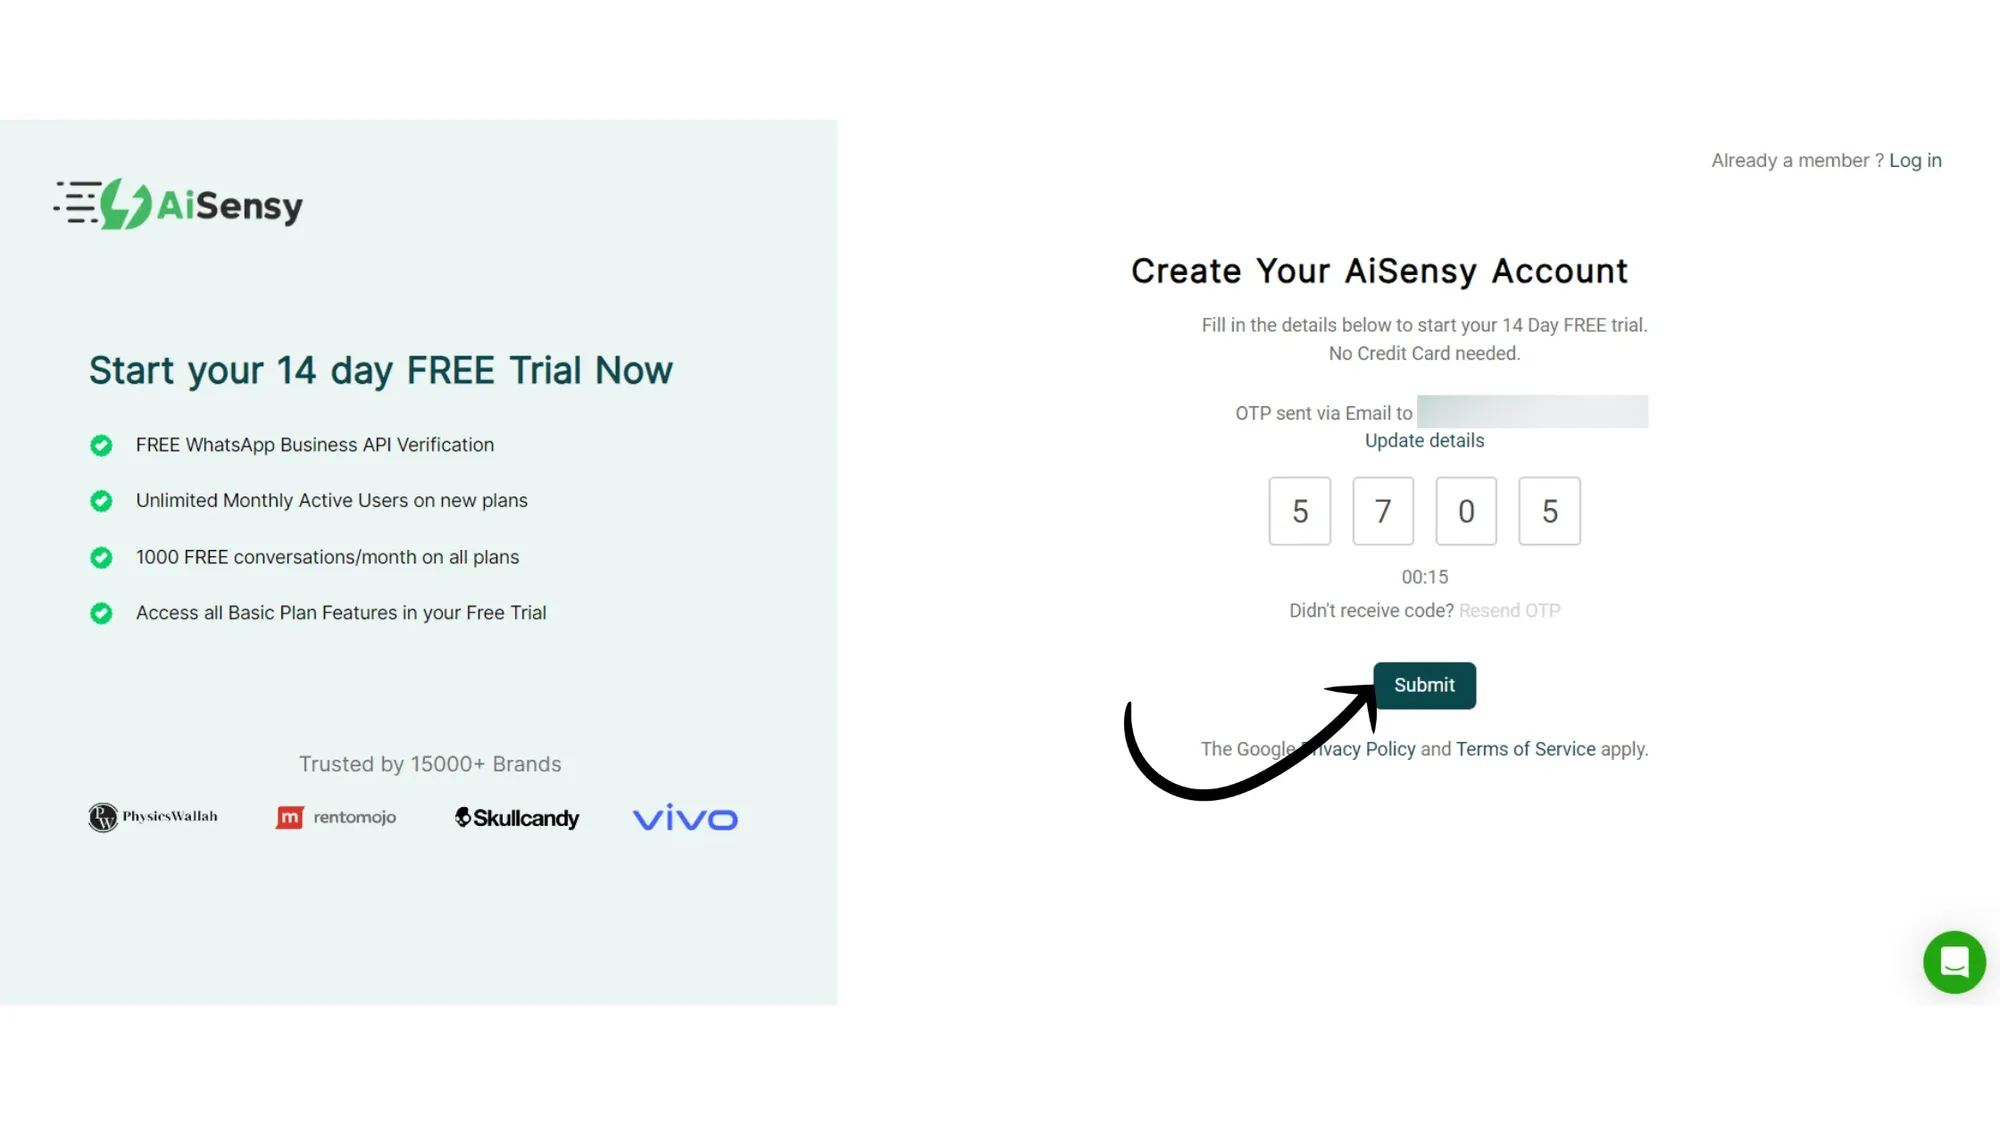
2. Enter OTP (for Form signup only)
If you signed up by filling out the form, you'll receive an OTP on your registered email ID.
Enter it & press 'Submit' to proceed.
3. Add Personal & Company Details
Enter important Business details like Company Name, size, industry, billing currency & timezone so that we can customise your experience.
Once done, click on the “Complete Sign Up” button to proceed ahead.
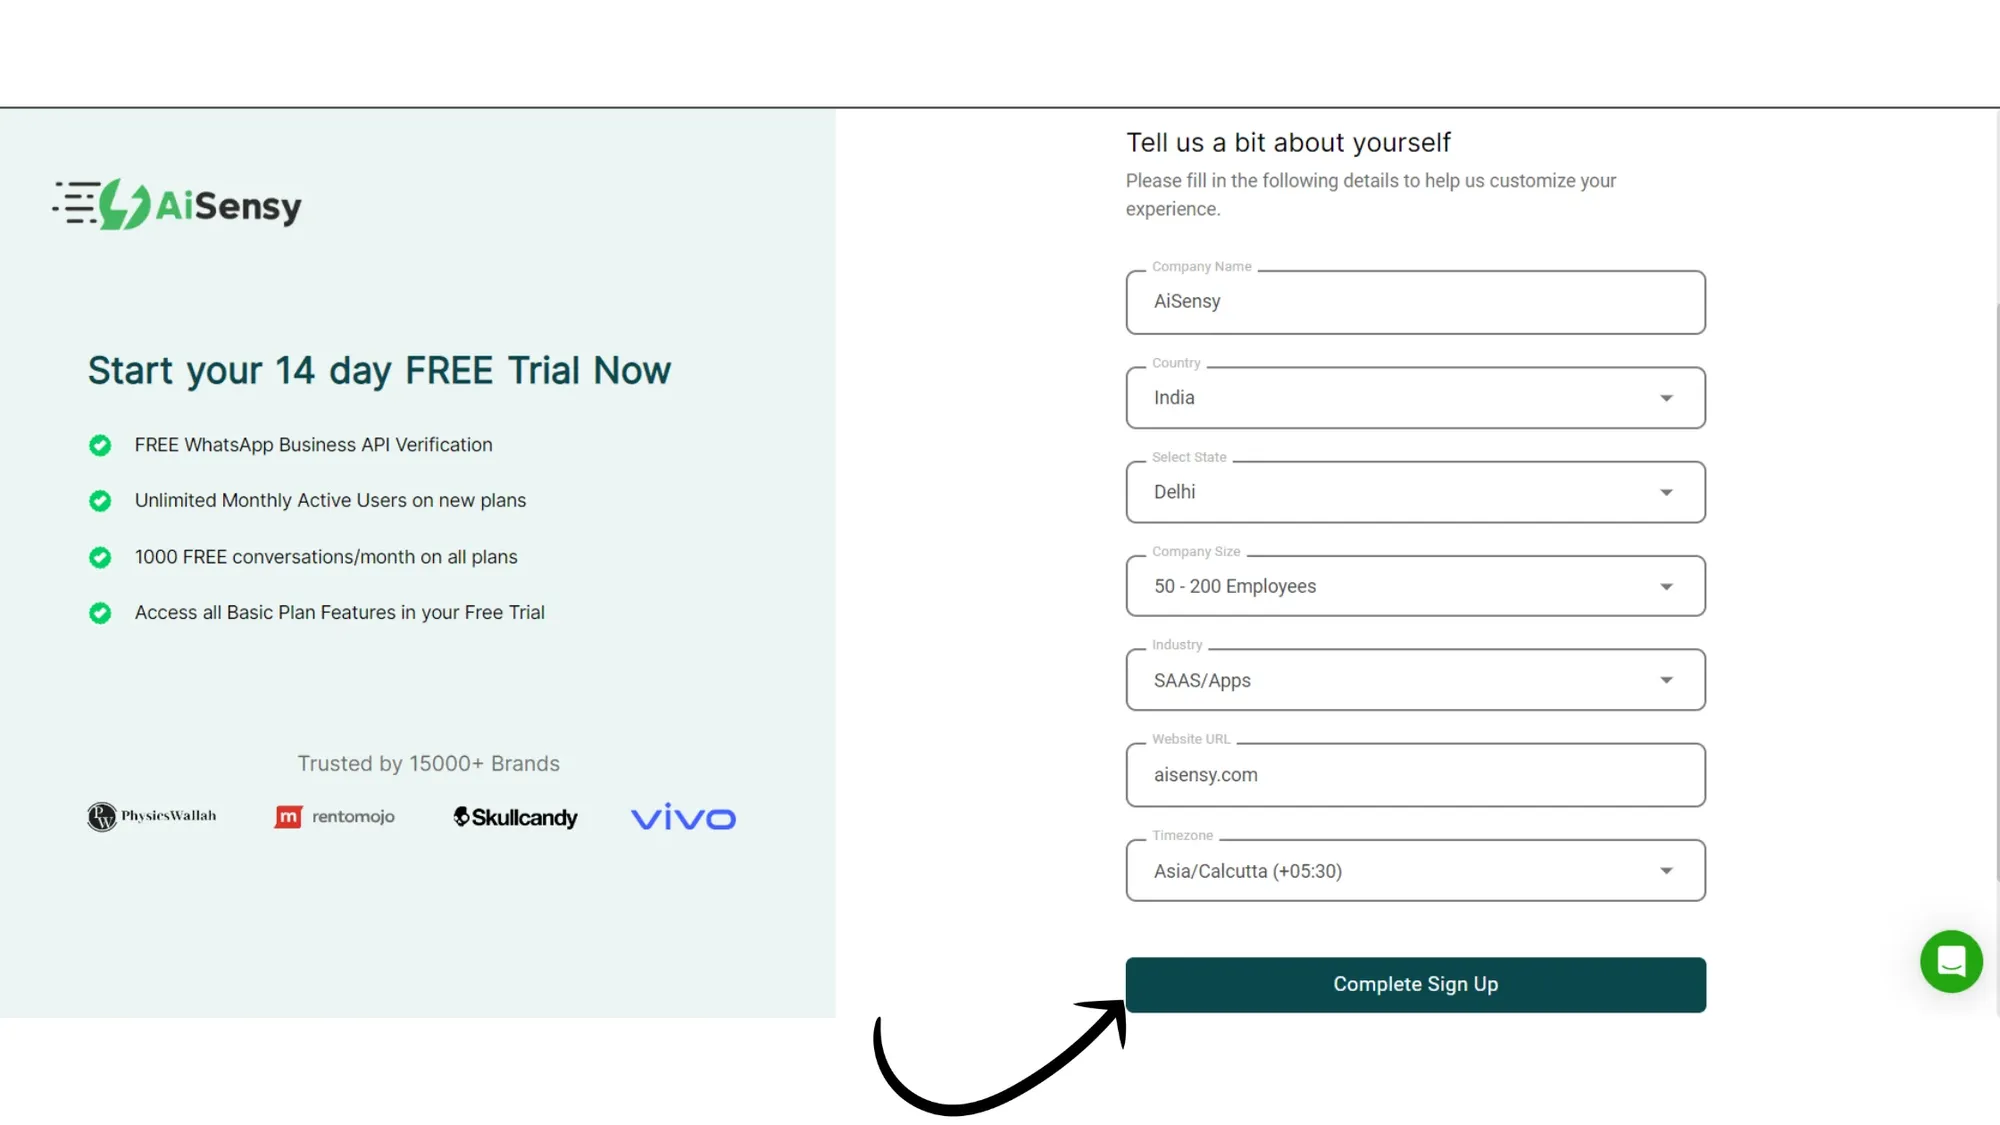
3. Add Personal & Company Details
Enter important Business details like Company Name, size, industry, billing currency & timezone so that we can customise your experience.
Once done, click on the “Complete Sign Up” button to proceed ahead.
4. Tap "Migrate from Vendor" to migrate from your existing WhatsApp API provider
... lastly you can invite your team and collaborate to create something super amazing. What are you waiting for? Get started now!
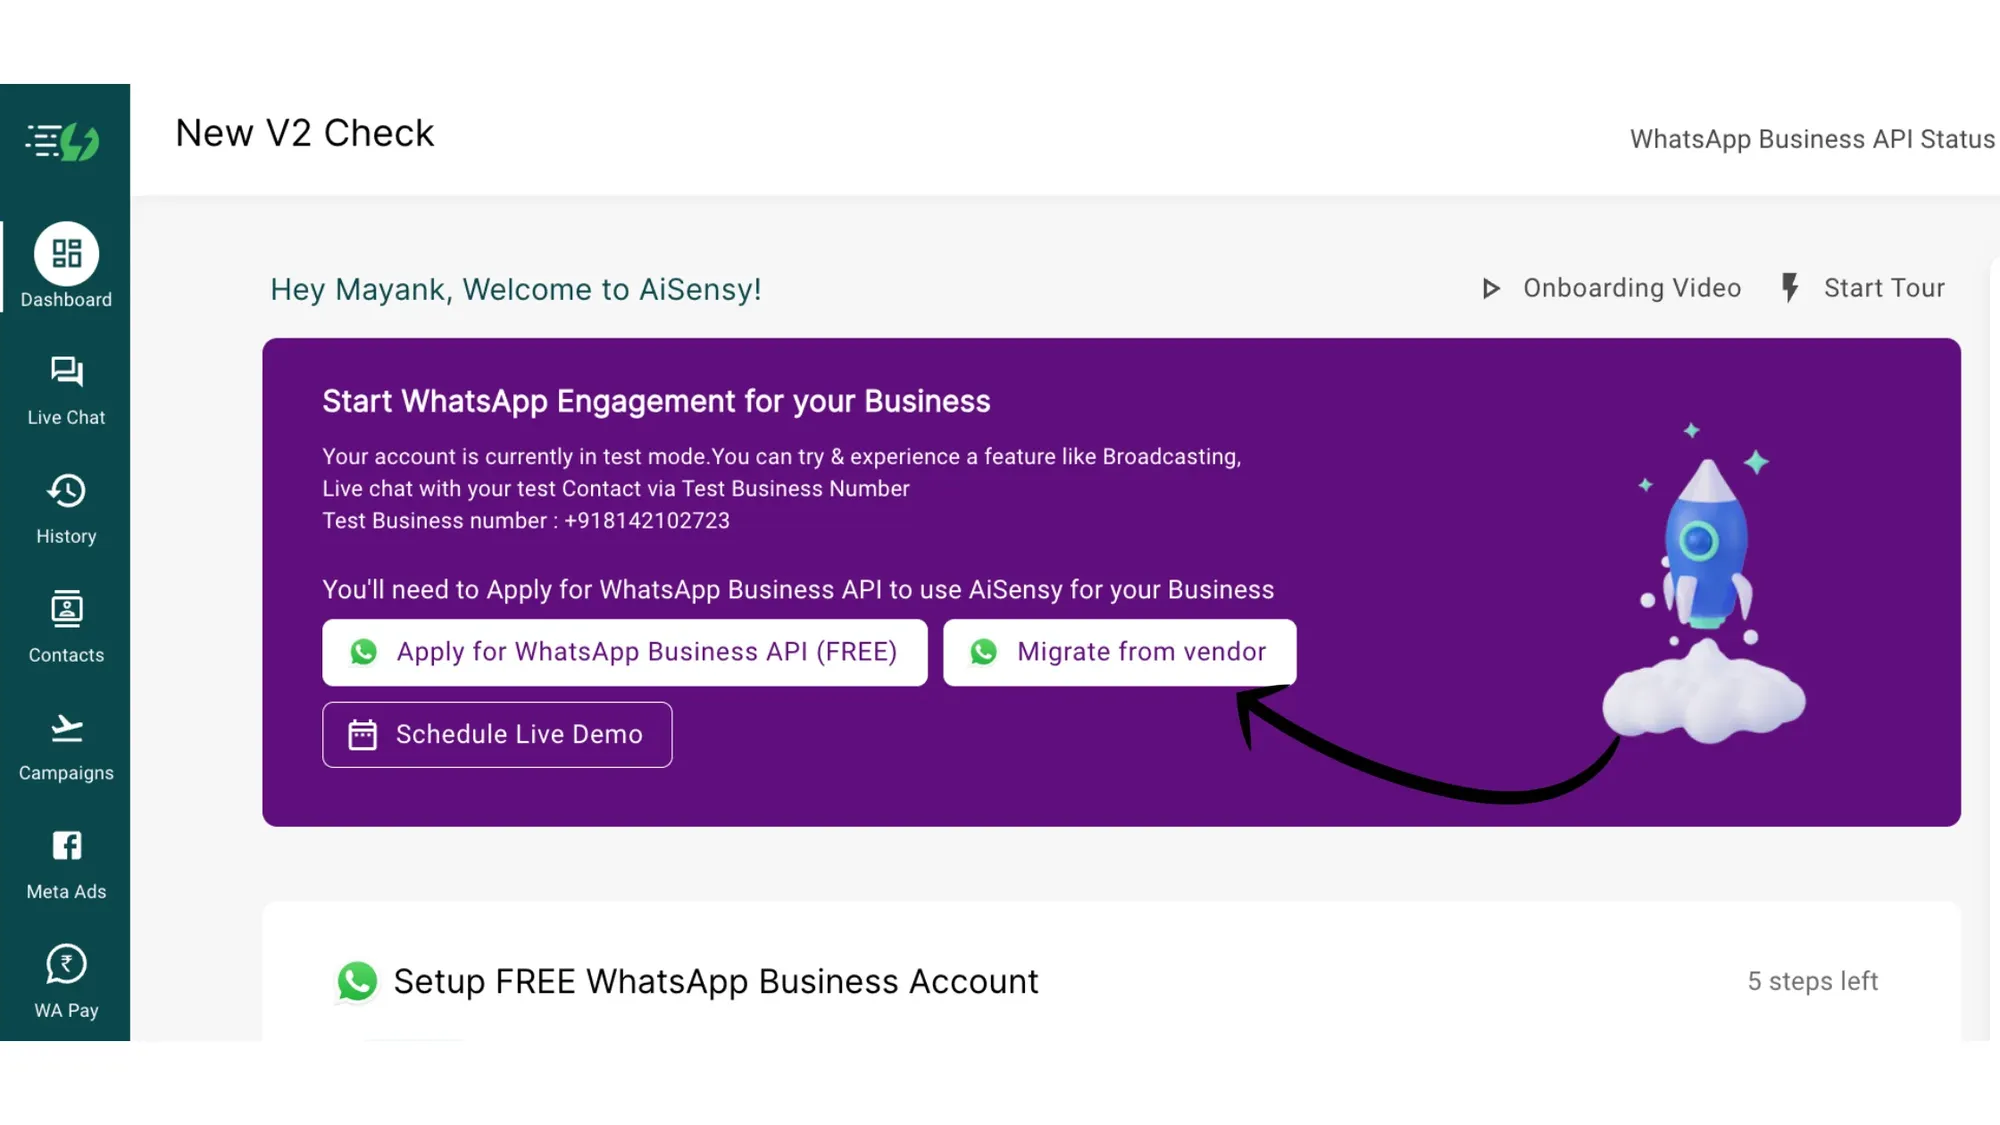
4. Tap "Migrate from Vendor" to migrate from your existing WhatsApp API provider
... lastly you can invite your team and collaborate to create something super amazing. What are you waiting for? Get started now!
5. Click Apply Now
Click on the "Apply Now" button
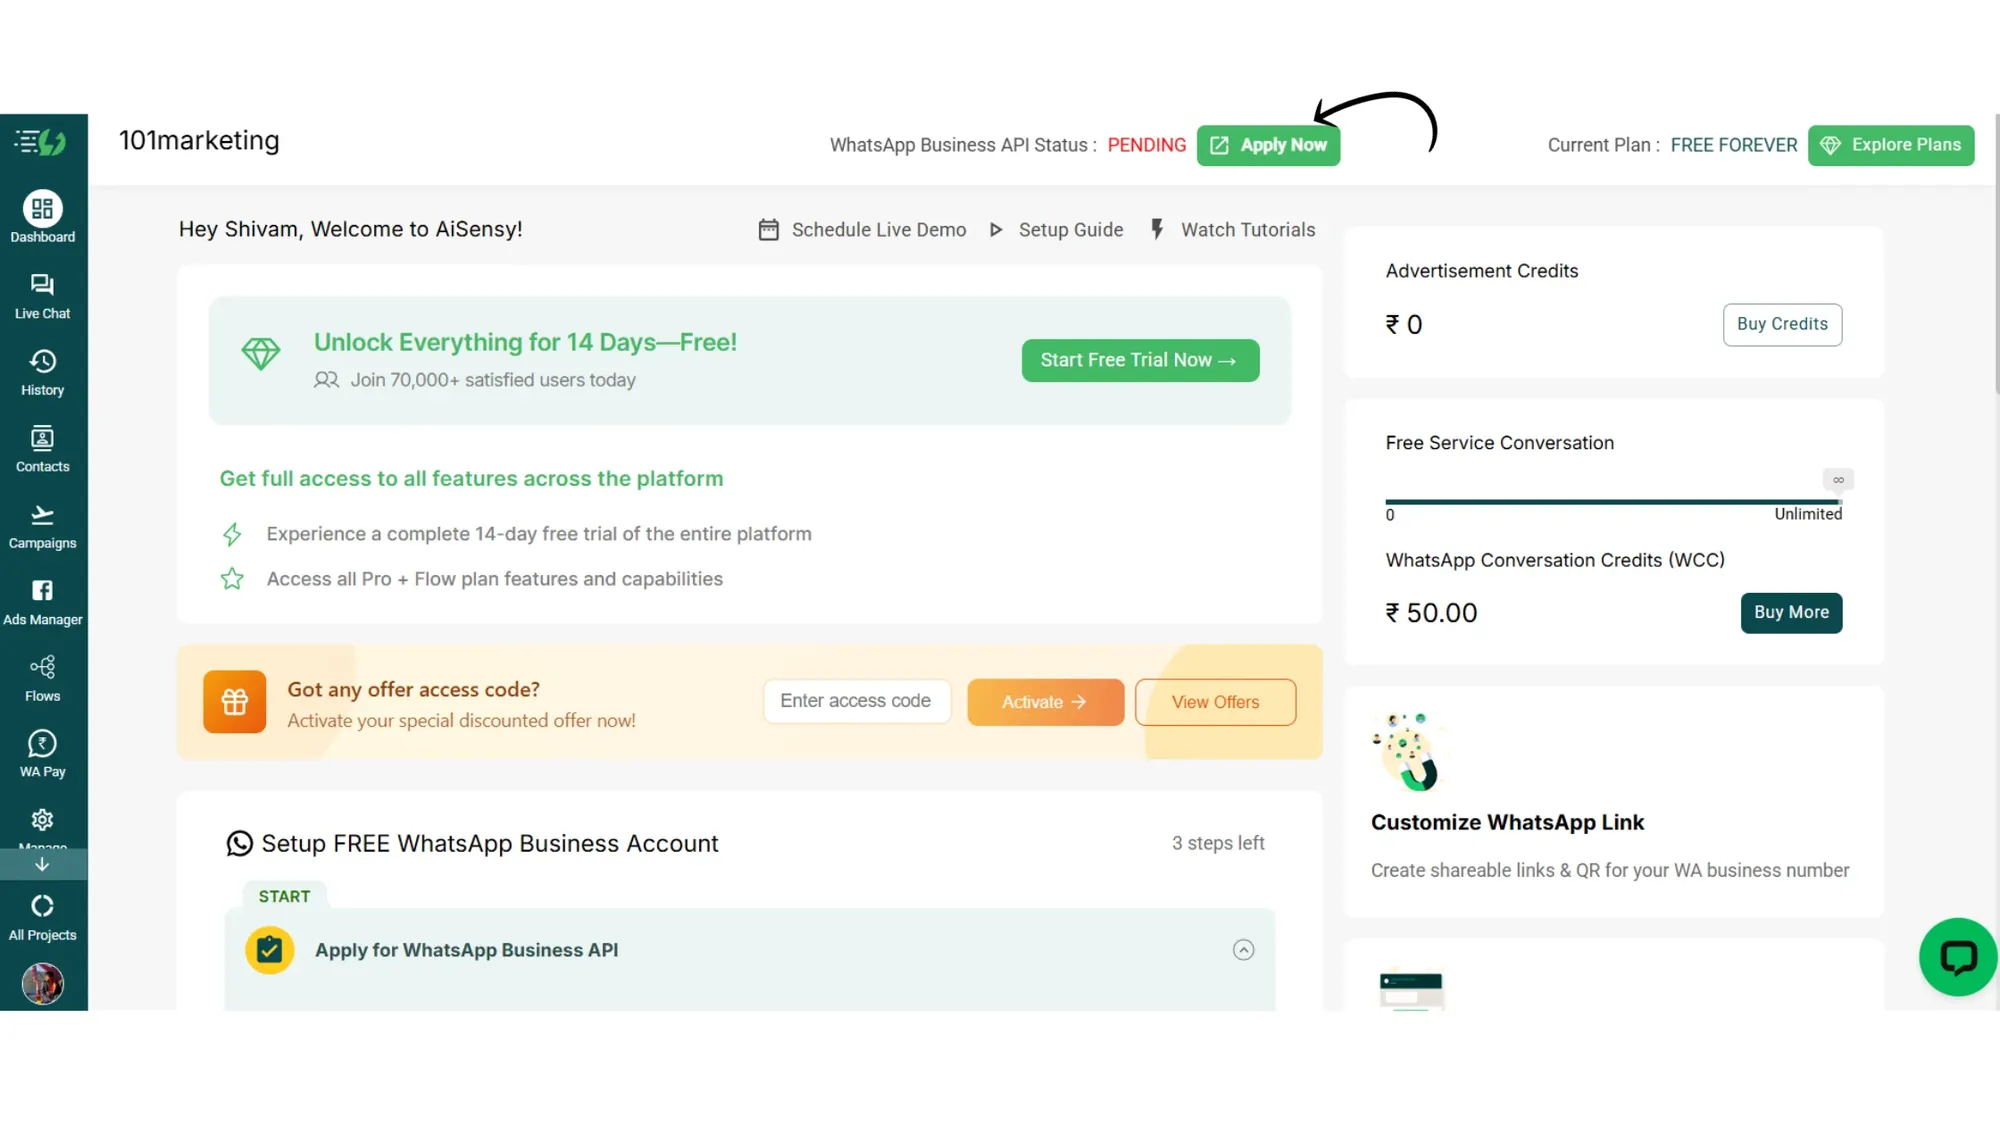
5. Click Apply Now
Click on the "Apply Now" button
6. Tap Continue with Facebook
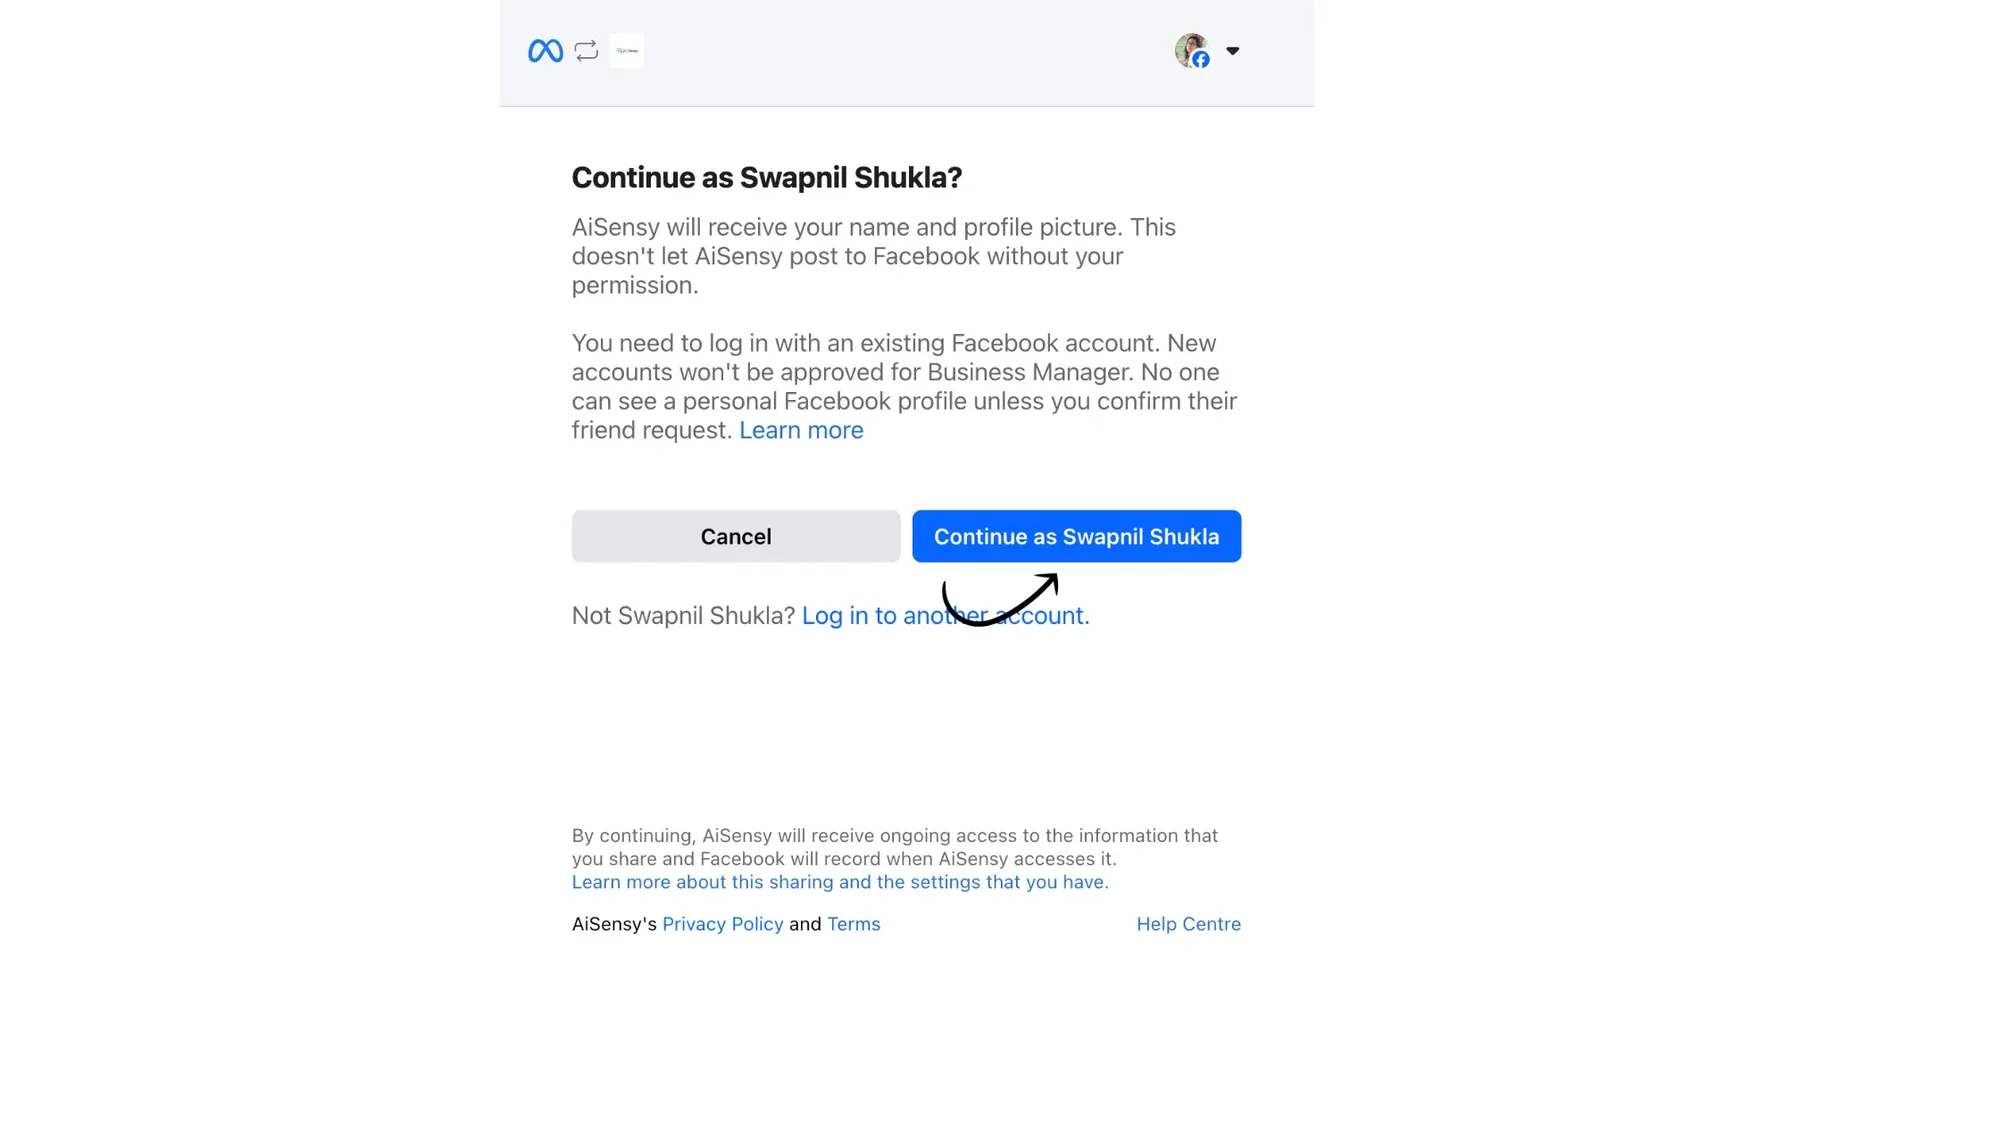
6. Tap Continue with Facebook
7. Next, tap "Get Started"
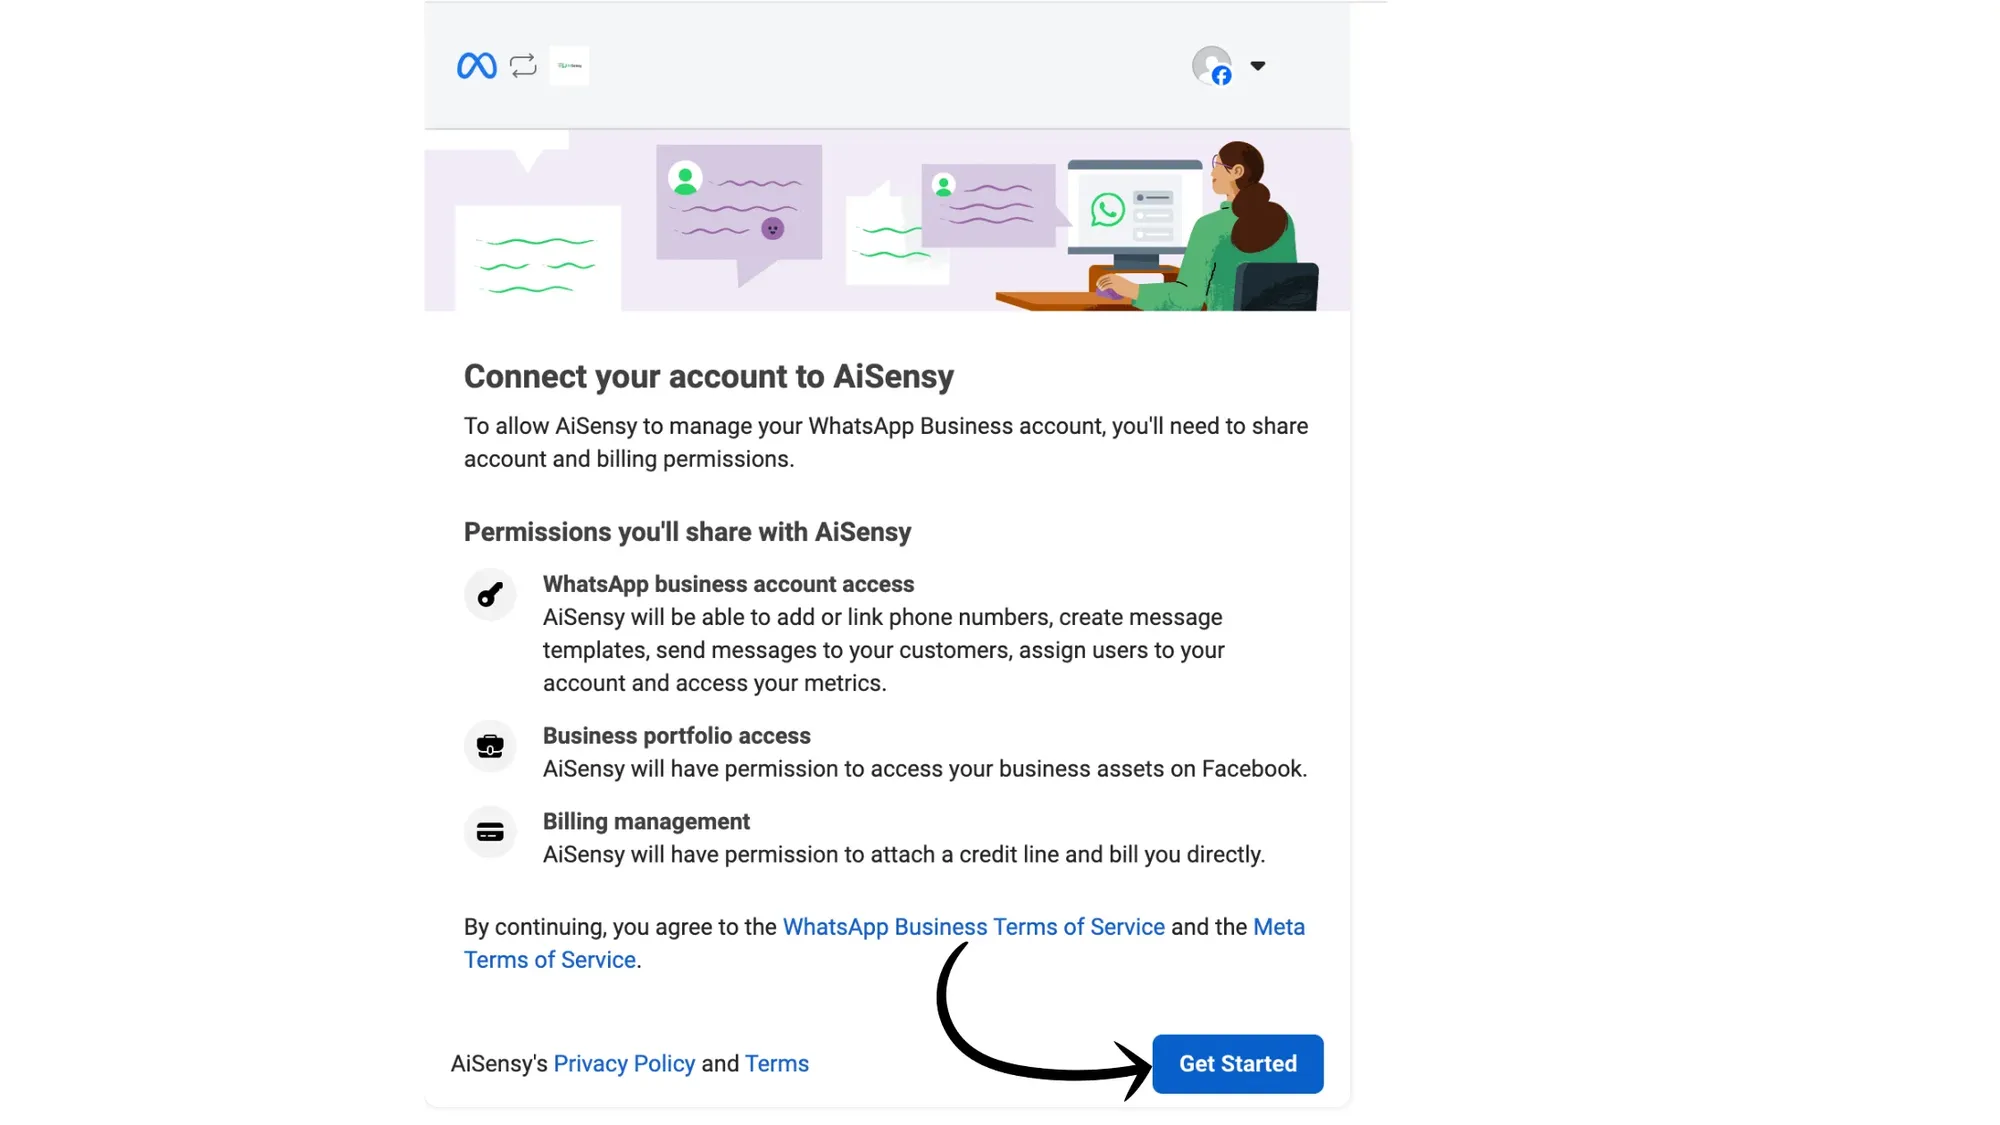
7. Next, tap "Get Started"
8. Tap on "Create a Business Portfolio"
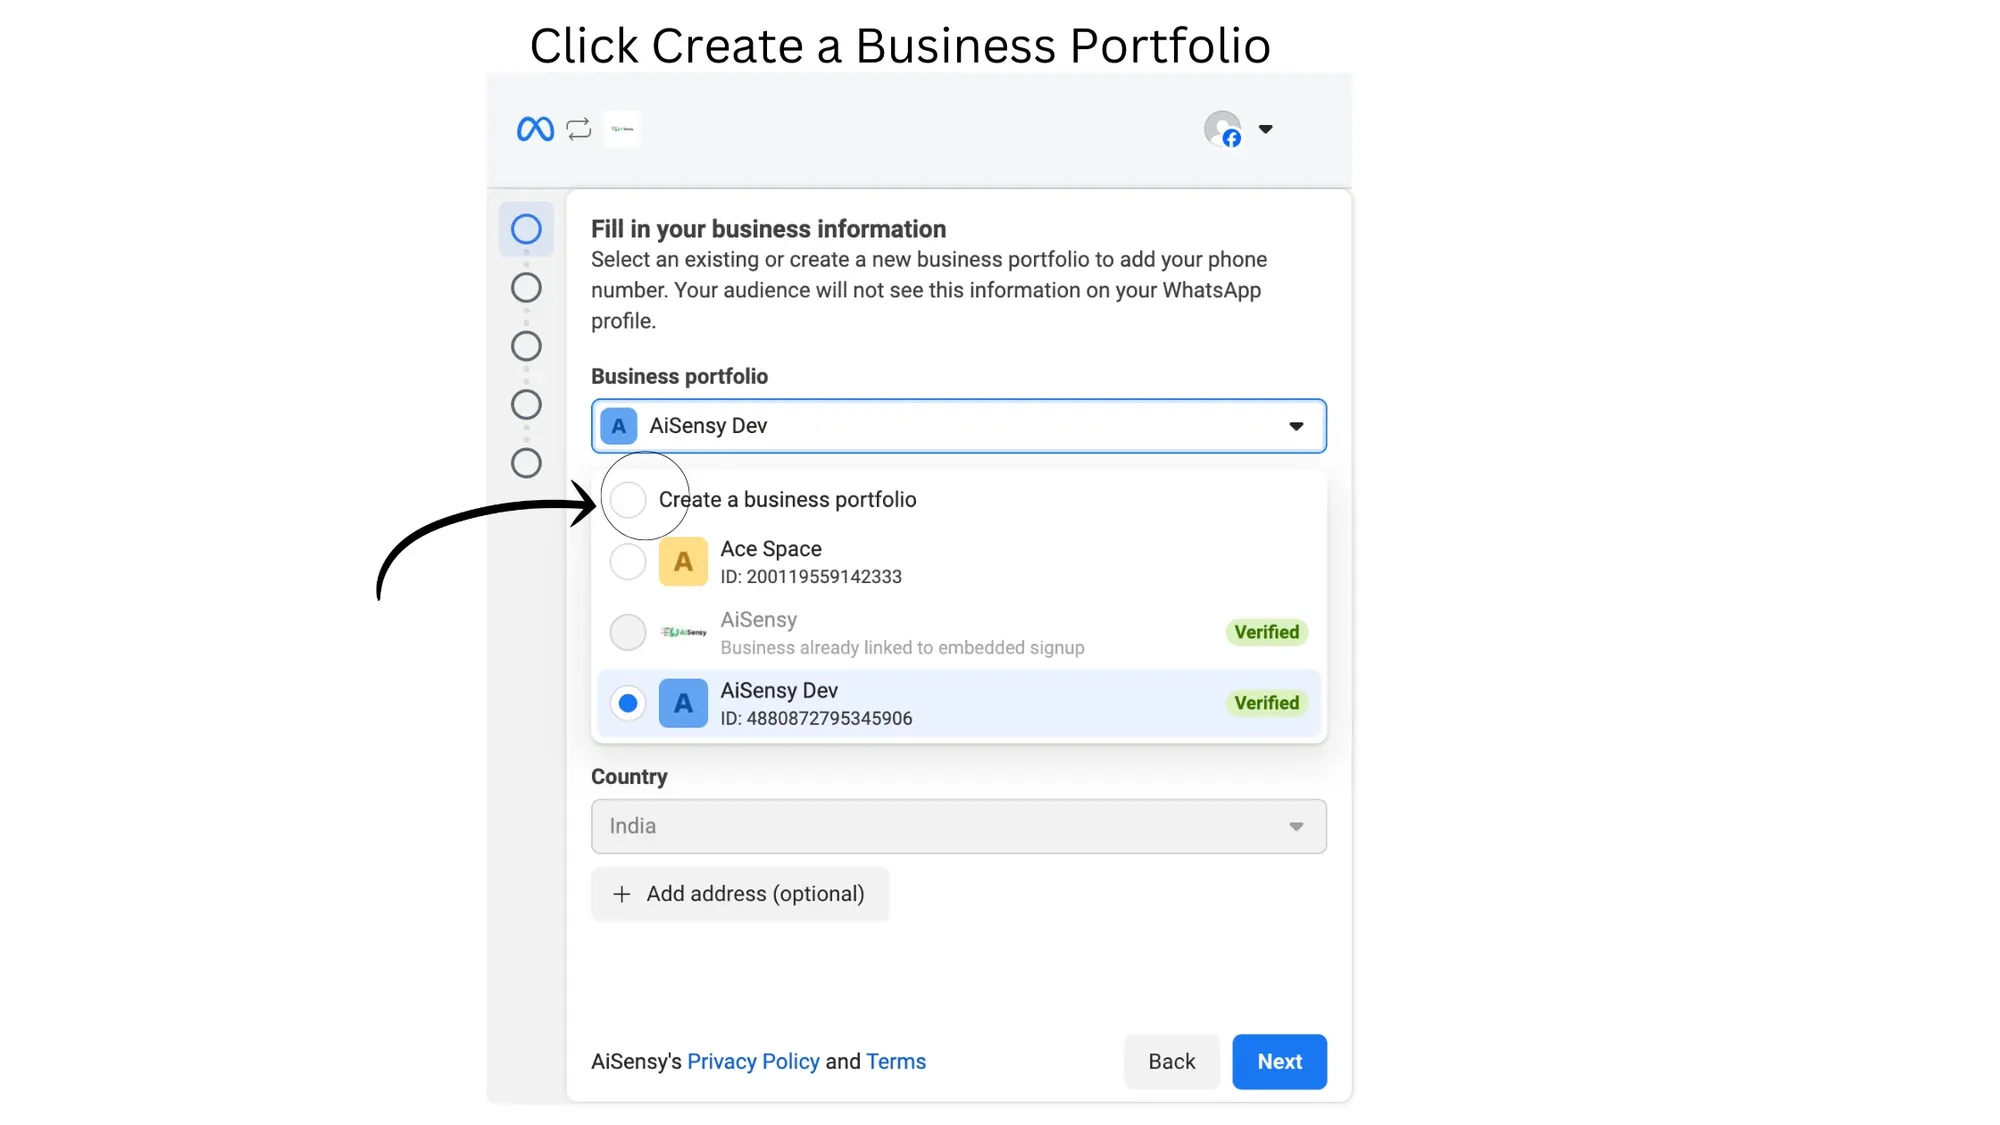
8. Tap on "Create a Business Portfolio"
9. Next, create new WhatsApp Business account
Under the section "Choose a WhatsApp Business account", select "Create a WhatsApp Business Account".
And select "Create a new WhatsApp Business profile" under "Create or select a WhatsApp Business Profile"
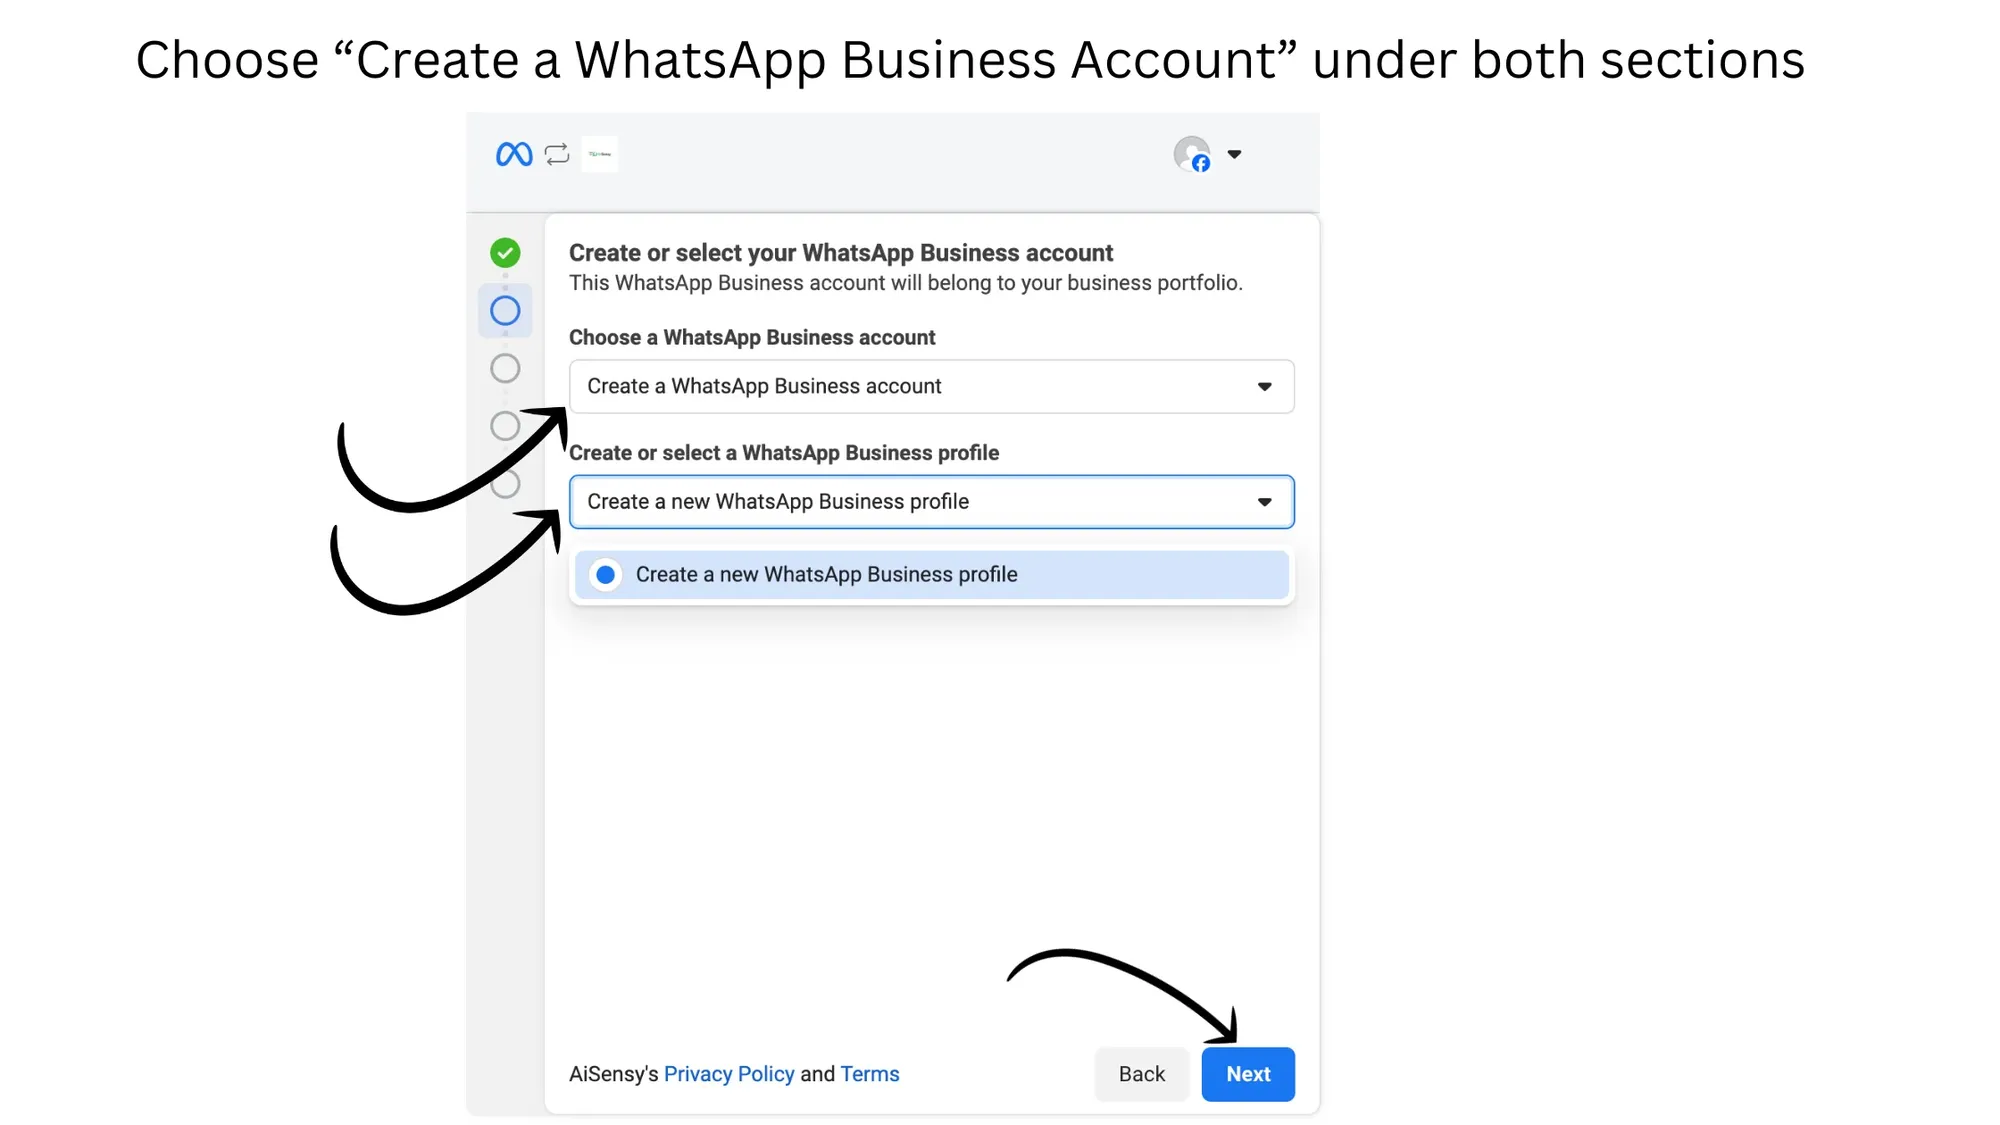
9. Next, create new WhatsApp Business account
Under the section "Choose a WhatsApp Business account", select "Create a WhatsApp Business Account".
And select "Create a new WhatsApp Business profile" under "Create or select a WhatsApp Business Profile"
10. Name your WhatsApp Business account
Name your WhatsApp Business account. This name can be anything as it isn't visible on your WhatsApp Business API Profile.
Next, create a WhatsApp Business Display name which will be visible to your customers when they view your WhatsApp API profile.
Last, pick your business category and tap next.
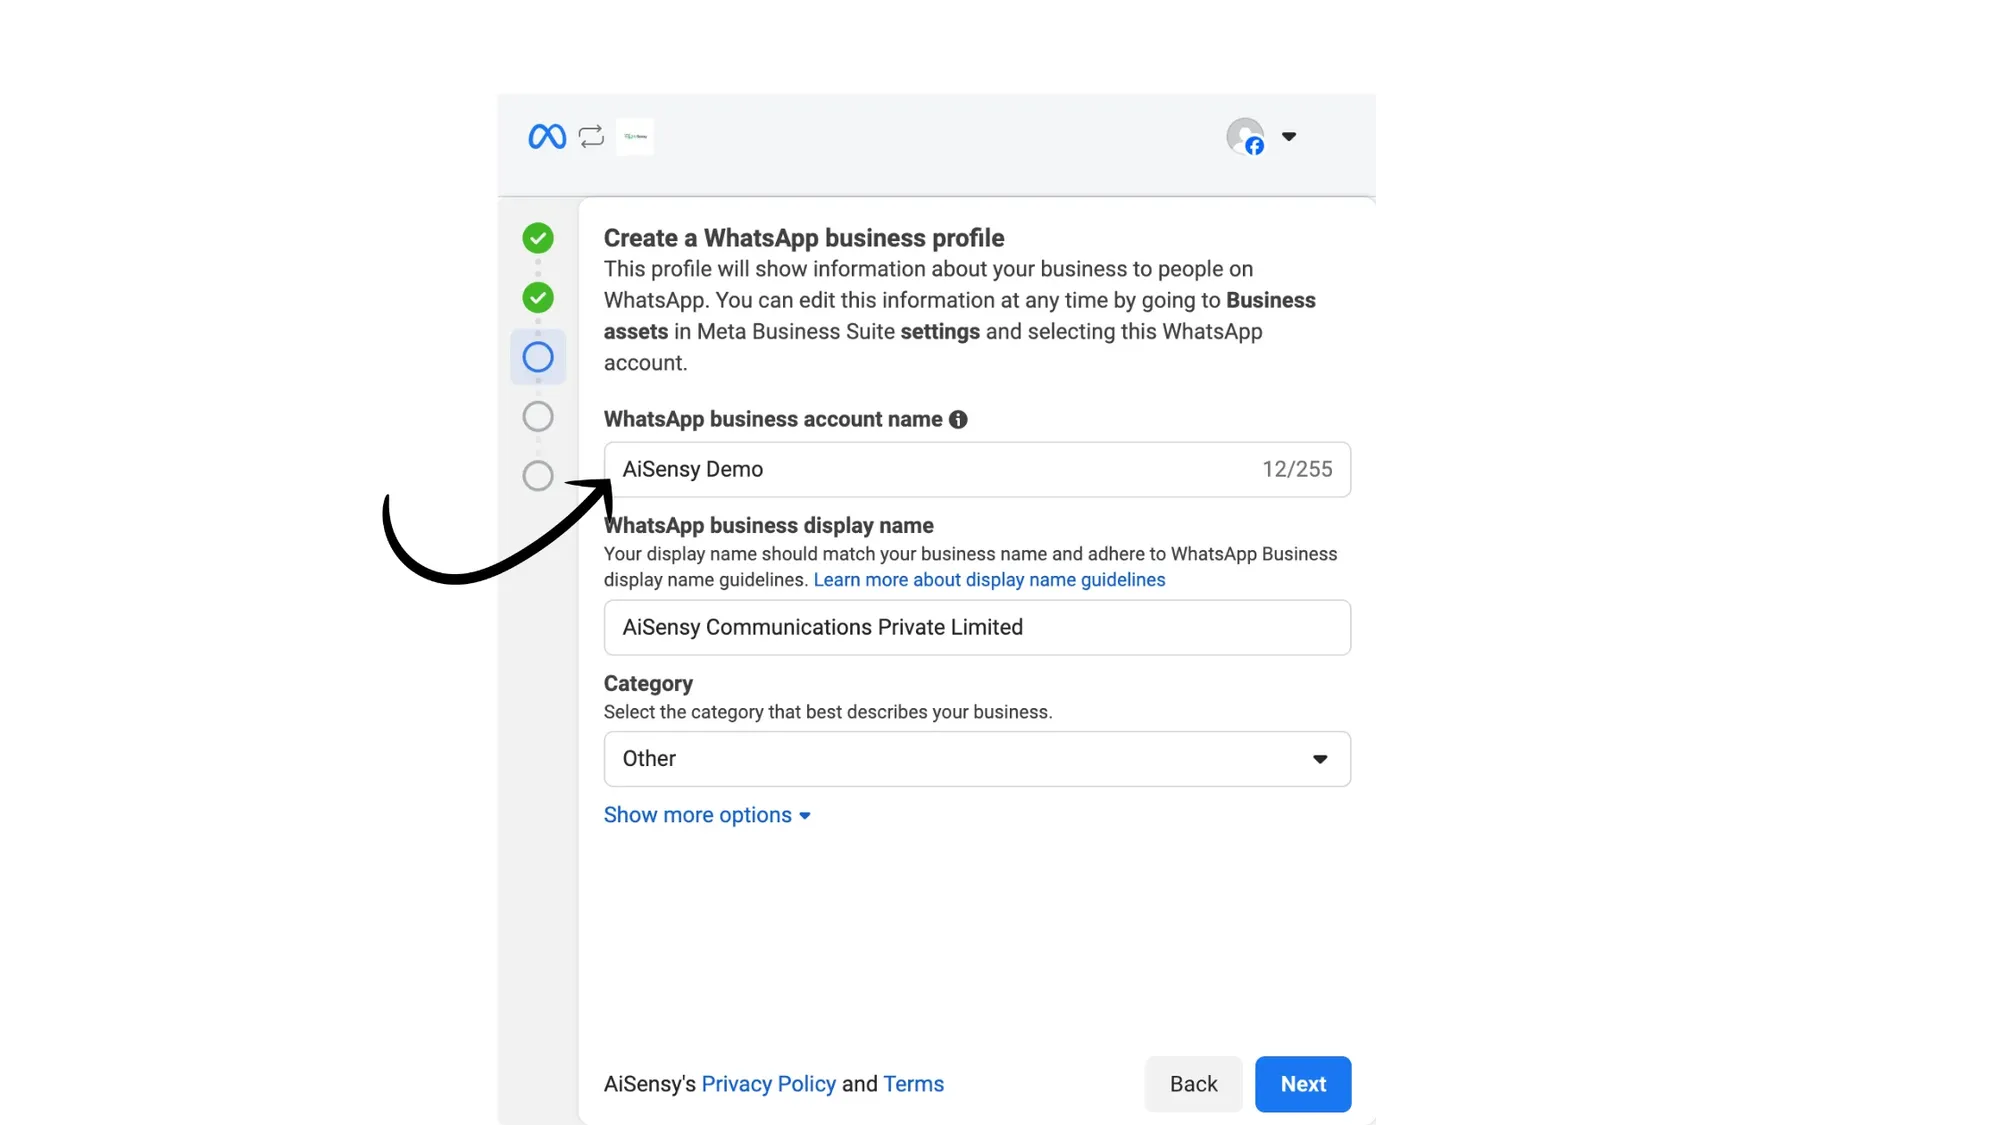
10. Name your WhatsApp Business account
Name your WhatsApp Business account. This name can be anything as it isn't visible on your WhatsApp Business API Profile.
Next, create a WhatsApp Business Display name which will be visible to your customers when they view your WhatsApp API profile.
Last, pick your business category and tap next.
11. Add your existing WhatsApp API number
Now, add your existing WhatsApp Business API number, select a verification method and tap next.
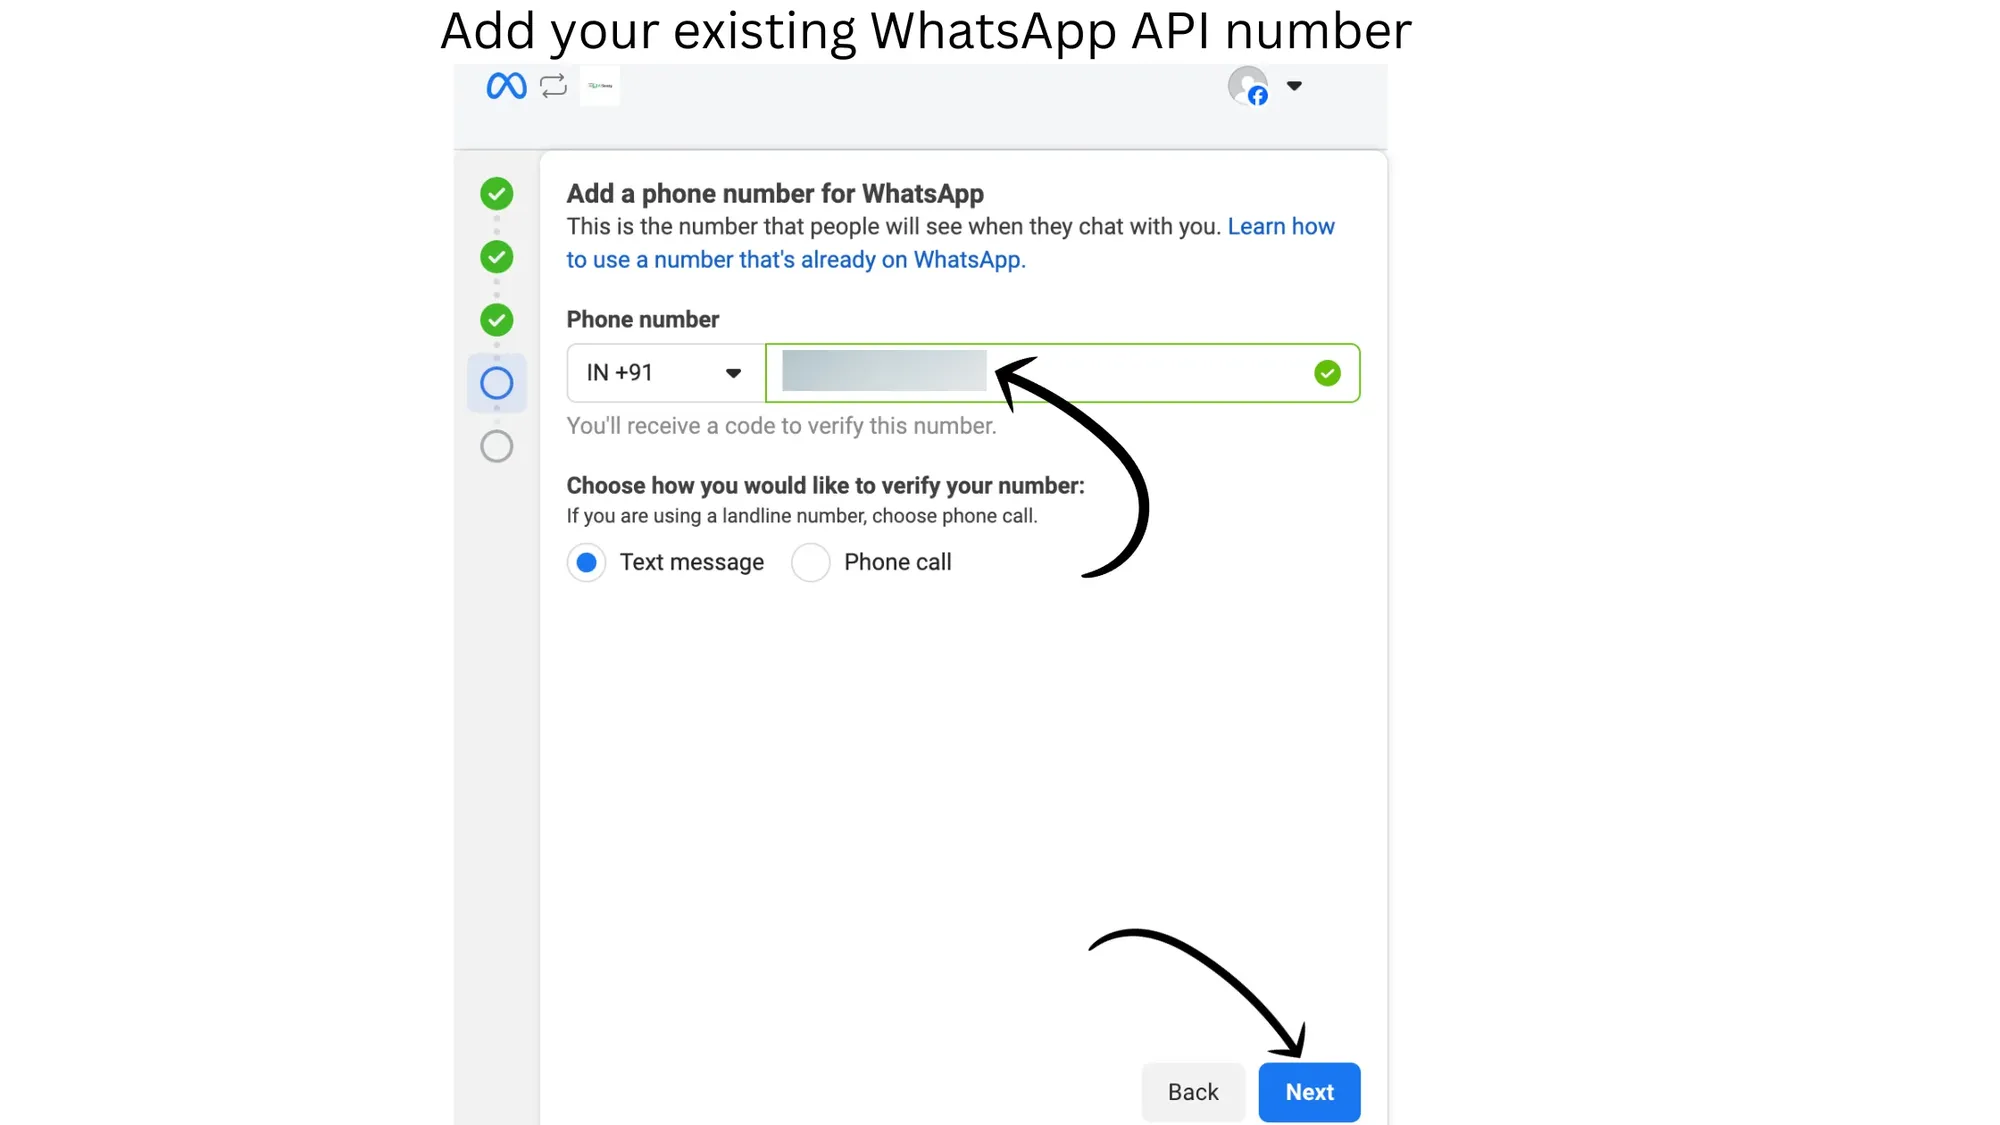
11. Add your existing WhatsApp API number
Now, add your existing WhatsApp Business API number, select a verification method and tap next.
12. Click next
If you see the following error here (refer to image), don't worry, it's supposed to be there!
Enter your phone number and press "Next".
In case, any other error is visible to you, contact us immediately via Live Chat.
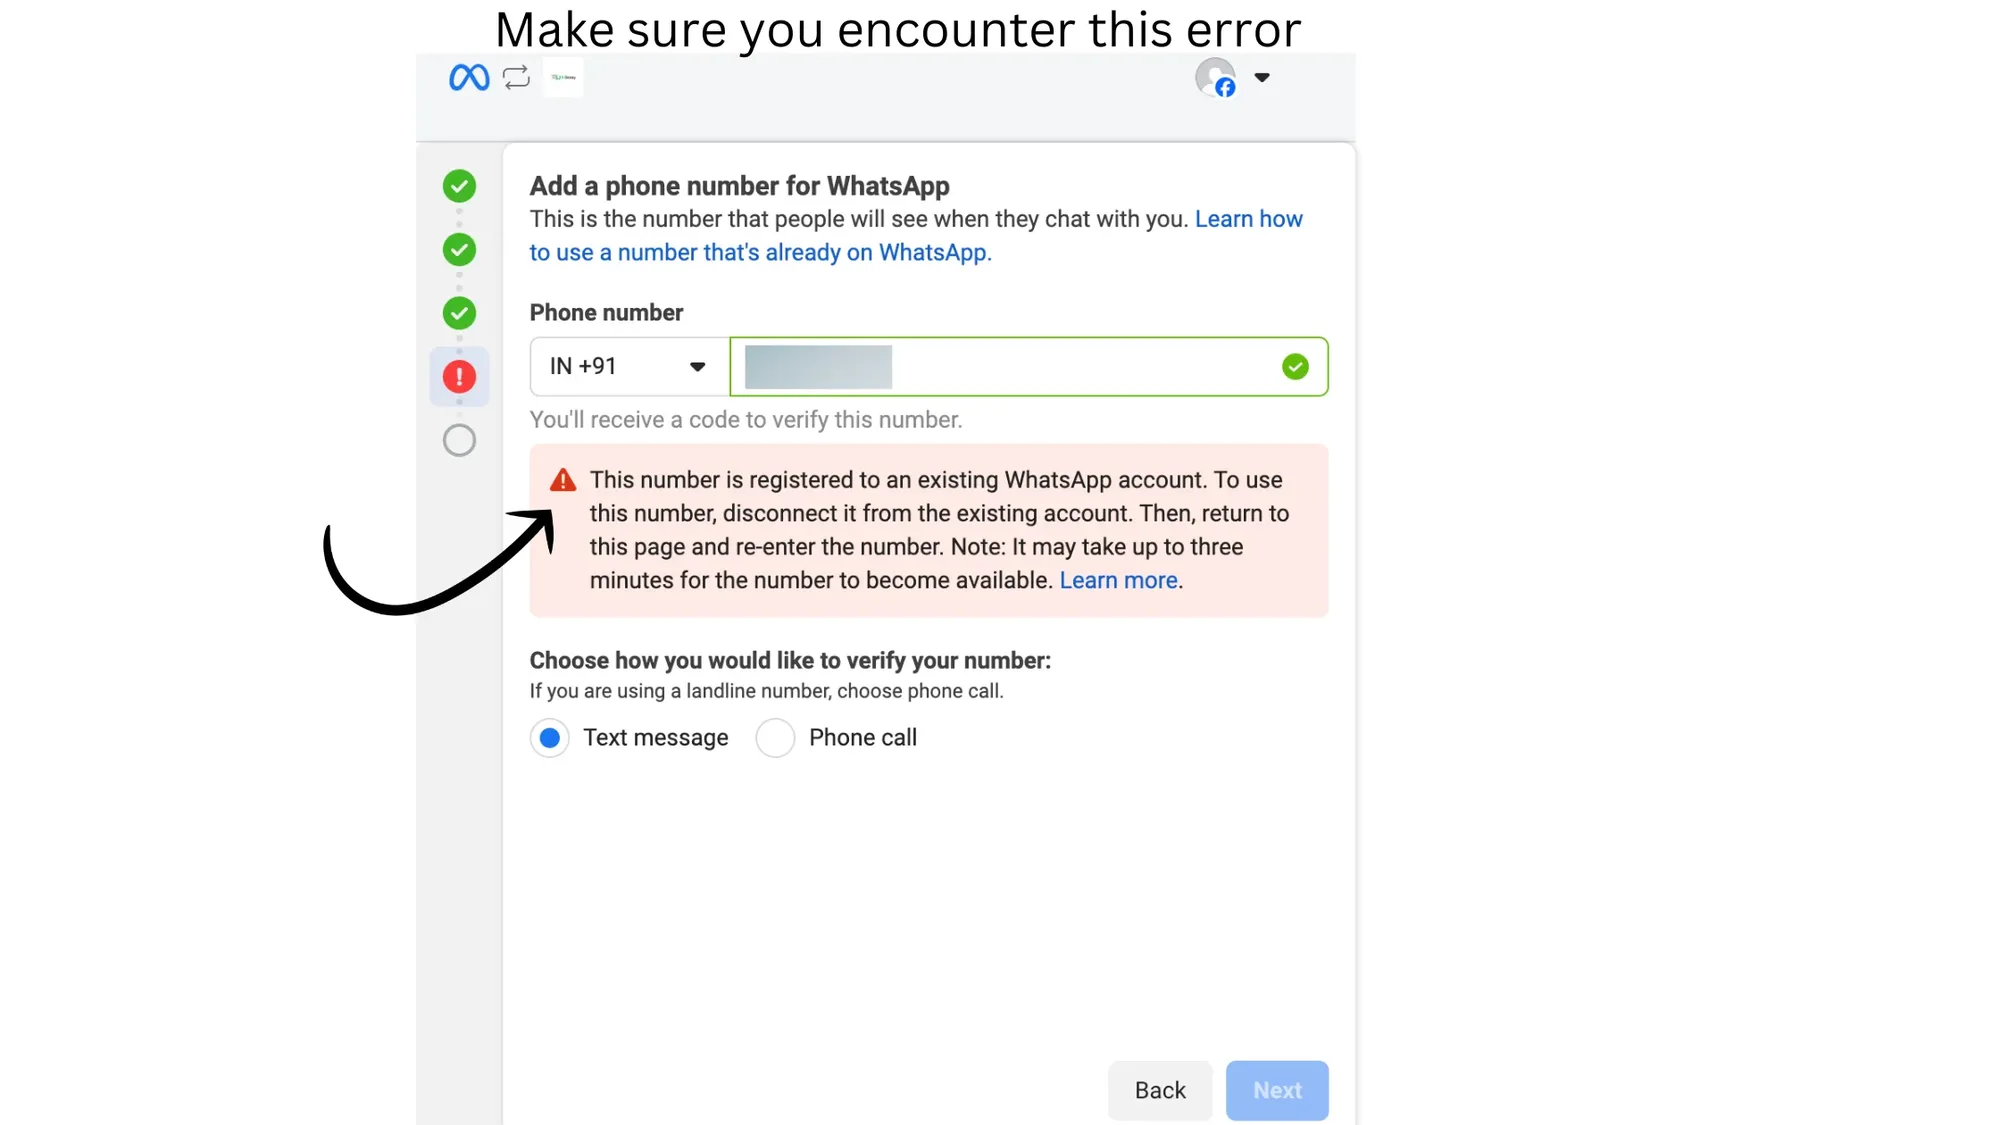
12. Click next
If you see the following error here (refer to image), don't worry, it's supposed to be there!
Enter your phone number and press "Next".
In case, any other error is visible to you, contact us immediately via Live Chat.
13. Congratulations🎉🎊 Your WhatsApp API is Live on Messegy
After verifying your number, just sit back and relax for a few minutes!!
Congratulations🎊
If you perform all the above steps correctly, your WhatsApp Business API account will be successfully migrated to Messegy along with your existing Broadcasting limit!
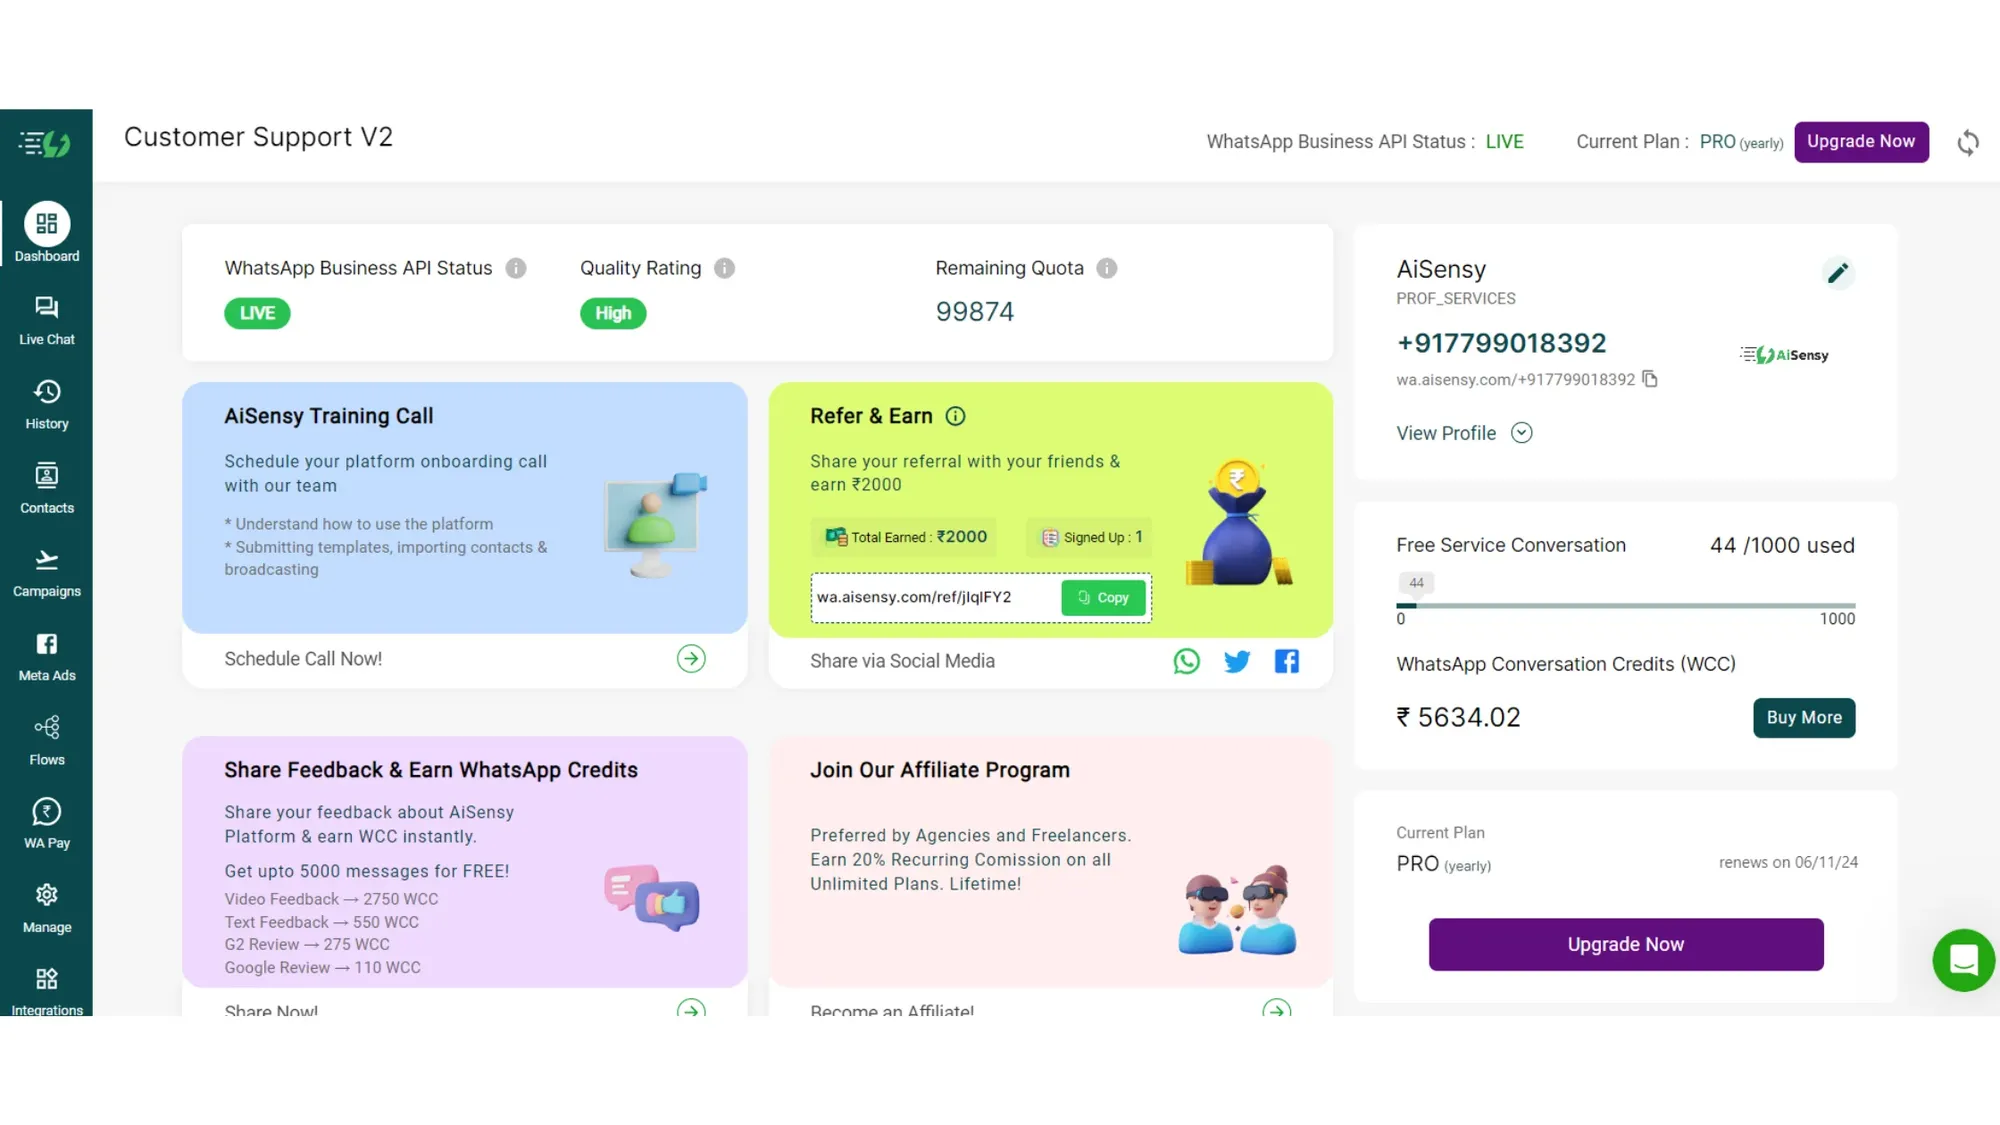
13. Congratulations🎉🎊 Your WhatsApp API is Live on Messegy
After verifying your number, just sit back and relax for a few minutes!!
Congratulations🎊
If you perform all the above steps correctly, your WhatsApp Business API account will be successfully migrated to Messegy along with your existing Broadcasting limit!
FAQ
Frequently asked questions answered
FAQ
Frequently asked questions answered
What can you retain after migrating from one WhatsApp API provider to another?
When migrating to Messegy, these are the information retained:
-
Registered phone number
-
Display name
-
Quality rating
-
WhatsApp Blue Tick status
-
Messaging limits
-
Previously approved high-quality WhatsApp template messages.
Approved high-quality templates are ready for use immediately after migration. These templates do not require re-approval.
Interesting fact: Template quality rating does not get migrated as Meta creates a duplicate of the existing high quality templates so they are treated as fresh templates and hence do not have quality rating associated with them.
What can you retain after migrating from one WhatsApp API provider to another?
When migrating to Messegy, these are the information retained:
-
Registered phone number
-
Display name
-
Quality rating
-
WhatsApp Blue Tick status
-
Messaging limits
-
Previously approved high-quality WhatsApp template messages.
Approved high-quality templates are ready for use immediately after migration. These templates do not require re-approval.
Interesting fact: Template quality rating does not get migrated as Meta creates a duplicate of the existing high quality templates so they are treated as fresh templates and hence do not have quality rating associated with them.
What Does NOT Get Migrated During WhatsApp API migration process?
The following items are not included in the migration process:
● Low-Quality, Rejected, or Pending Templates● Chat History● Message Insights● Authentication Tokens
If retaining chat history is important, consider backing up data before migration from your current WhatsApp API provider
What Does NOT Get Migrated During WhatsApp API migration process?
The following items are not included in the migration process:
● Low-Quality, Rejected, or Pending Templates● Chat History● Message Insights● Authentication Tokens
If retaining chat history is important, consider backing up data before migration from your current WhatsApp API provider
How Long Does Migration Take?
The entire migration process typically takes a few minutes. During the migration:
-
The Source WhatsApp Business API can continue sending and receiving messages.
-
Once the migration is complete, the Destination WhatsApp Business API can start sending messages immediately.
There’s no downtime, ensuring seamless communication.
How Long Does Migration Take?
The entire migration process typically takes a few minutes. During the migration:
-
The Source WhatsApp Business API can continue sending and receiving messages.
-
Once the migration is complete, the Destination WhatsApp Business API can start sending messages immediately.
There’s no downtime, ensuring seamless communication.