Wish to send a WhatsApp Broadcast via Messegy? Learn the step-by-step process of broadcasting messages on WhatsApp via the Messegy app.
How to Broadcast WhatsApp Messages in Messegy App?
Wish to send a WhatsApp Broadcast via Messegy? Learn the step-by-step process of broadcasting messages on WhatsApp via the Messegy app.
How to send a WhatsApp Broadcast via Messegy?

How to send a WhatsApp Broadcast via Messegy?
In Messegy Dashboard, click 'Manage'
To send a WhatsApp Broadcast, you first need to approve a Template message from WhatsApp since you can only send pre-approved template messages to users.So, go to Messegy Dashboard & click Manage to create a new template message.
How to import contacts in Messegy
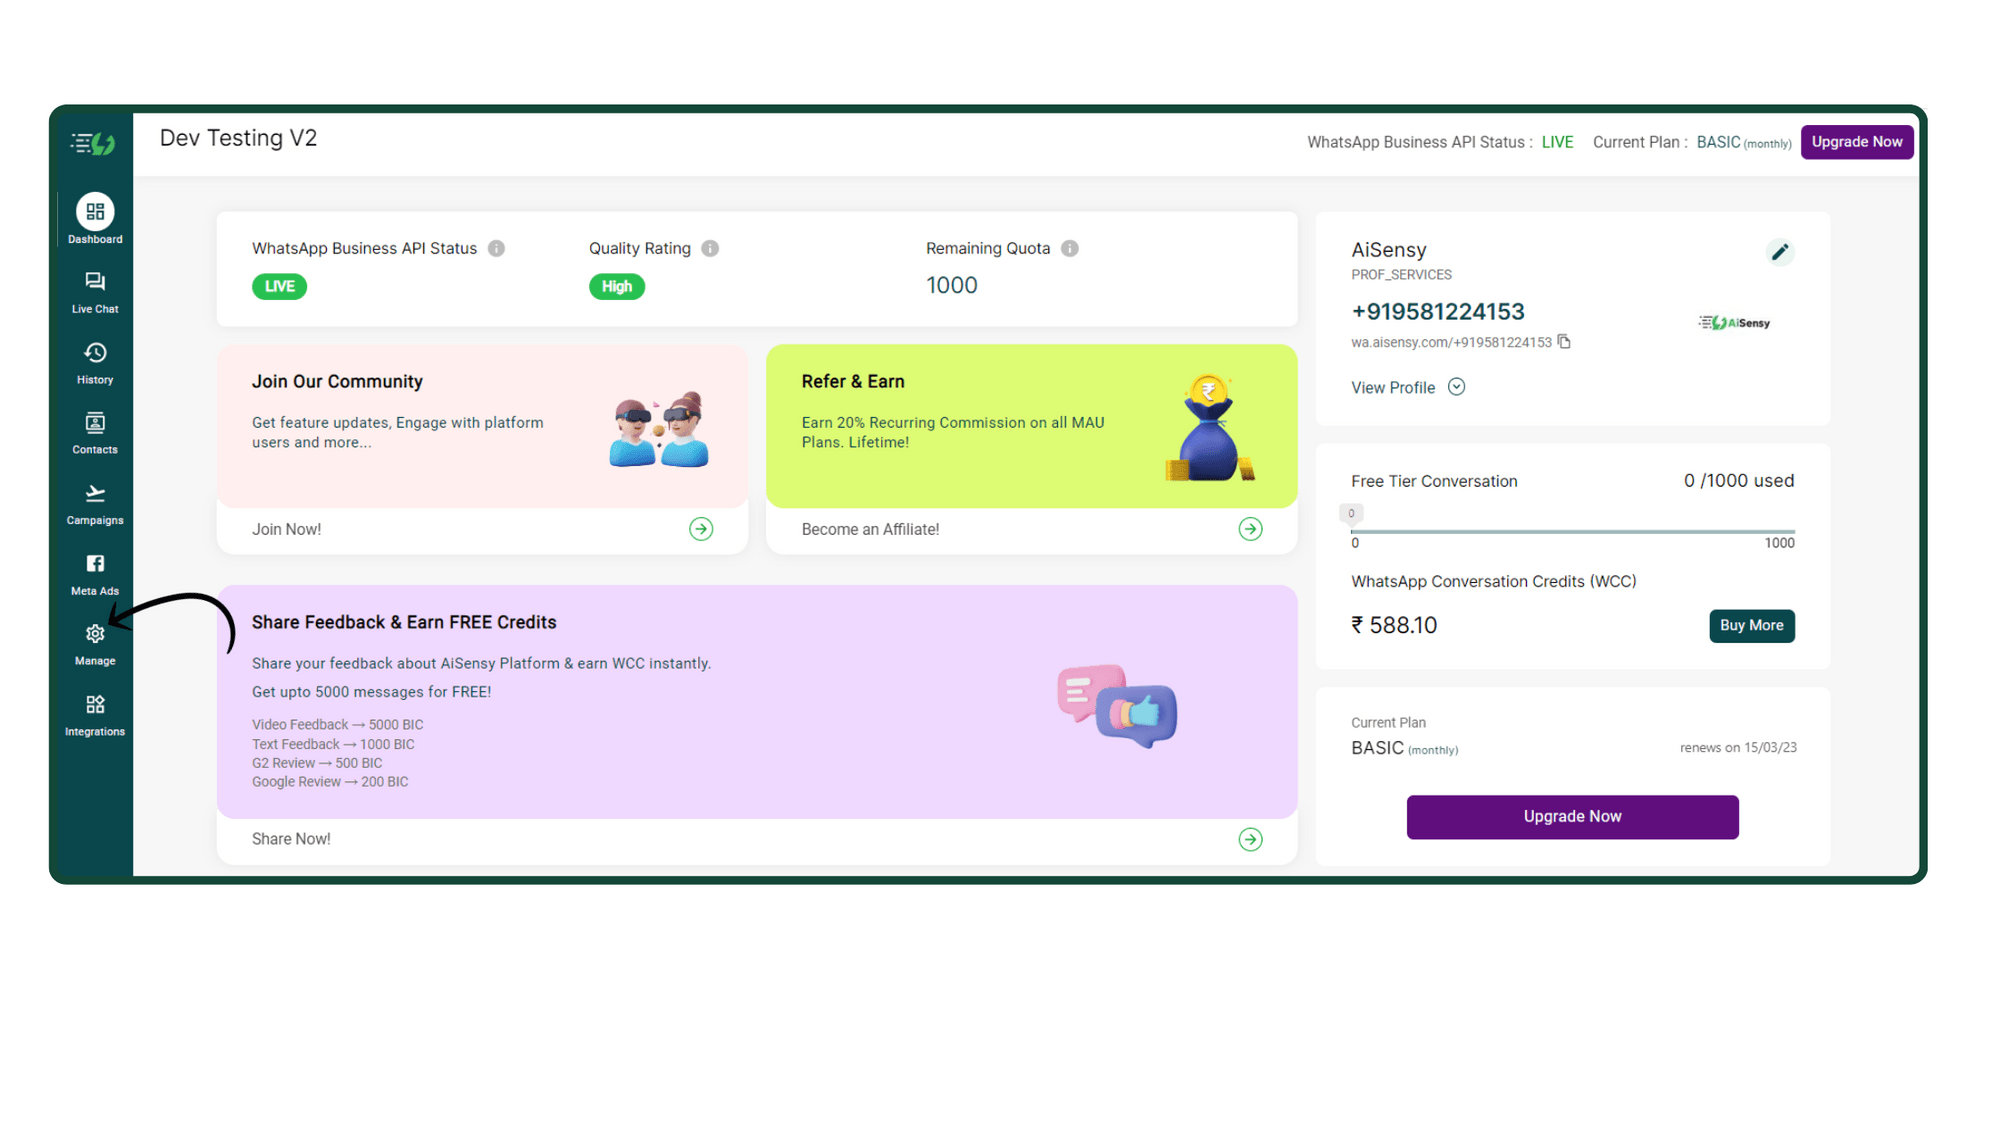
In Messegy Dashboard, click 'Manage'
To send a WhatsApp Broadcast, you first need to approve a Template message from WhatsApp since you can only send pre-approved template messages to users.So, go to Messegy Dashboard & click Manage to create a new template message.
How to import contacts in Messegy
Click '+New' to create a Template Message
Click the +New button to create a New template message.
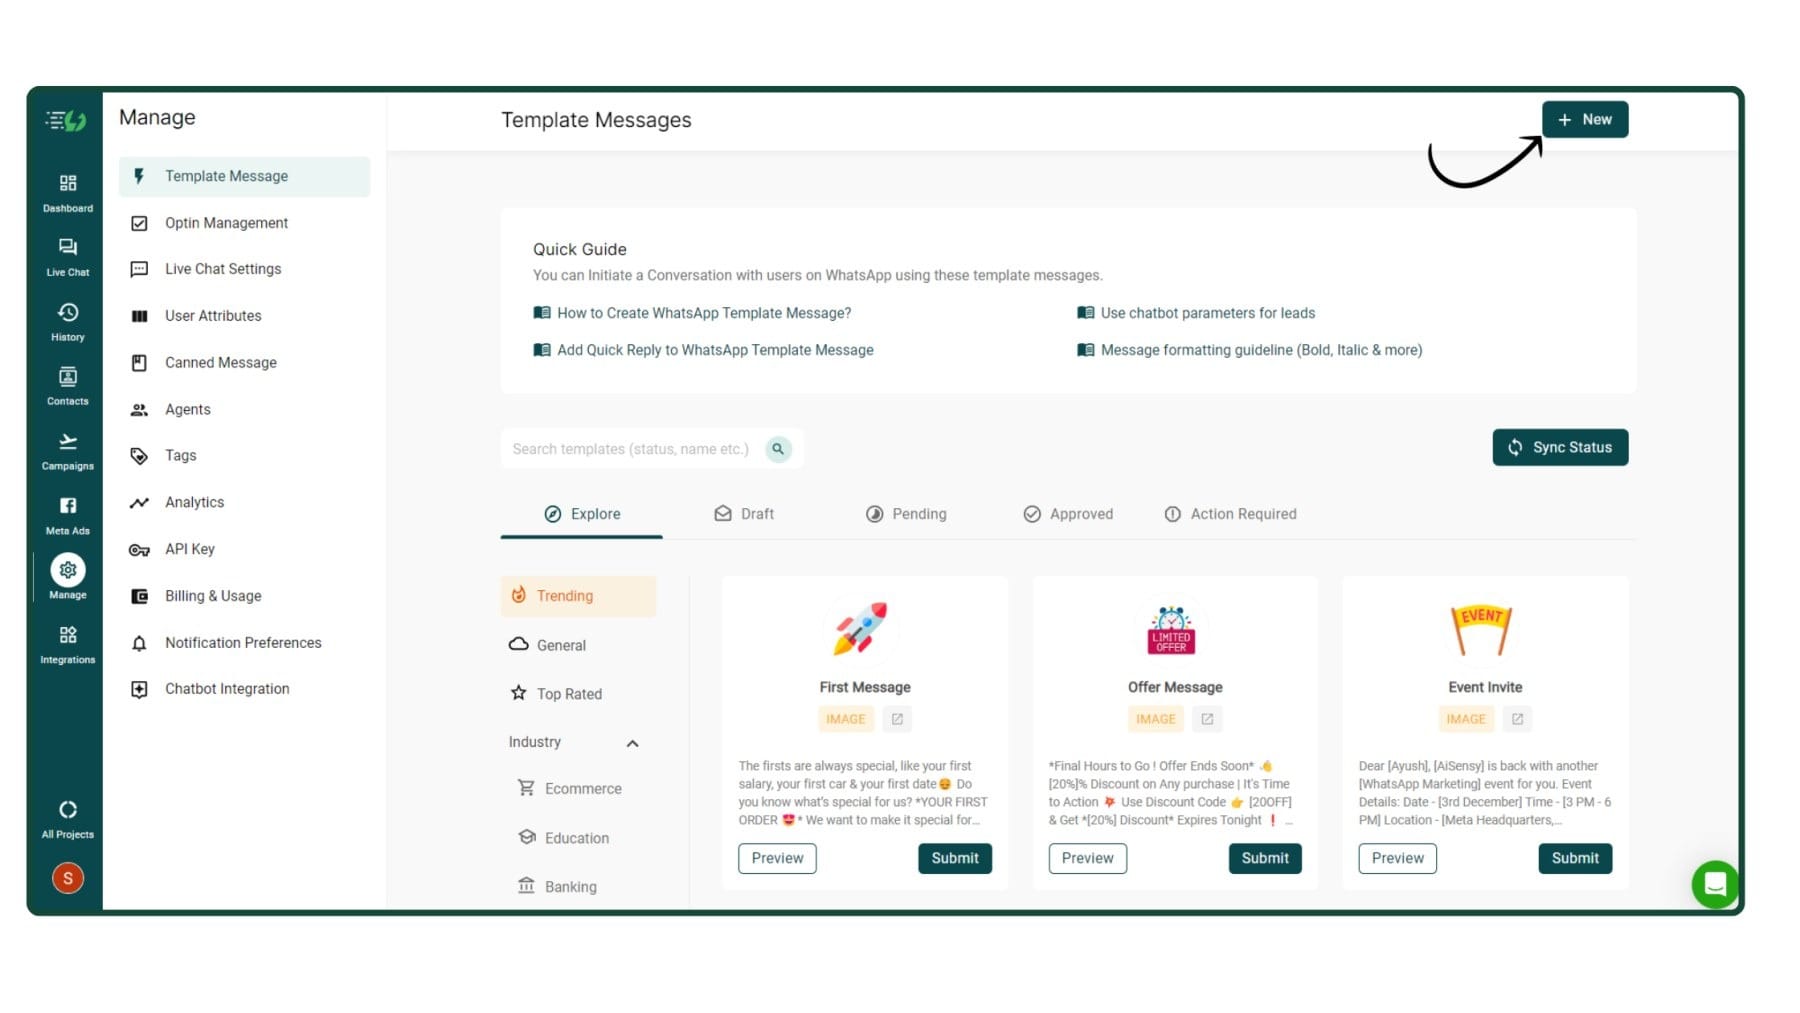
Click '+New' to create a Template Message
Click the +New button to create a New template message.
Fill in the required fields to create a Template message
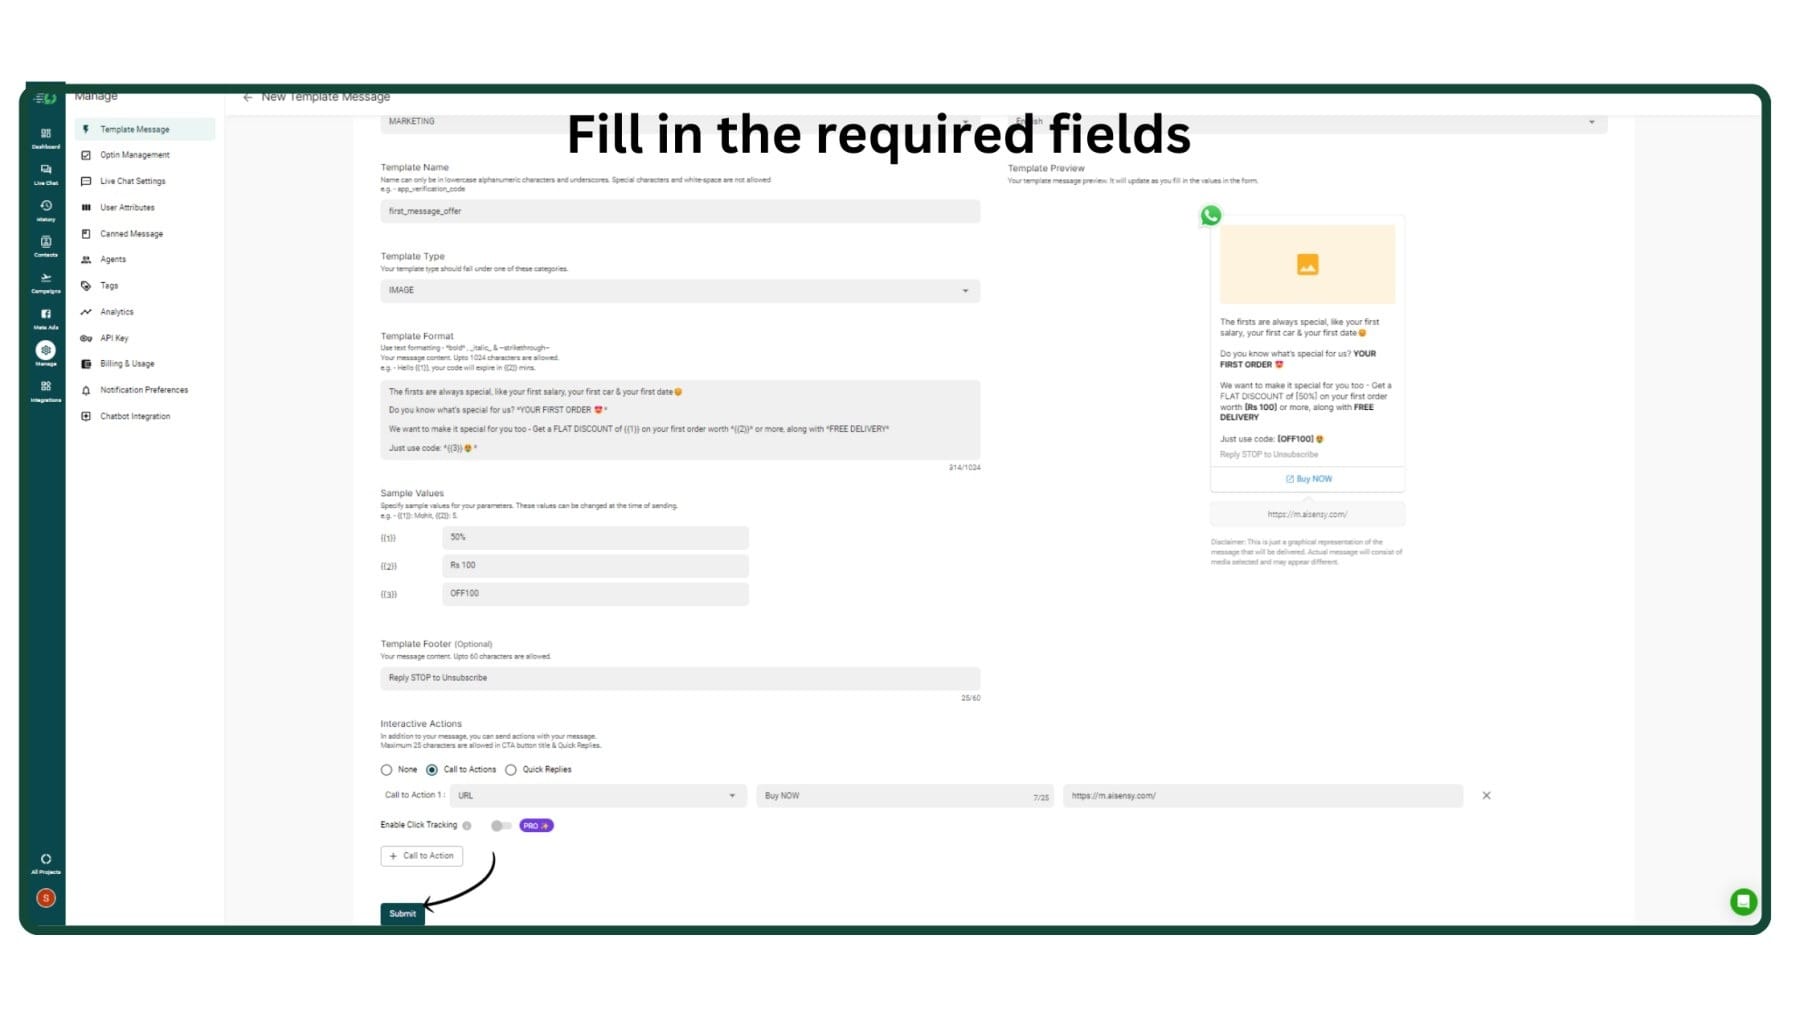
Here, you must fill in the necessary fields including Template Category, Template name, type of message, message format, CTA buttons (optional) & template language.We've already covered this in detail in the Template Message Guide. Check it out!
Template Message Guide
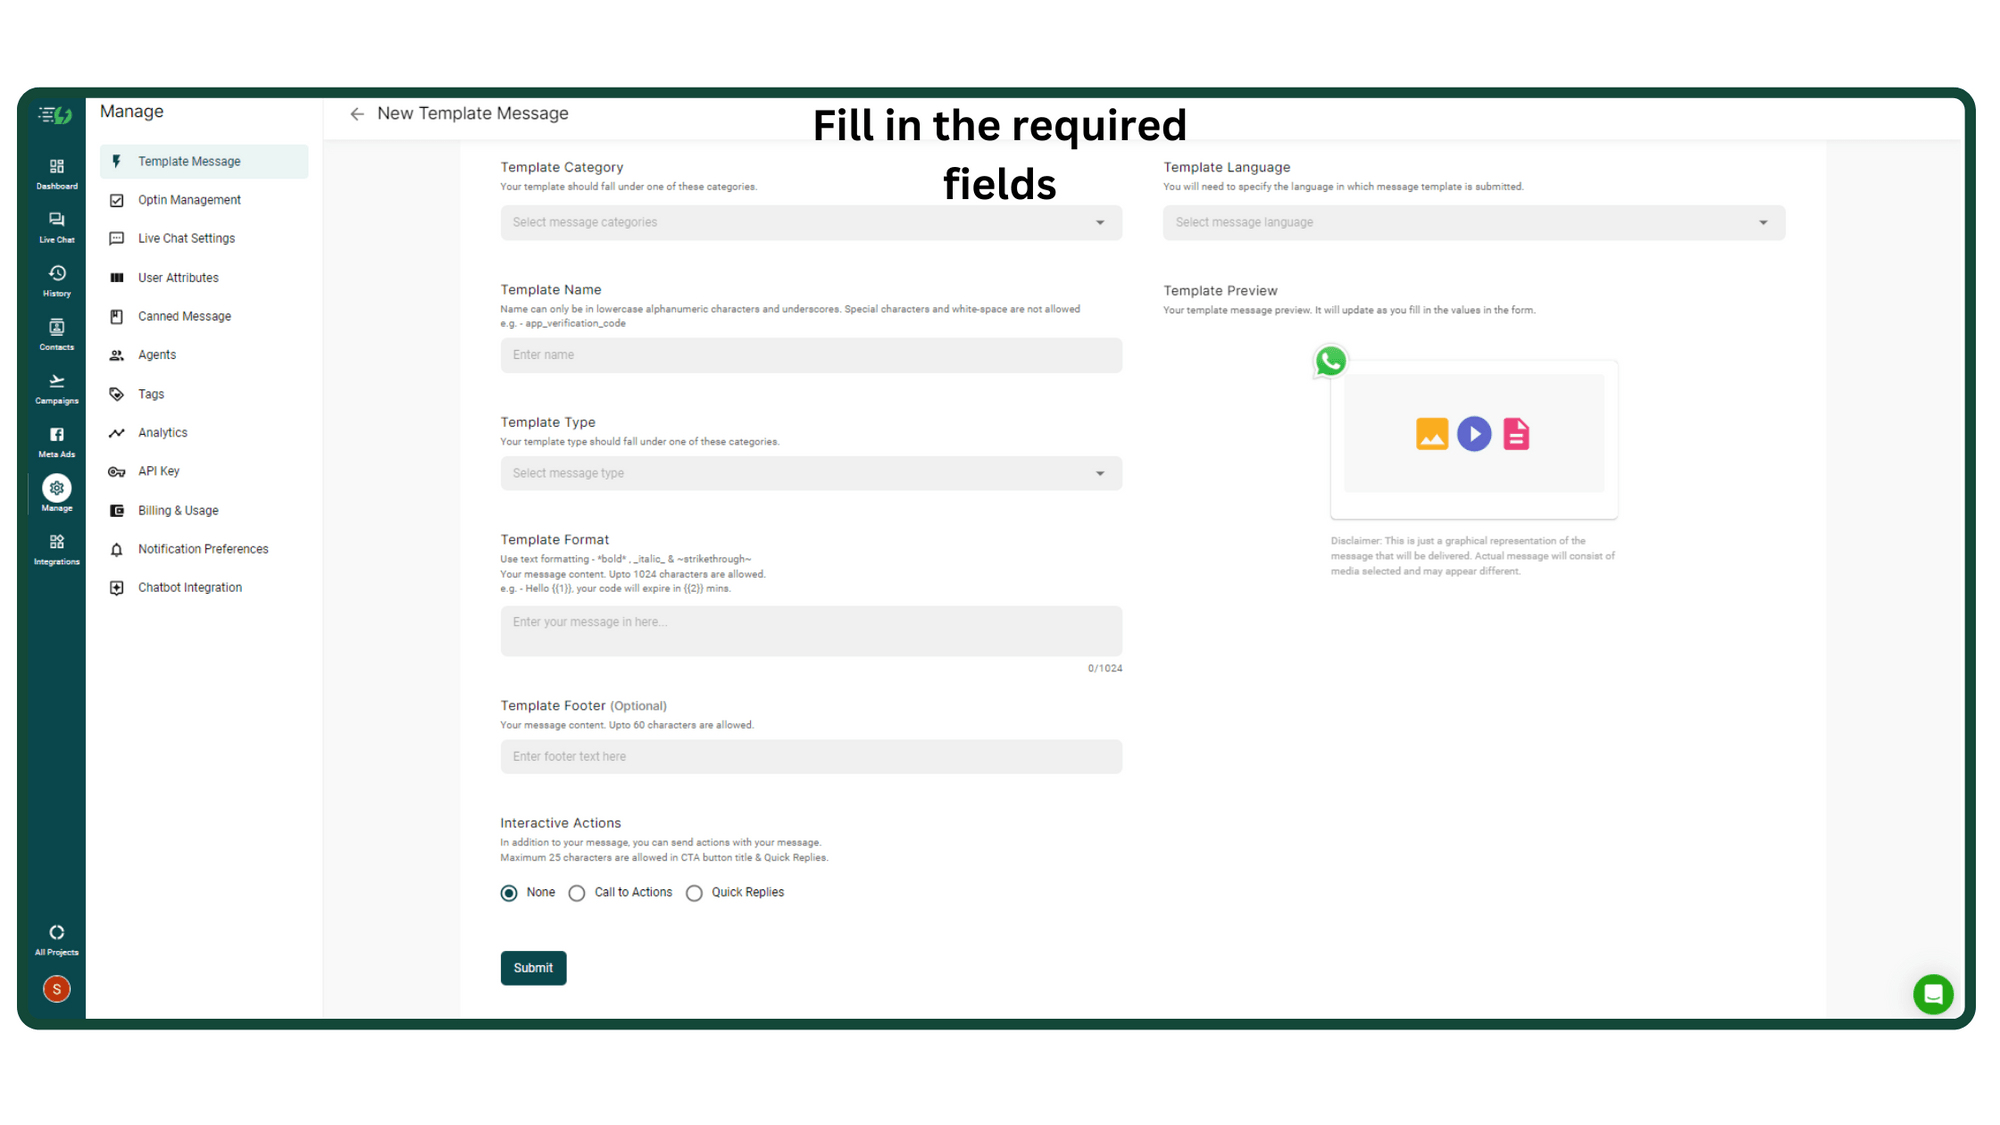
Fill in the required fields to create a Template message
Here, you must fill in the necessary fields including Template Category, Template name, type of message, message format, CTA buttons (optional) & template language.We've already covered this in detail in the Template Message Guide. Check it out!
Template Message Guide
Submit your WhatsApp Template for approval
Created your Template message? Great!After filling in the required fields, Submit the template message for approval.
Submit your WhatsApp Template for approval
Created your Template message? Great!After filling in the required fields, Submit the template message for approval.
In Template Message, go to 'Approved' & click 'Sync Status'
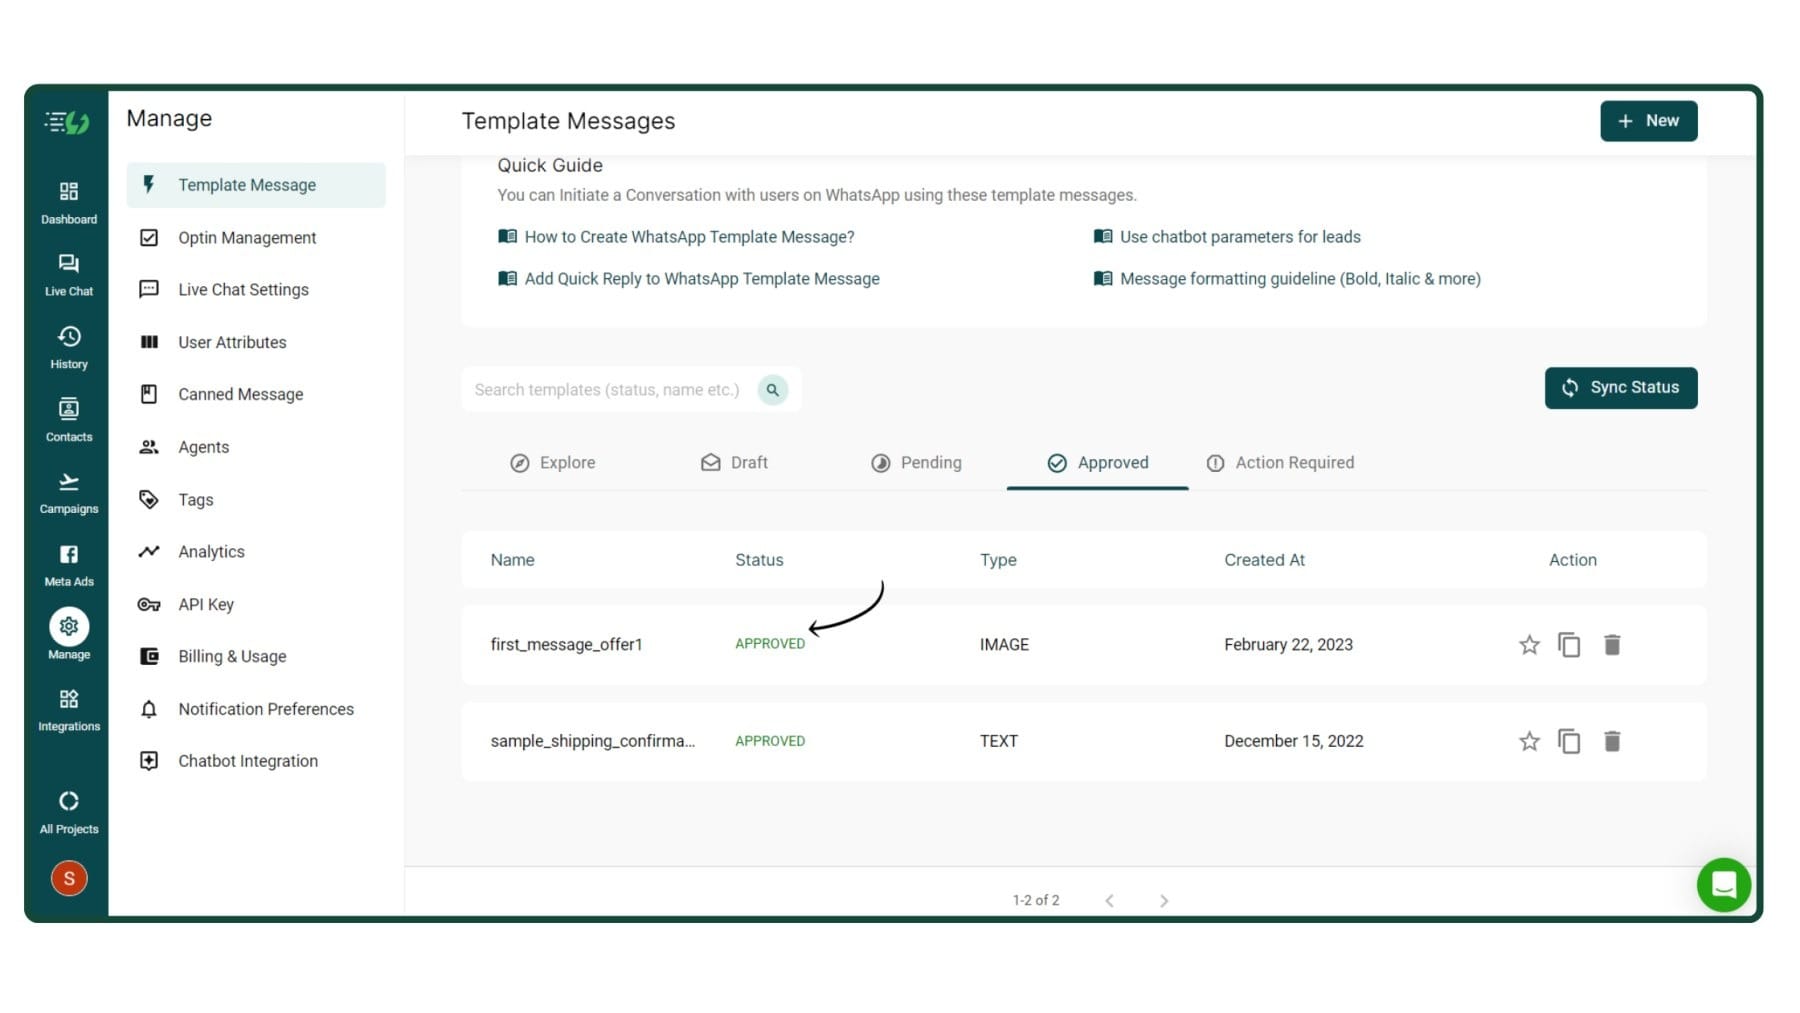
To verify the approval status of your submitted Template message, go to the Approved section in the Template message & click Sync Status.
In Template Message, go to 'Approved' & click 'Sync Status'
To verify the approval status of your submitted Template message, go to the Approved section in the Template message & click Sync Status.
Go to the Contacts Page & click 'Import'
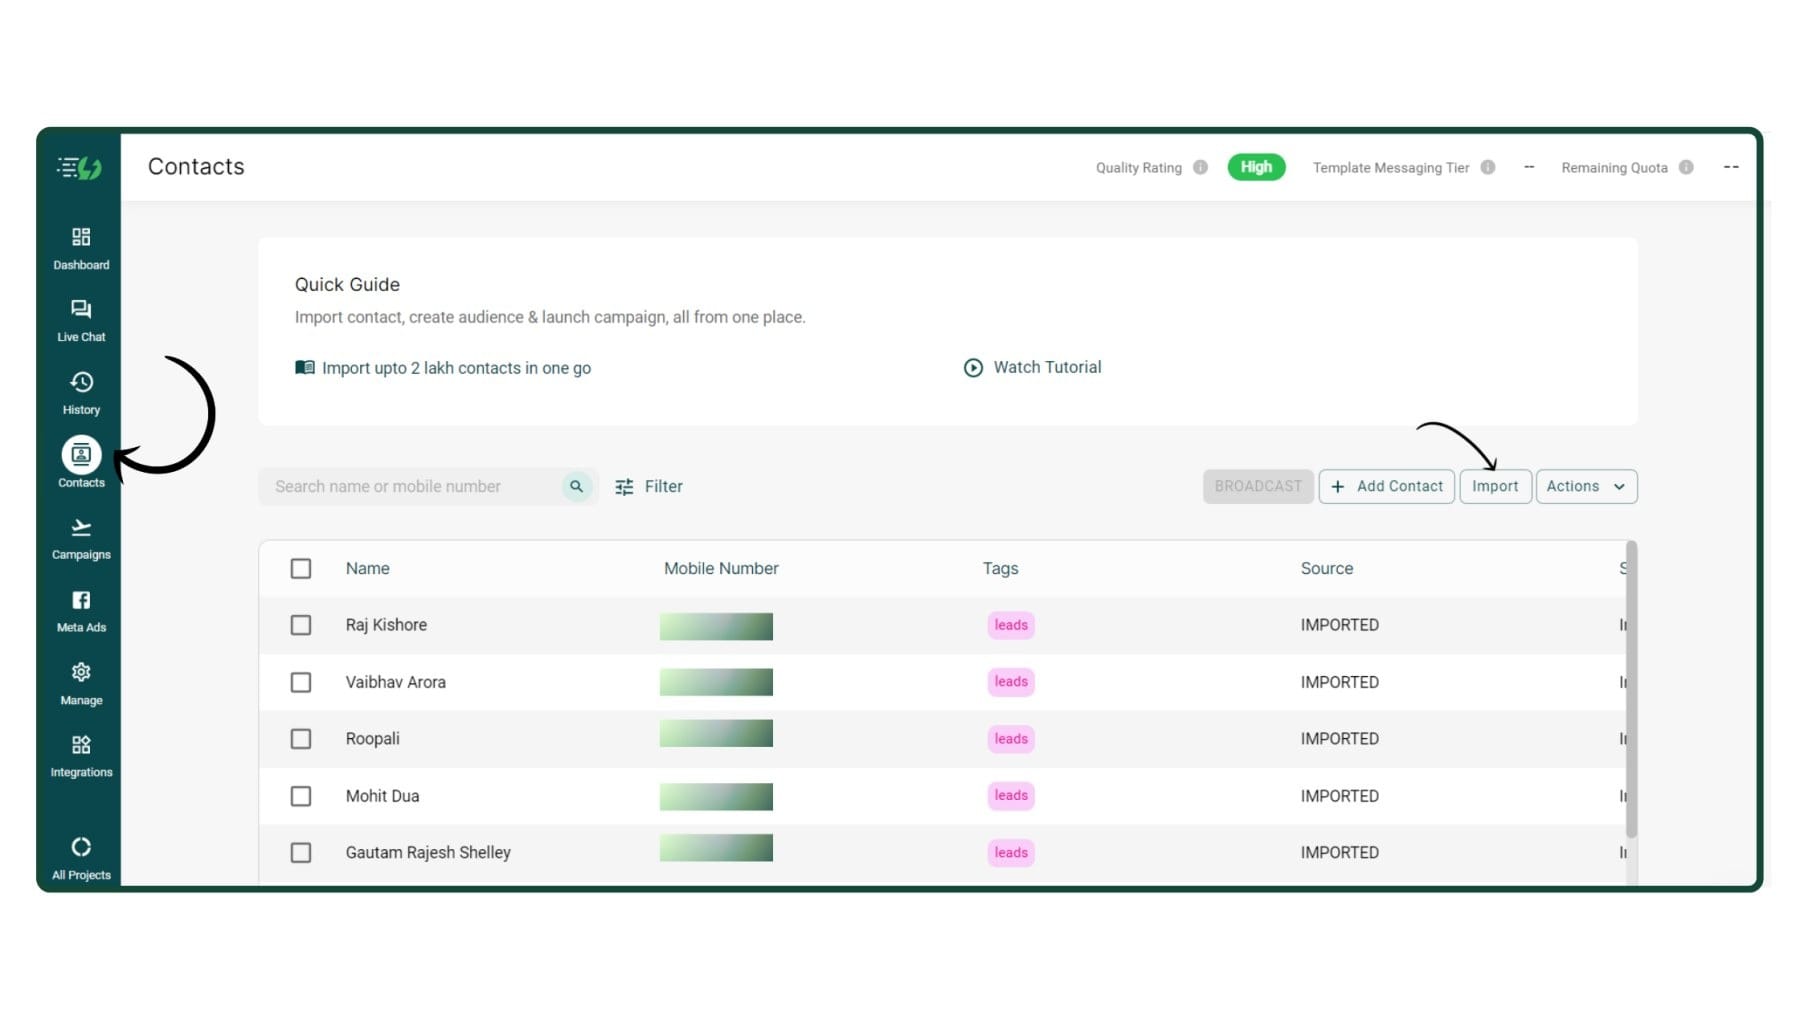
After getting your template approved, you need to import your contacts to Messegy in a .csv format.On the Contacts page & click Import to add your contacts.
Go to the Contacts Page & click 'Import'
After getting your template approved, you need to import your contacts to Messegy in a .csv format.On the Contacts page & click Import to add your contacts.
Now, go to Sheets & add the Contacts you wish to Import to Messegy
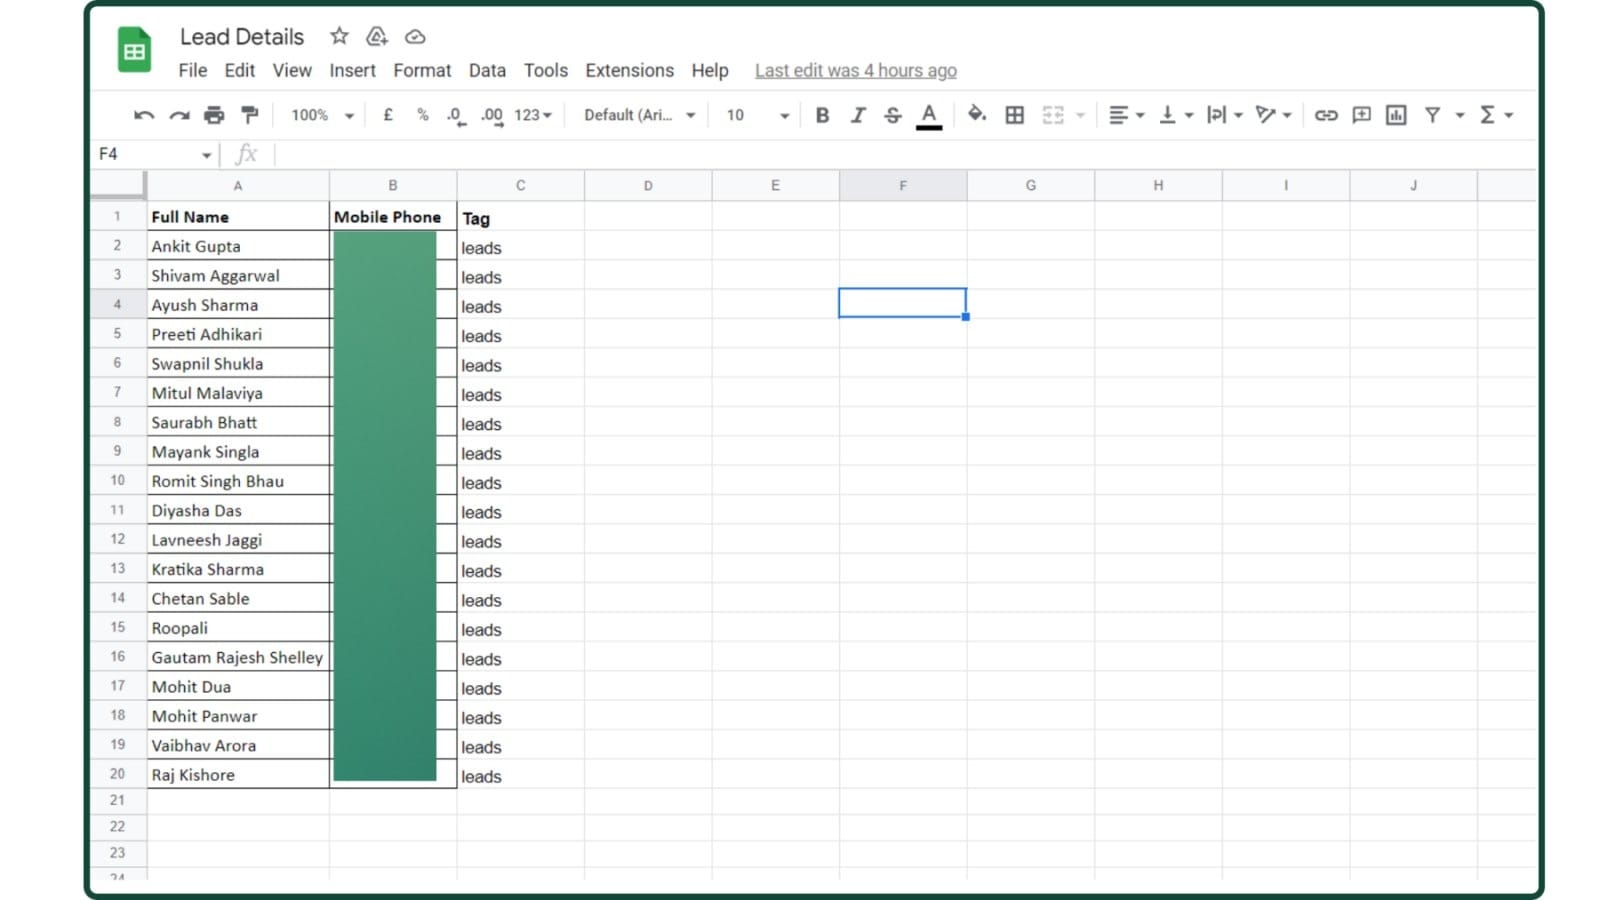
The easiest way to upload your contacts is to add them to a spreadsheet document and then import them to Messegy in a .csv format.Add a tag attribute to the contacts so that you can easily filter & find the latest contacts among a sea of contacts whom you wish to Broadcast.If you're confused about how to do this, check out:
How to Add Contacts to Messegy
Now, go to Sheets & add the Contacts you wish to Import to Messegy
The easiest way to upload your contacts is to add them to a spreadsheet document and then import them to Messegy in a .csv format.Add a tag attribute to the contacts so that you can easily filter & find the latest contacts among a sea of contacts whom you wish to Broadcast.If you're confused about how to do this, check out:
How to Add Contacts to Messegy
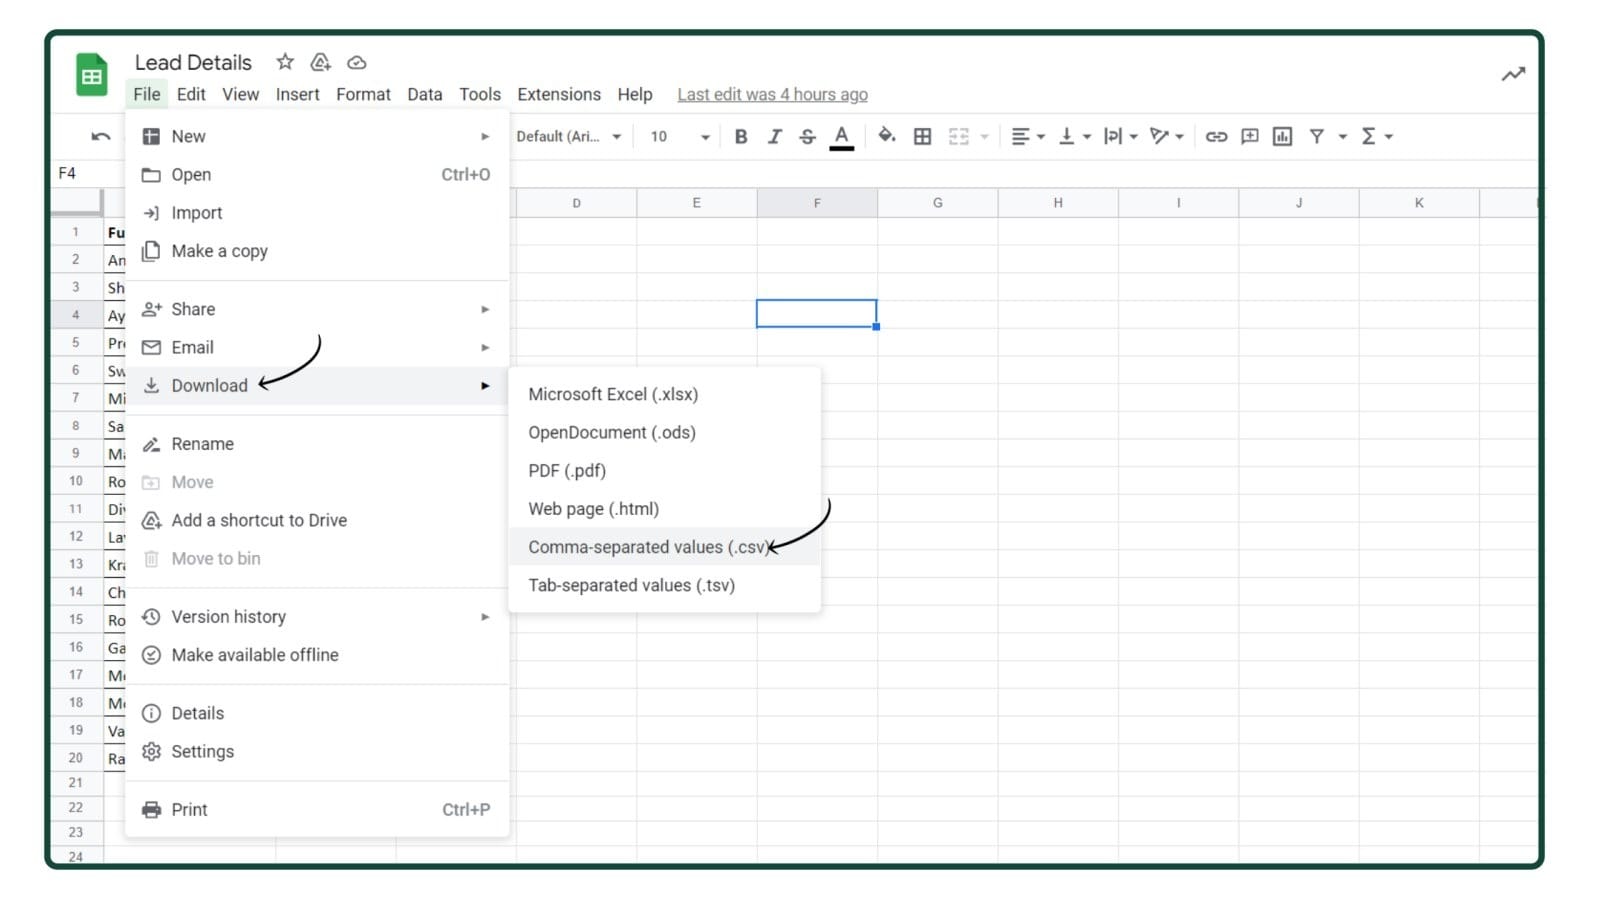
Download in .csv format
After adding the contacts, click File at the top right corner & Download the file in .csv format as shown in the below image.
Download in .csv format
After adding the contacts, click File at the top right corner & Download the file in .csv format as shown in the below image.
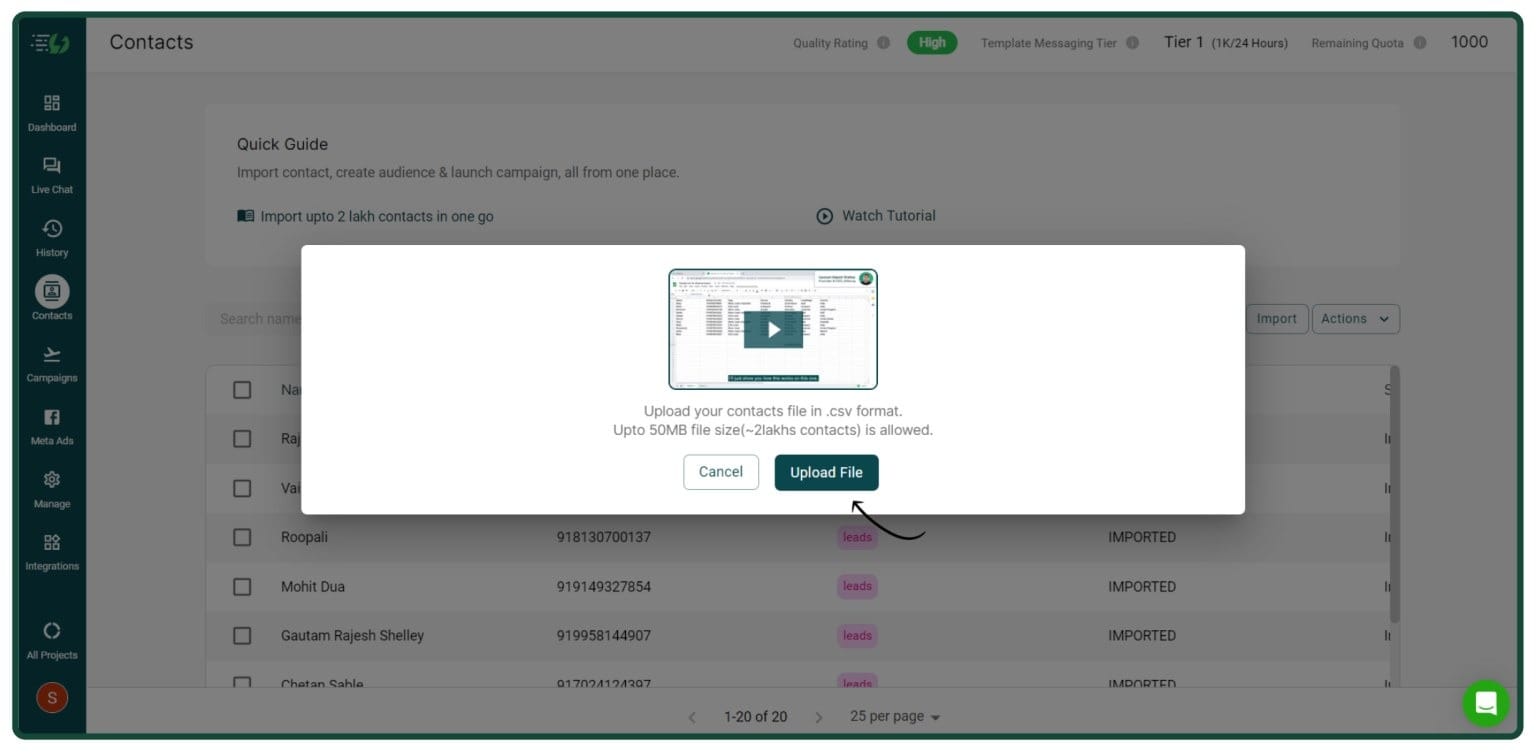
Upload .csv File (create it from Sheets)
Now, come back to the Messegy app & click Upload File to add the .csv file you just created.
Upload .csv File (create it from Sheets)
Now, come back to the Messegy app & click Upload File to add the .csv file you just created.
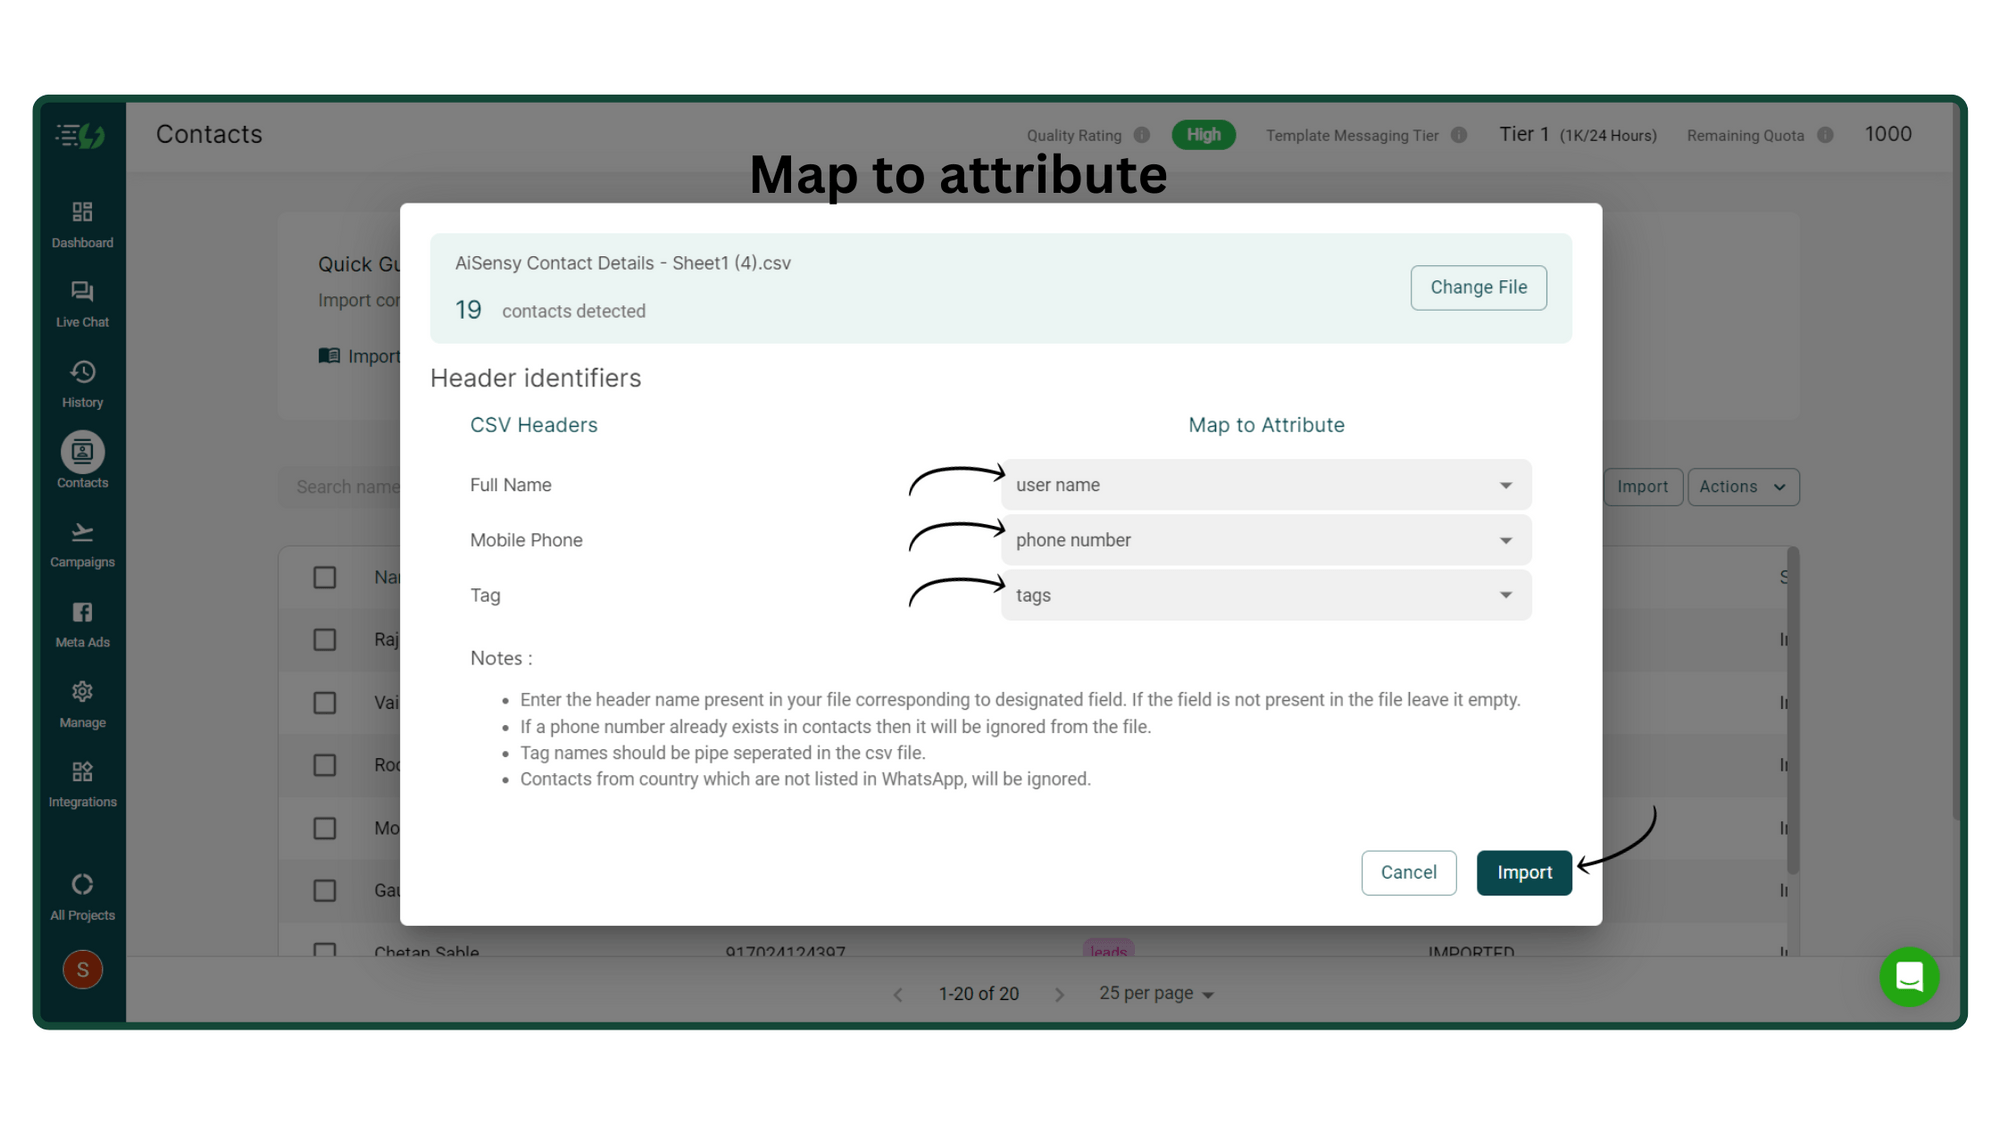
Map to Attributes
Next, you need to map the contacts to particular attributes you wish to import. In the image, we added three attributes: Name, Mobile Phone & Tag. Map these attributes to import the contacts successfully.Note: Mapping the wrong attribute might lead to the failure of the import process. So, kindly do this carefully.
Map to Attributes
Next, you need to map the contacts to particular attributes you wish to import. In the image, we added three attributes: Name, Mobile Phone & Tag. Map these attributes to import the contacts successfully.Note: Mapping the wrong attribute might lead to the failure of the import process. So, kindly do this carefully.
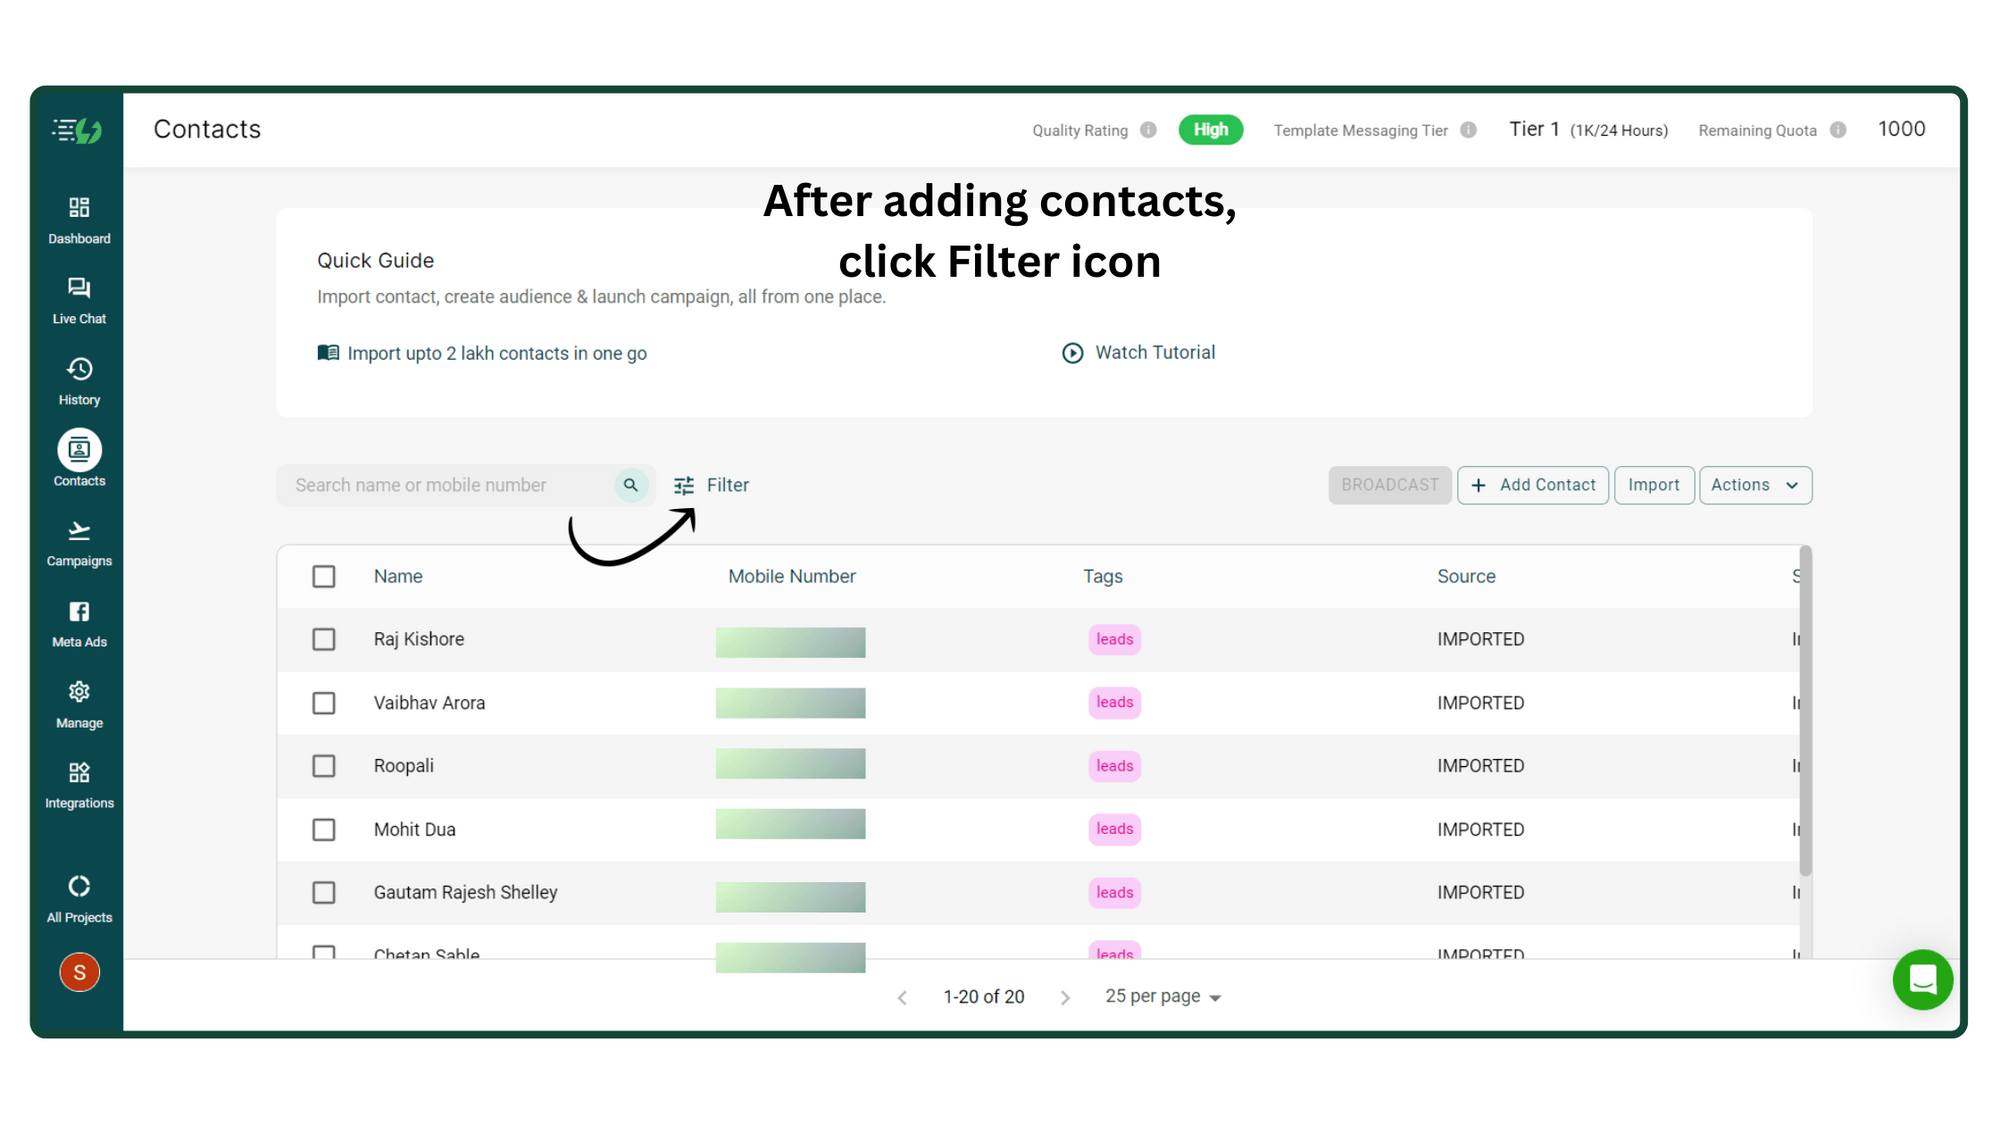
Now, segregate the Contacts by clicking 'Filter'
Once you have imported your contacts, you can filter them by selecting who you want to send a WhatsApp Broadcast.Click the Filter button to filter the contacts you wish to Broadcast.
Now, segregate the Contacts by clicking 'Filter'
Once you have imported your contacts, you can filter them by selecting who you want to send a WhatsApp Broadcast.Click the Filter button to filter the contacts you wish to Broadcast.
Select the attribute of contacts you wish to Broadcast
In this step, apply the filter that will segregate your contacts. There are multiple filters available like a user's Last seen, Created at, Opted in, Incoming blocked & attributes using which you can smartly filter your contacts.
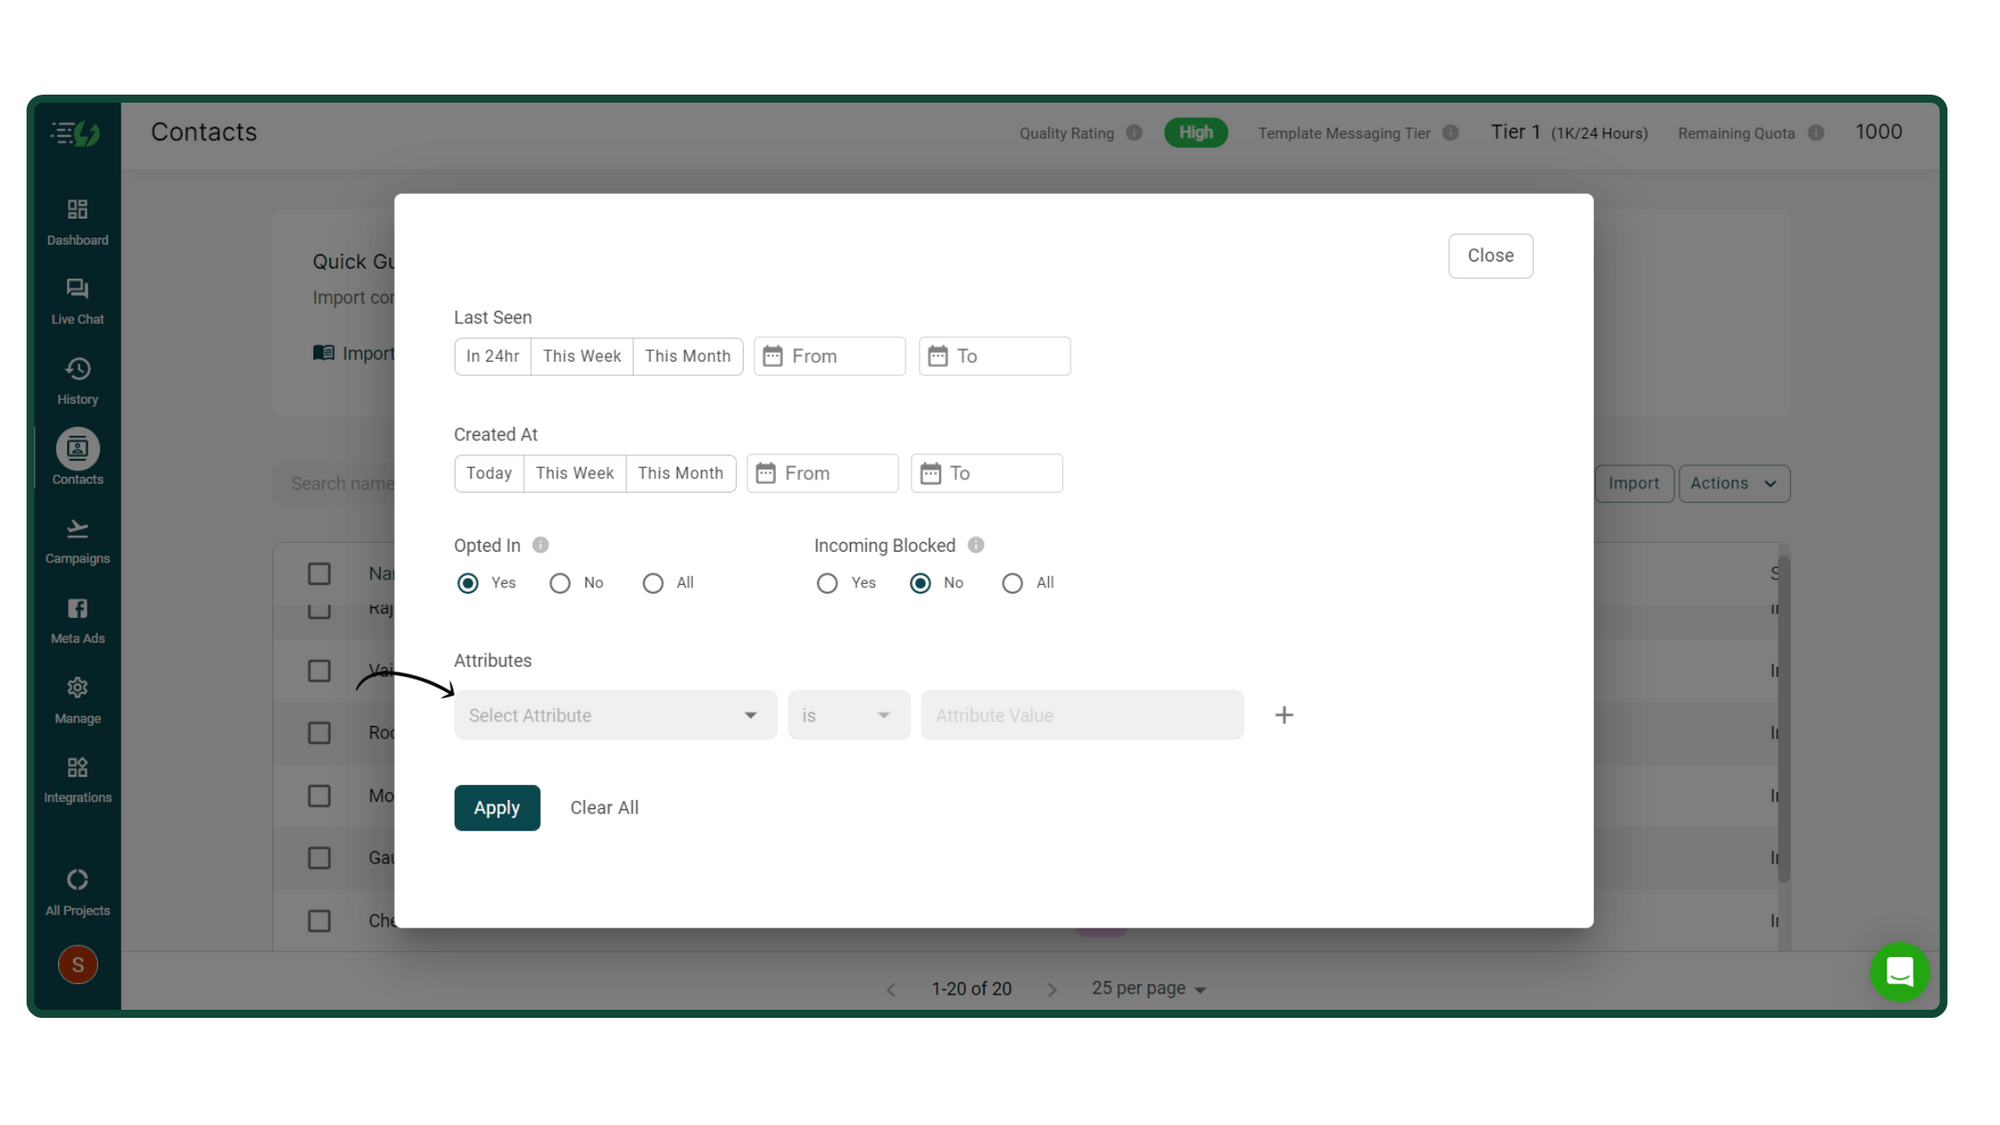
Select the attribute of contacts you wish to Broadcast
In this step, apply the filter that will segregate your contacts. There are multiple filters available like a user's Last seen, Created at, Opted in, Incoming blocked & attributes using which you can smartly filter your contacts.
Select your preferred attribute, like a tag
Since we added a common tag to each imported contact, we'll use the attribute Tags to select our added contacts.
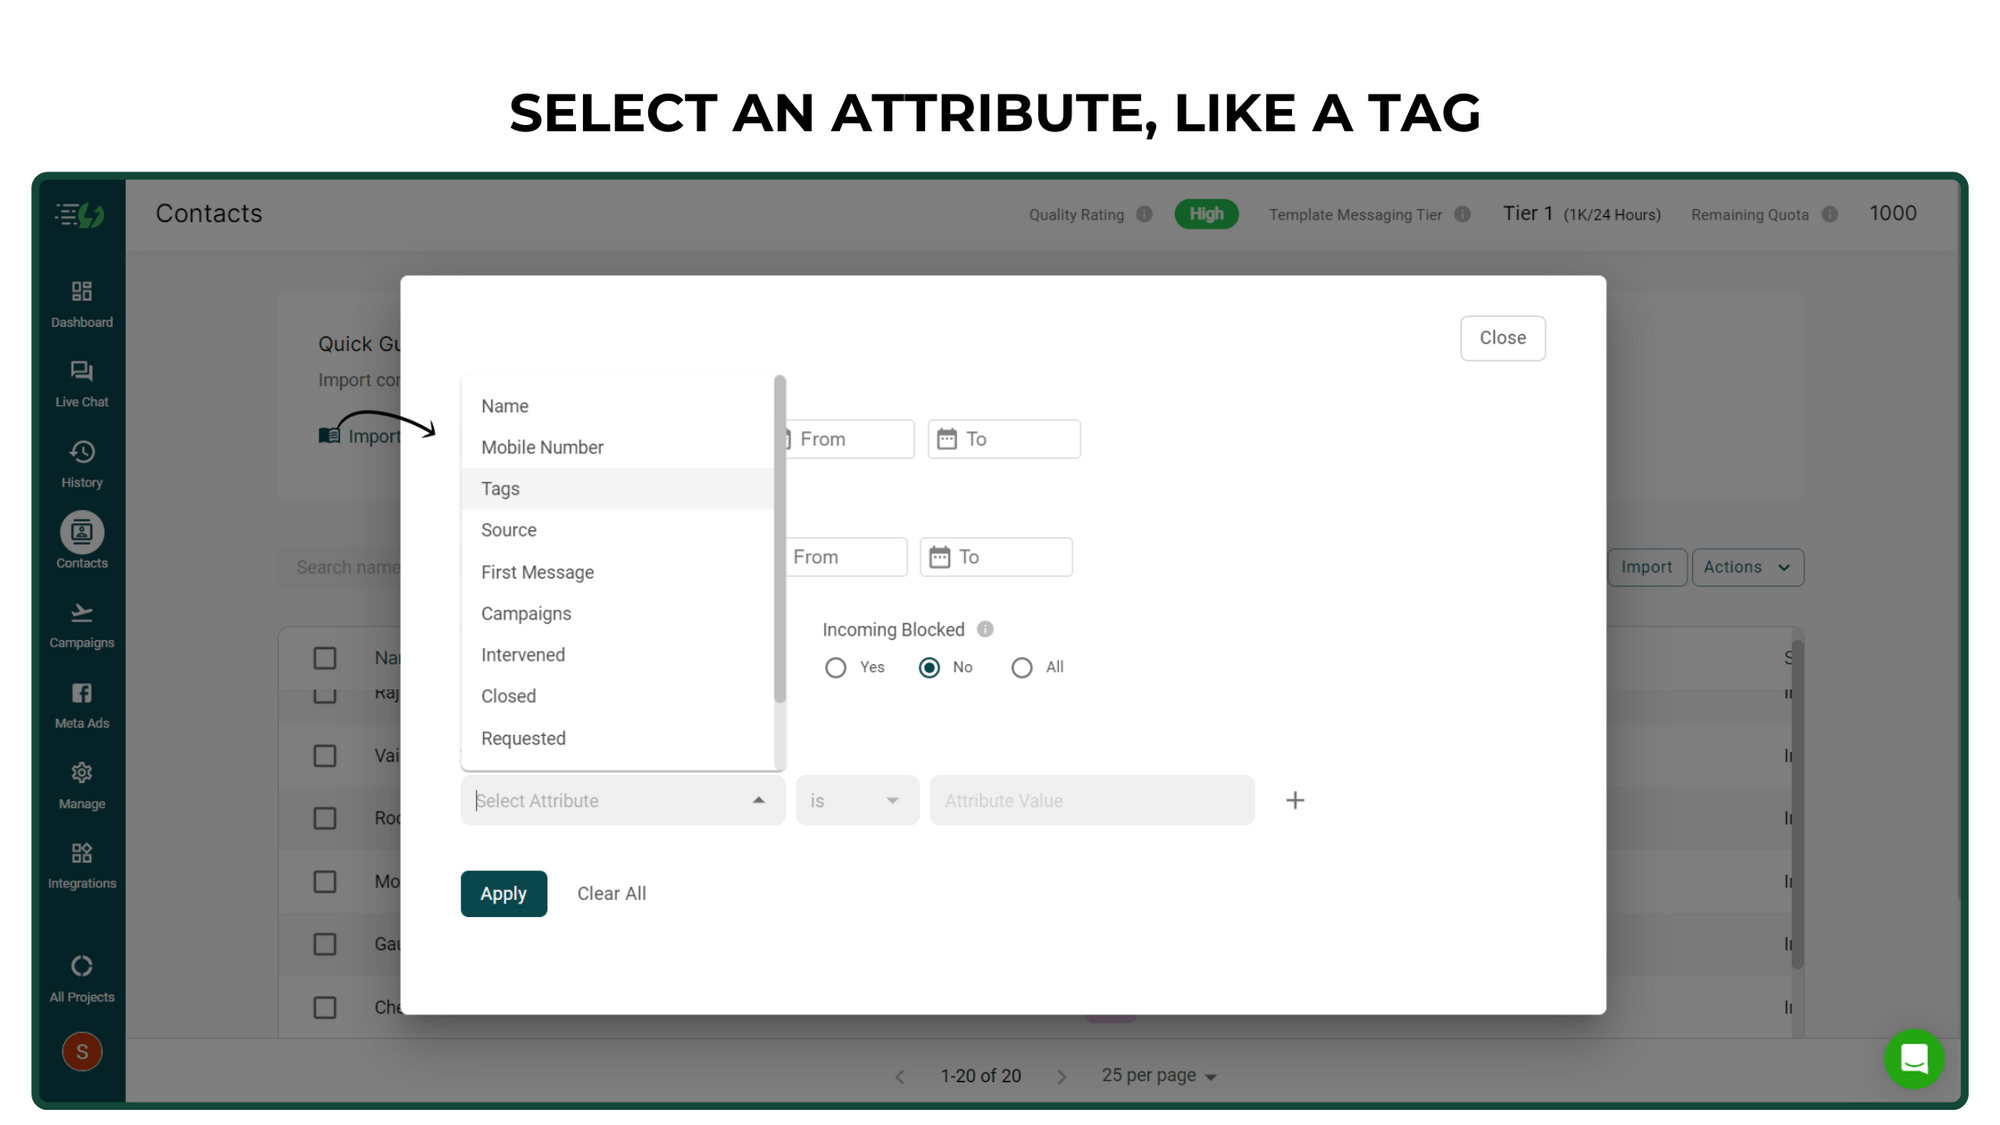
Select your preferred attribute, like a tag
Since we added a common tag to each imported contact, we'll use the attribute Tags to select our added contacts.
After picking the Attribute, click 'Apply'
After selecting the tag (which in this case was Leads which we added to the contacts in our Sheet file), click Apply to view the contacts that contain the tag Leads.
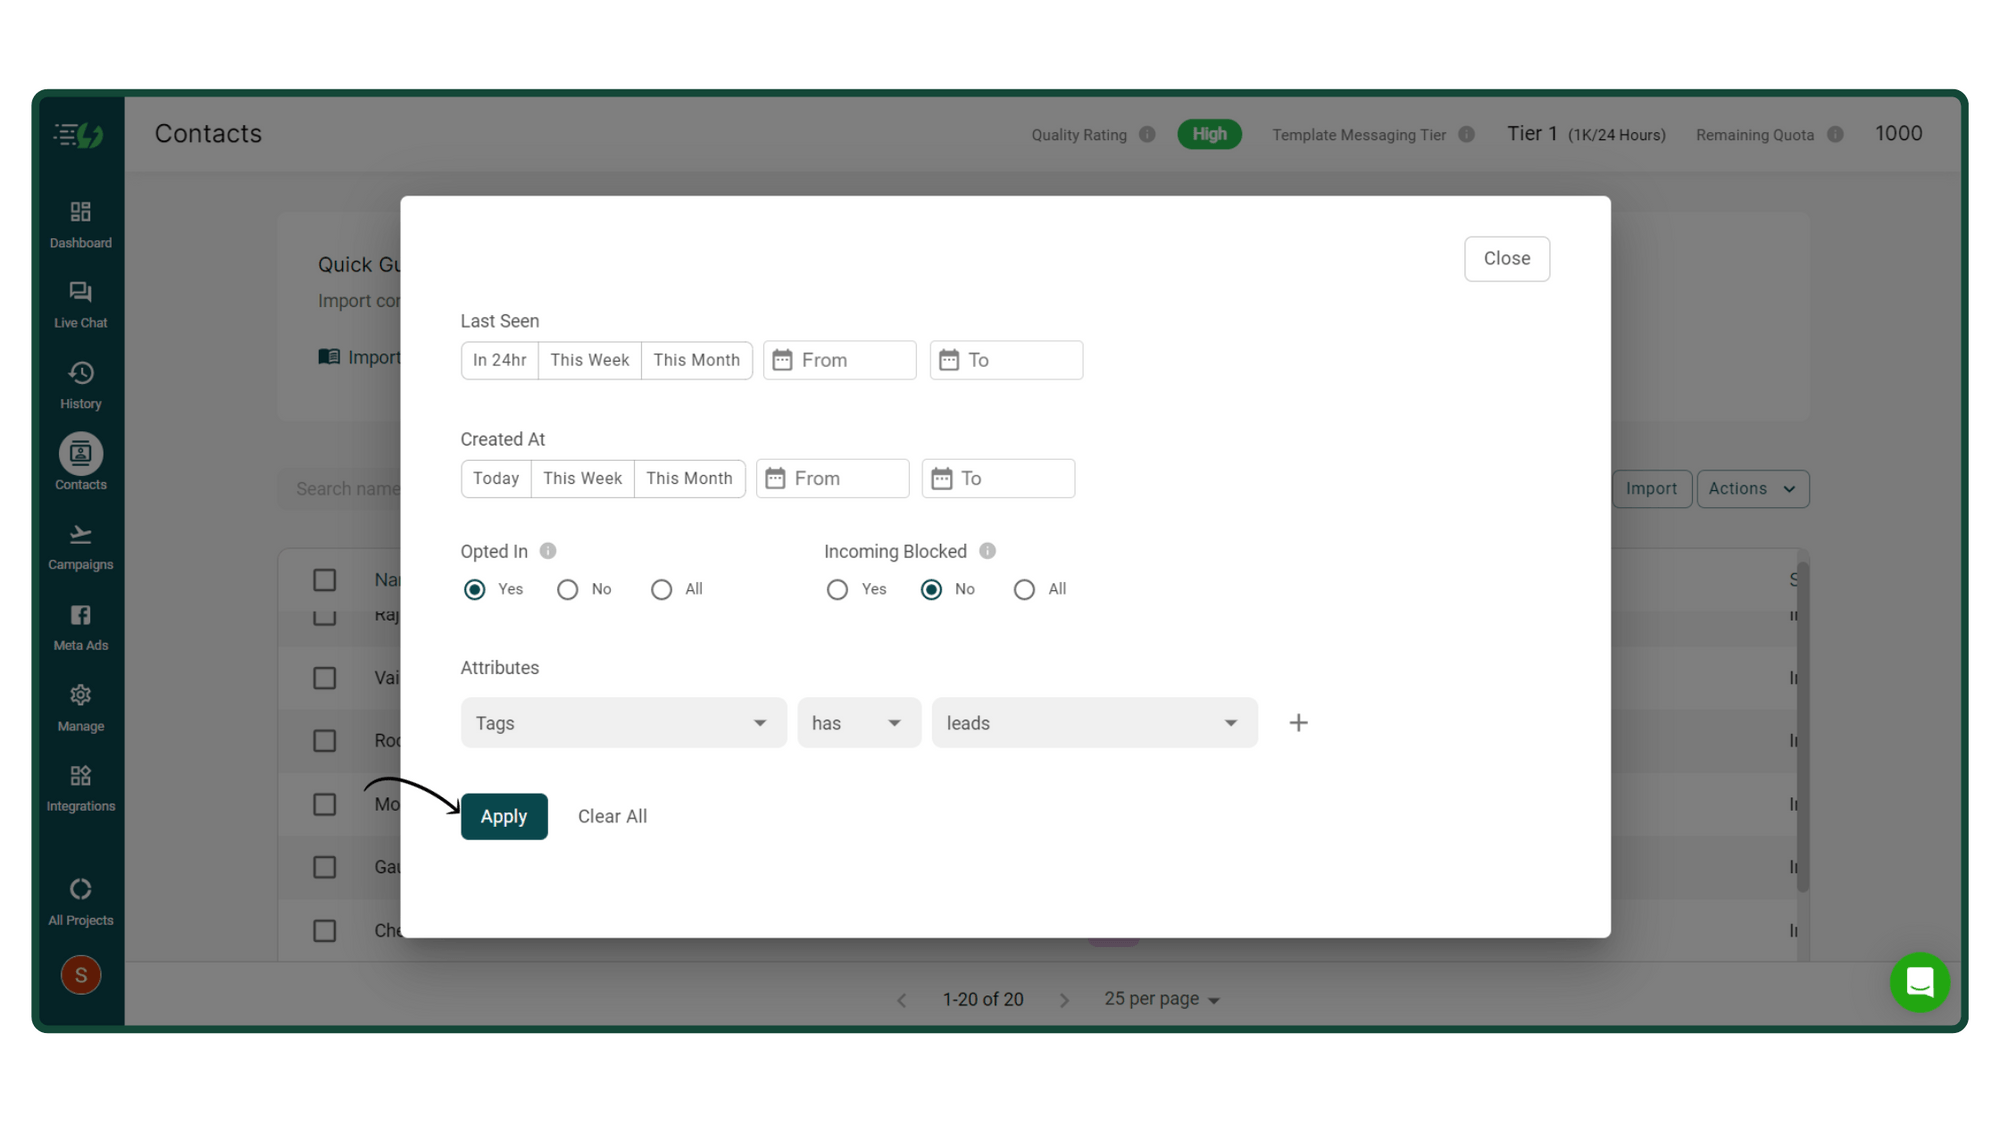
After picking the Attribute, click 'Apply'
After selecting the tag (which in this case was Leads which we added to the contacts in our Sheet file), click Apply to view the contacts that contain the tag Leads.
Select the Contacts & click 'Broadcast'
As you can see, all 19 contacts which we added now show on the contacts page.Select all contacts & click on Broadcast to create a new Broadcast campaign.Note: If you're worried about whether the filter is applied or not, verify whether there's a dot above the filter button as shown in the below image.
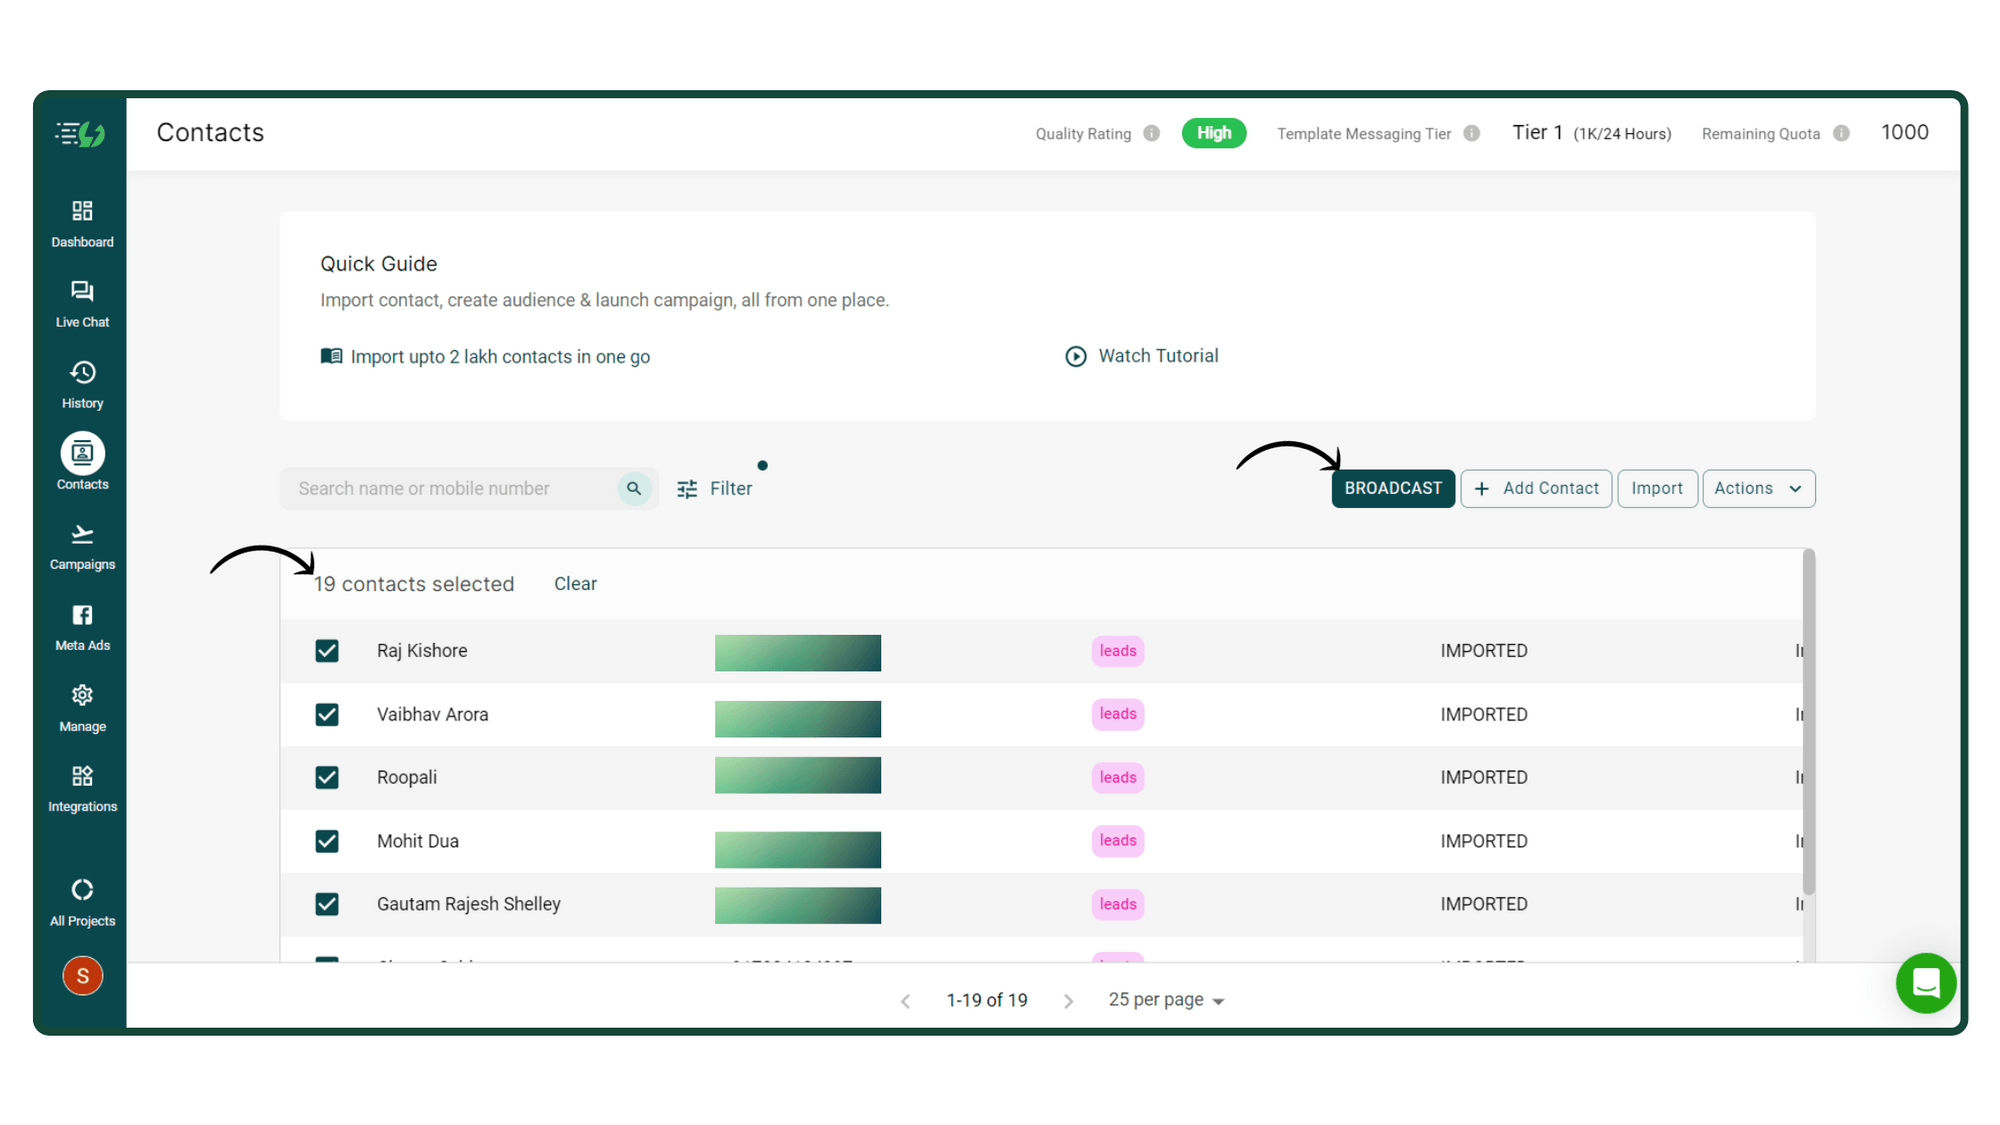
Select the Contacts & click 'Broadcast'
As you can see, all 19 contacts which we added now show on the contacts page.Select all contacts & click on Broadcast to create a new Broadcast campaign.Note: If you're worried about whether the filter is applied or not, verify whether there's a dot above the filter button as shown in the below image.
Add the Campaign name & select your pre-approved Template message
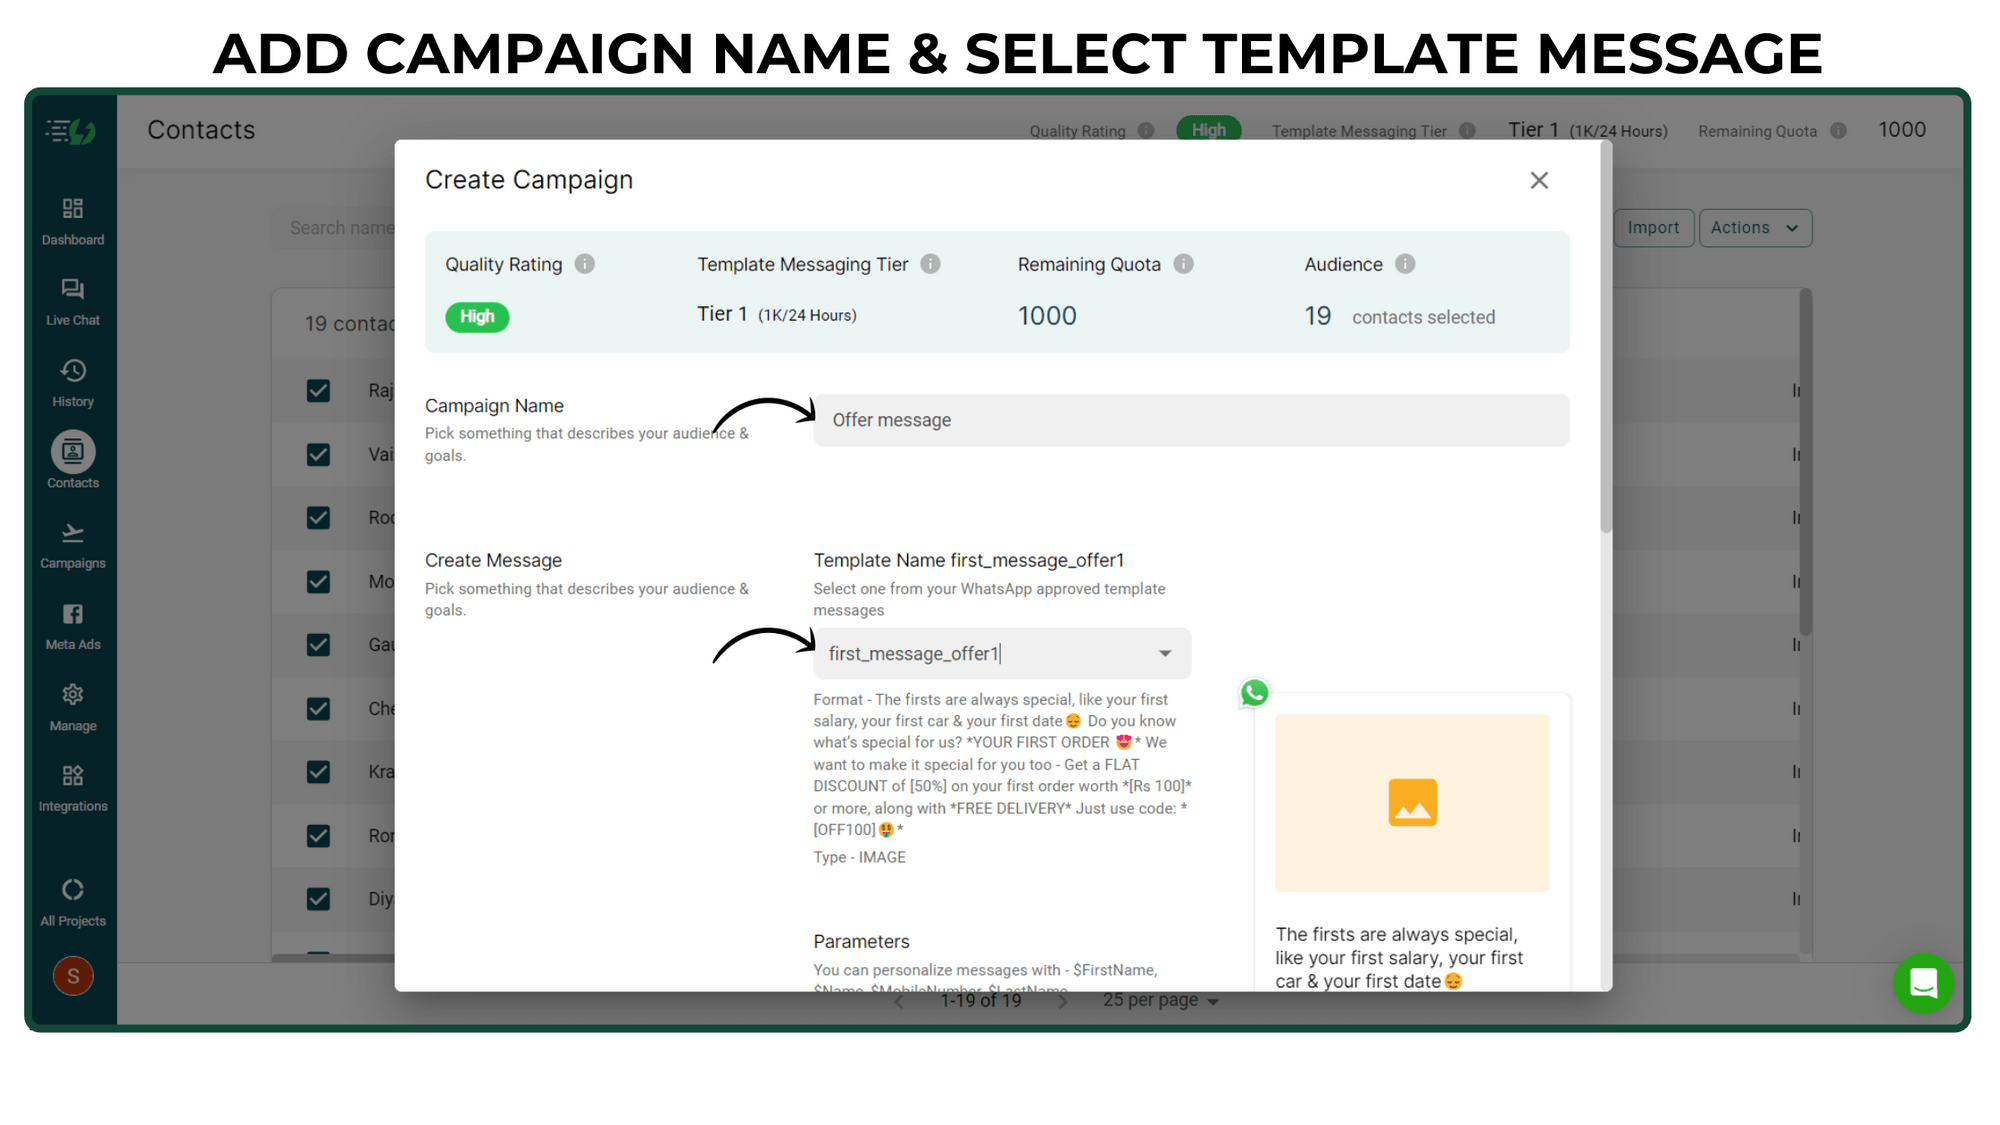
Here, add your Campaign name (Campaign name should be unique for every campaign) & select your pre-approved template message.
Add the Campaign name & select your pre-approved Template message
Here, add your Campaign name (Campaign name should be unique for every campaign) & select your pre-approved template message.
Add Parameter values & Media file
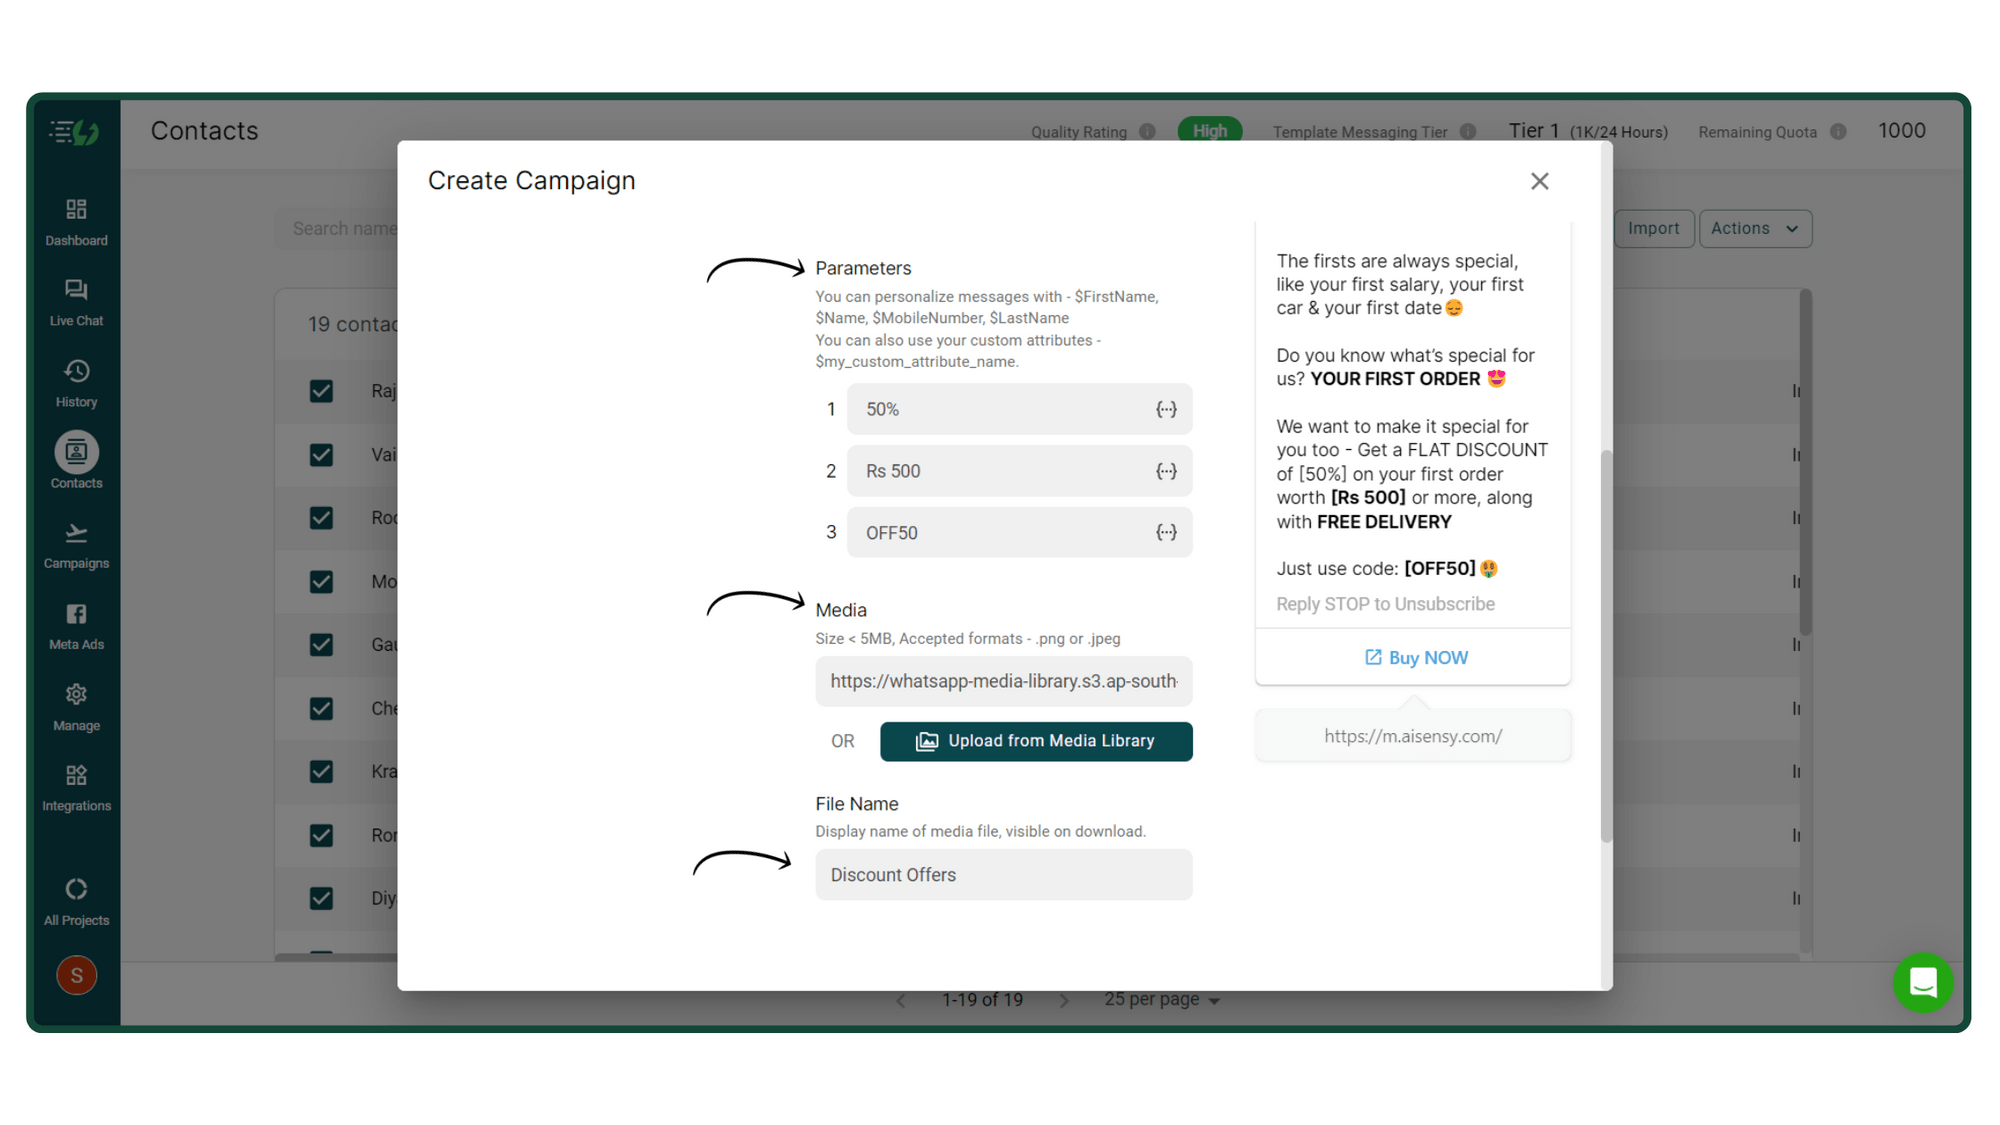
Parameters are exact values that will replace the variable parameters (i.e., there need to be 2 brackets on the left and 2 on the right of the variable).The users will receive the message with these values. You can also personalize by sending messages with the user's first name by using attributes like $FirstName. Check out how to add attributes like $FirstName, $Email, $Country & more in a single click.
How to Add Attributes
Add Parameter values & Media file
Parameters are exact values that will replace the variable parameters (i.e., there need to be 2 brackets on the left and 2 on the right of the variable).The users will receive the message with these values. You can also personalize by sending messages with the user's first name by using attributes like $FirstName. Check out how to add attributes like $FirstName, $Email, $Country & more in a single click.
How to Add Attributes
Verify your Campaign & Click 'Send Now'
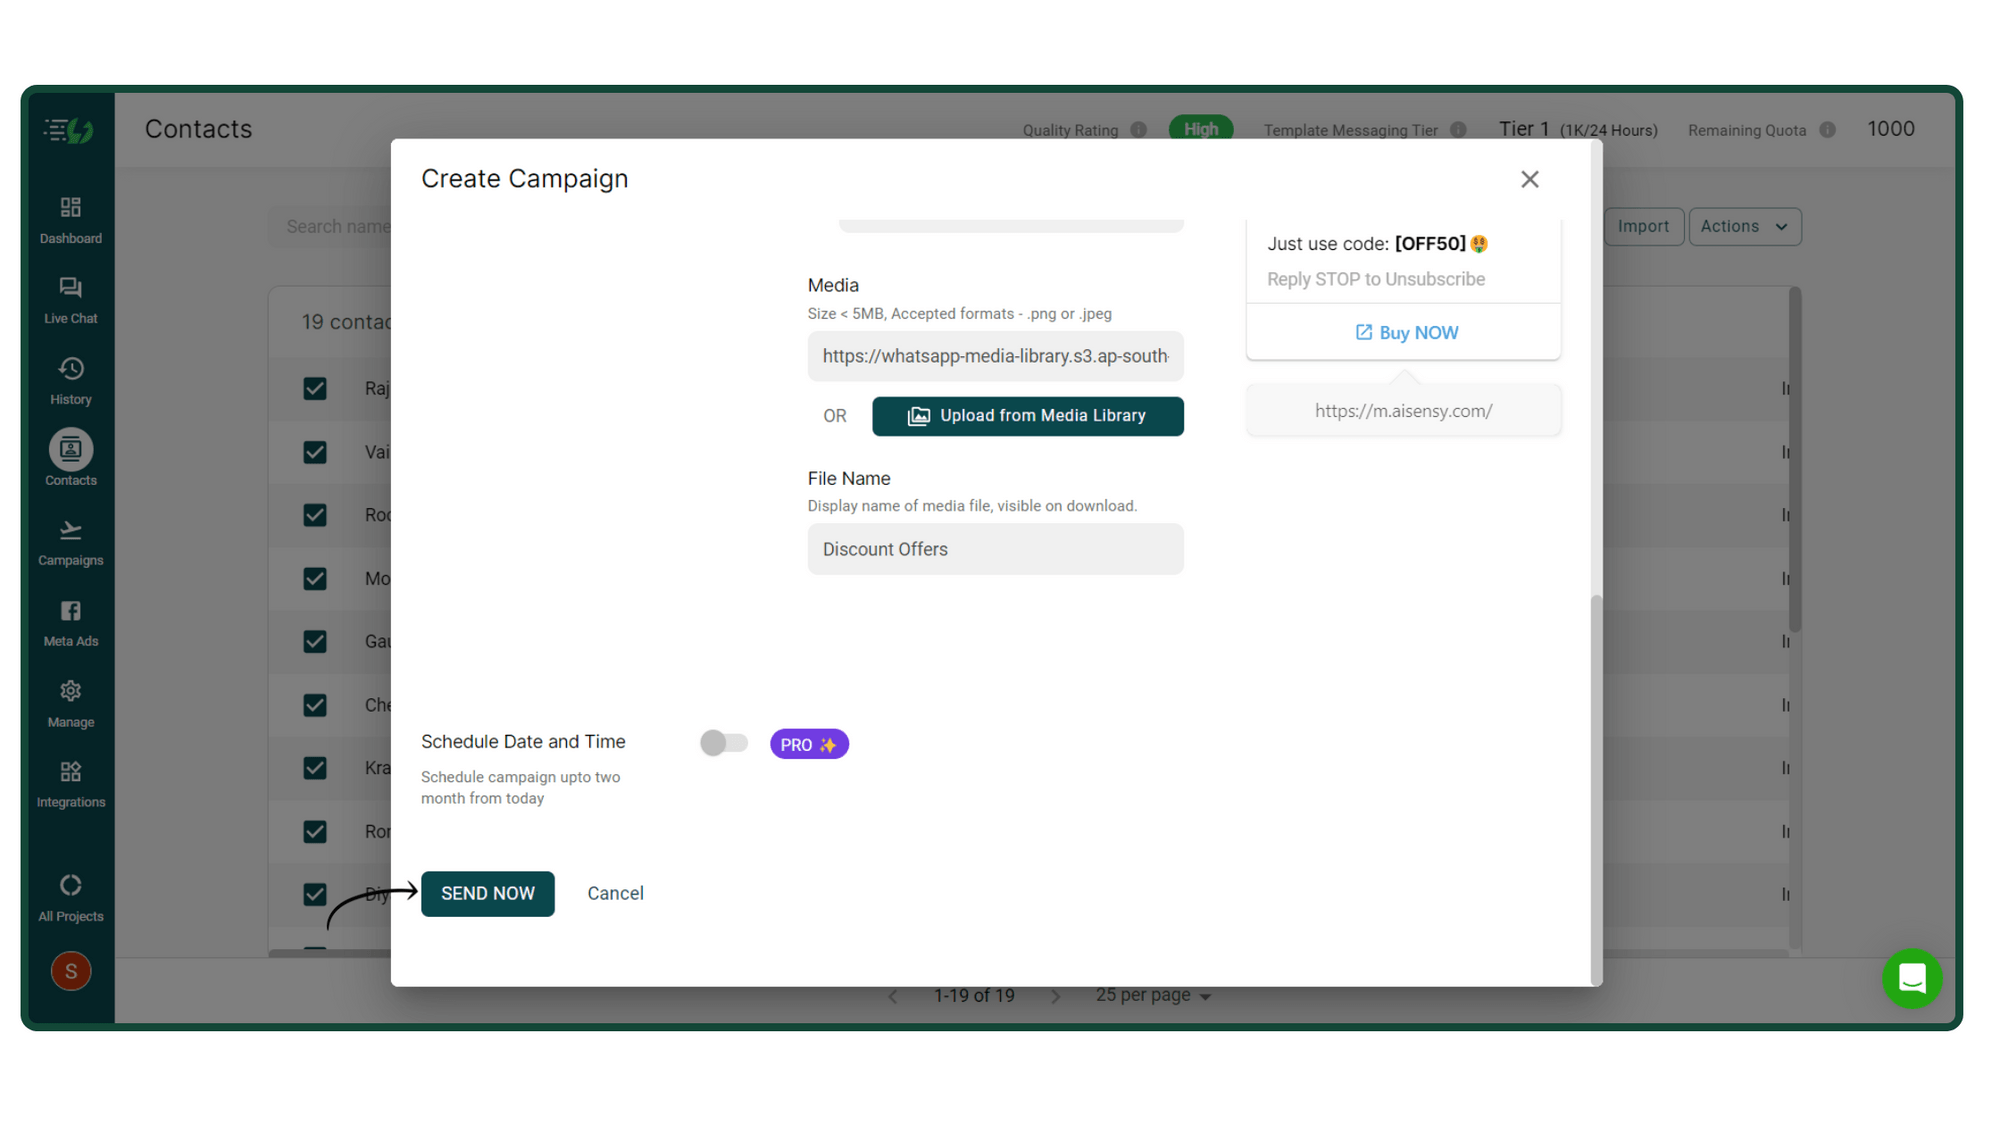
Last, verify your WhatsApp Broadcast Campaign & click Send Now to share the Broadcast with users.Additionally, you can also Schedule WhatsApp Broadcasts (Pro plan feature) for up to two months in advance.
How to Schedule WhatsApp Broadcasts
Verify your Campaign & Click 'Send Now'
Last, verify your WhatsApp Broadcast Campaign & click Send Now to share the Broadcast with users.Additionally, you can also Schedule WhatsApp Broadcasts (Pro plan feature) for up to two months in advance.
How to Schedule WhatsApp Broadcasts
Track the Analytics by going to Campaigns Page
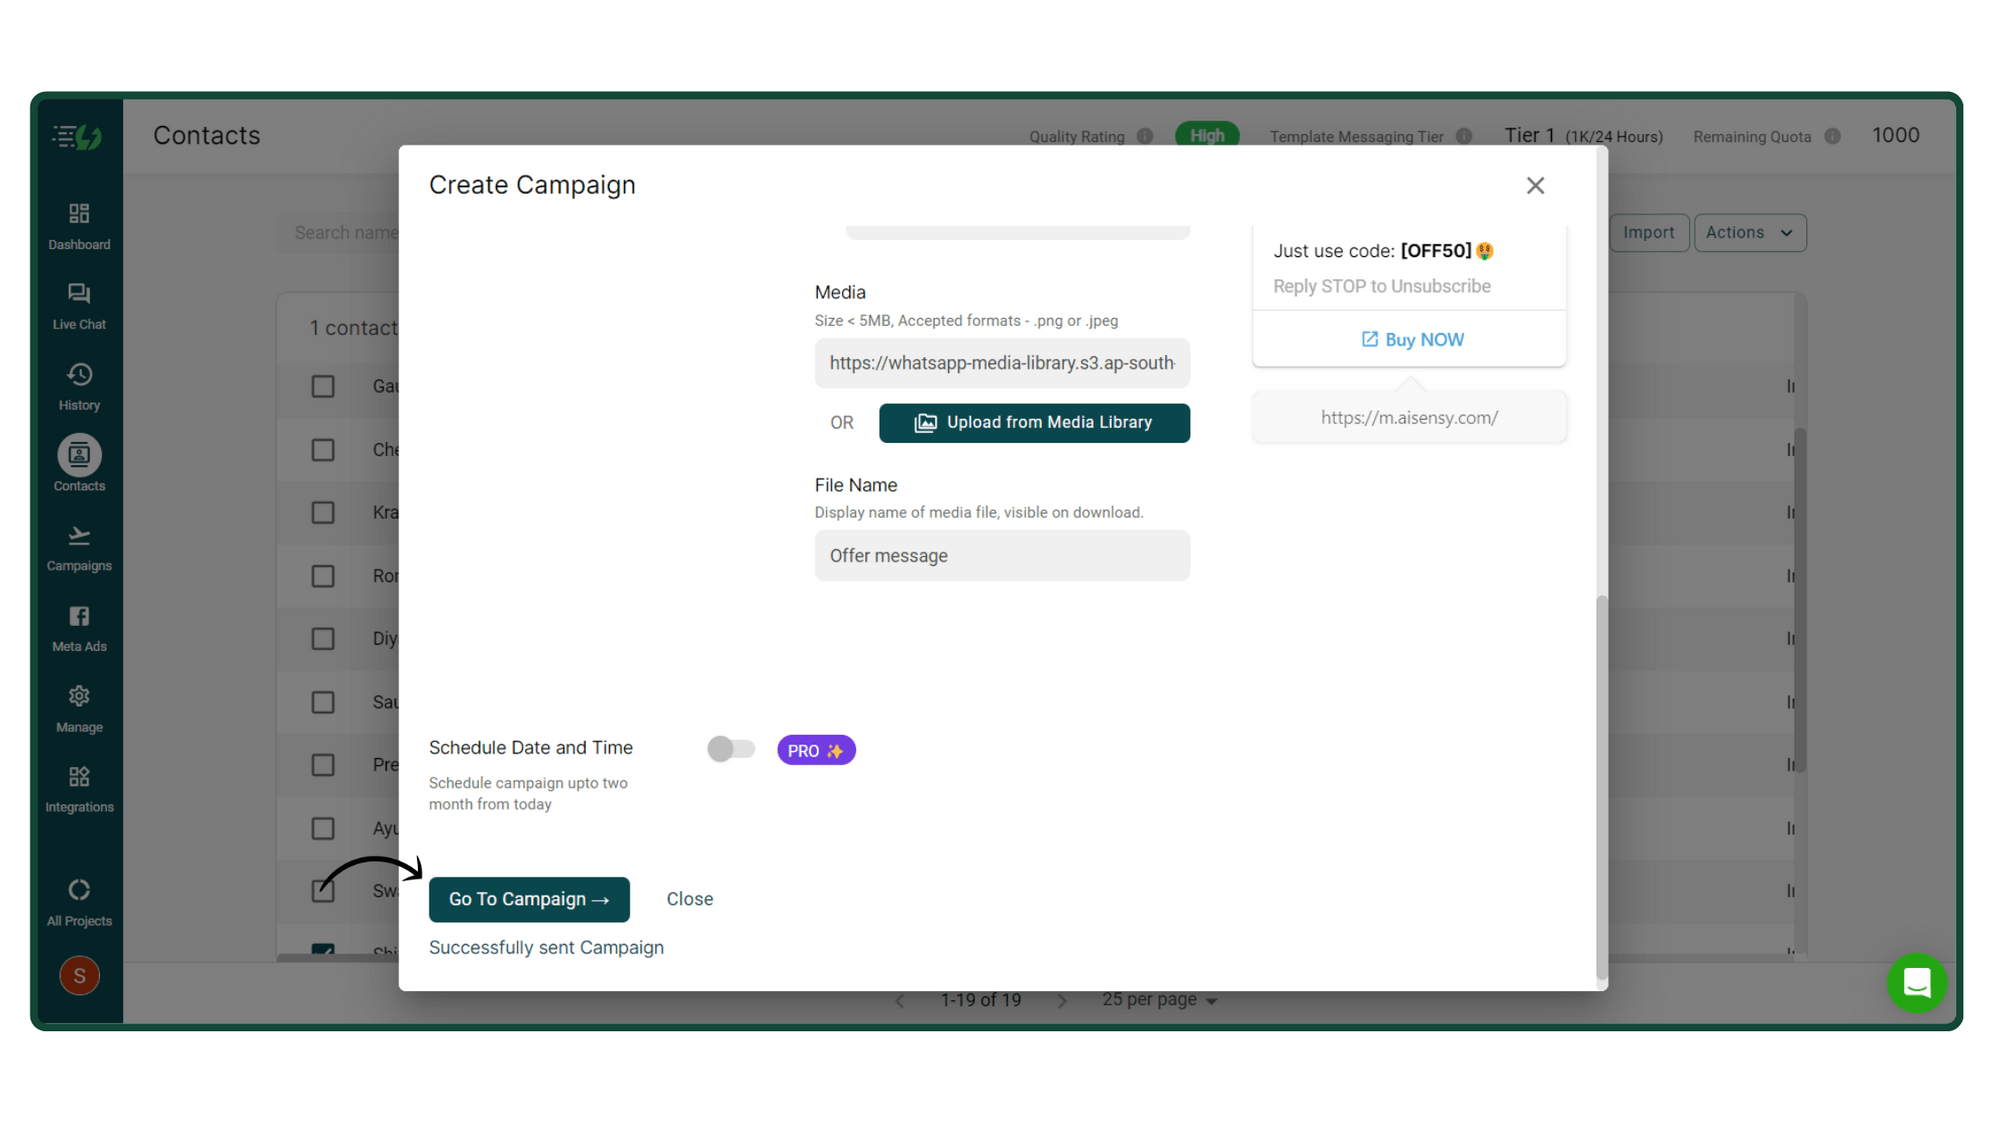
After the campaign is sent, click Go to Campaign to verify your Campaign analytics. This will help you track how your campaigns are performing and make any changes if required.
Track the Analytics by going to Campaigns Page
After the campaign is sent, click Go to Campaign to verify your Campaign analytics. This will help you track how your campaigns are performing and make any changes if required.
Track Campaign Analytics seamlessly
This is the Messegy Campaign analytics where you can view analytics for the number of messages that have been Sent, delivered, read, clicked (Pro plan feature), replied & failed.You can further Retarget users based on these filters for 7x higher conversions. Check out:
How to Retarget Users on WhatsApp
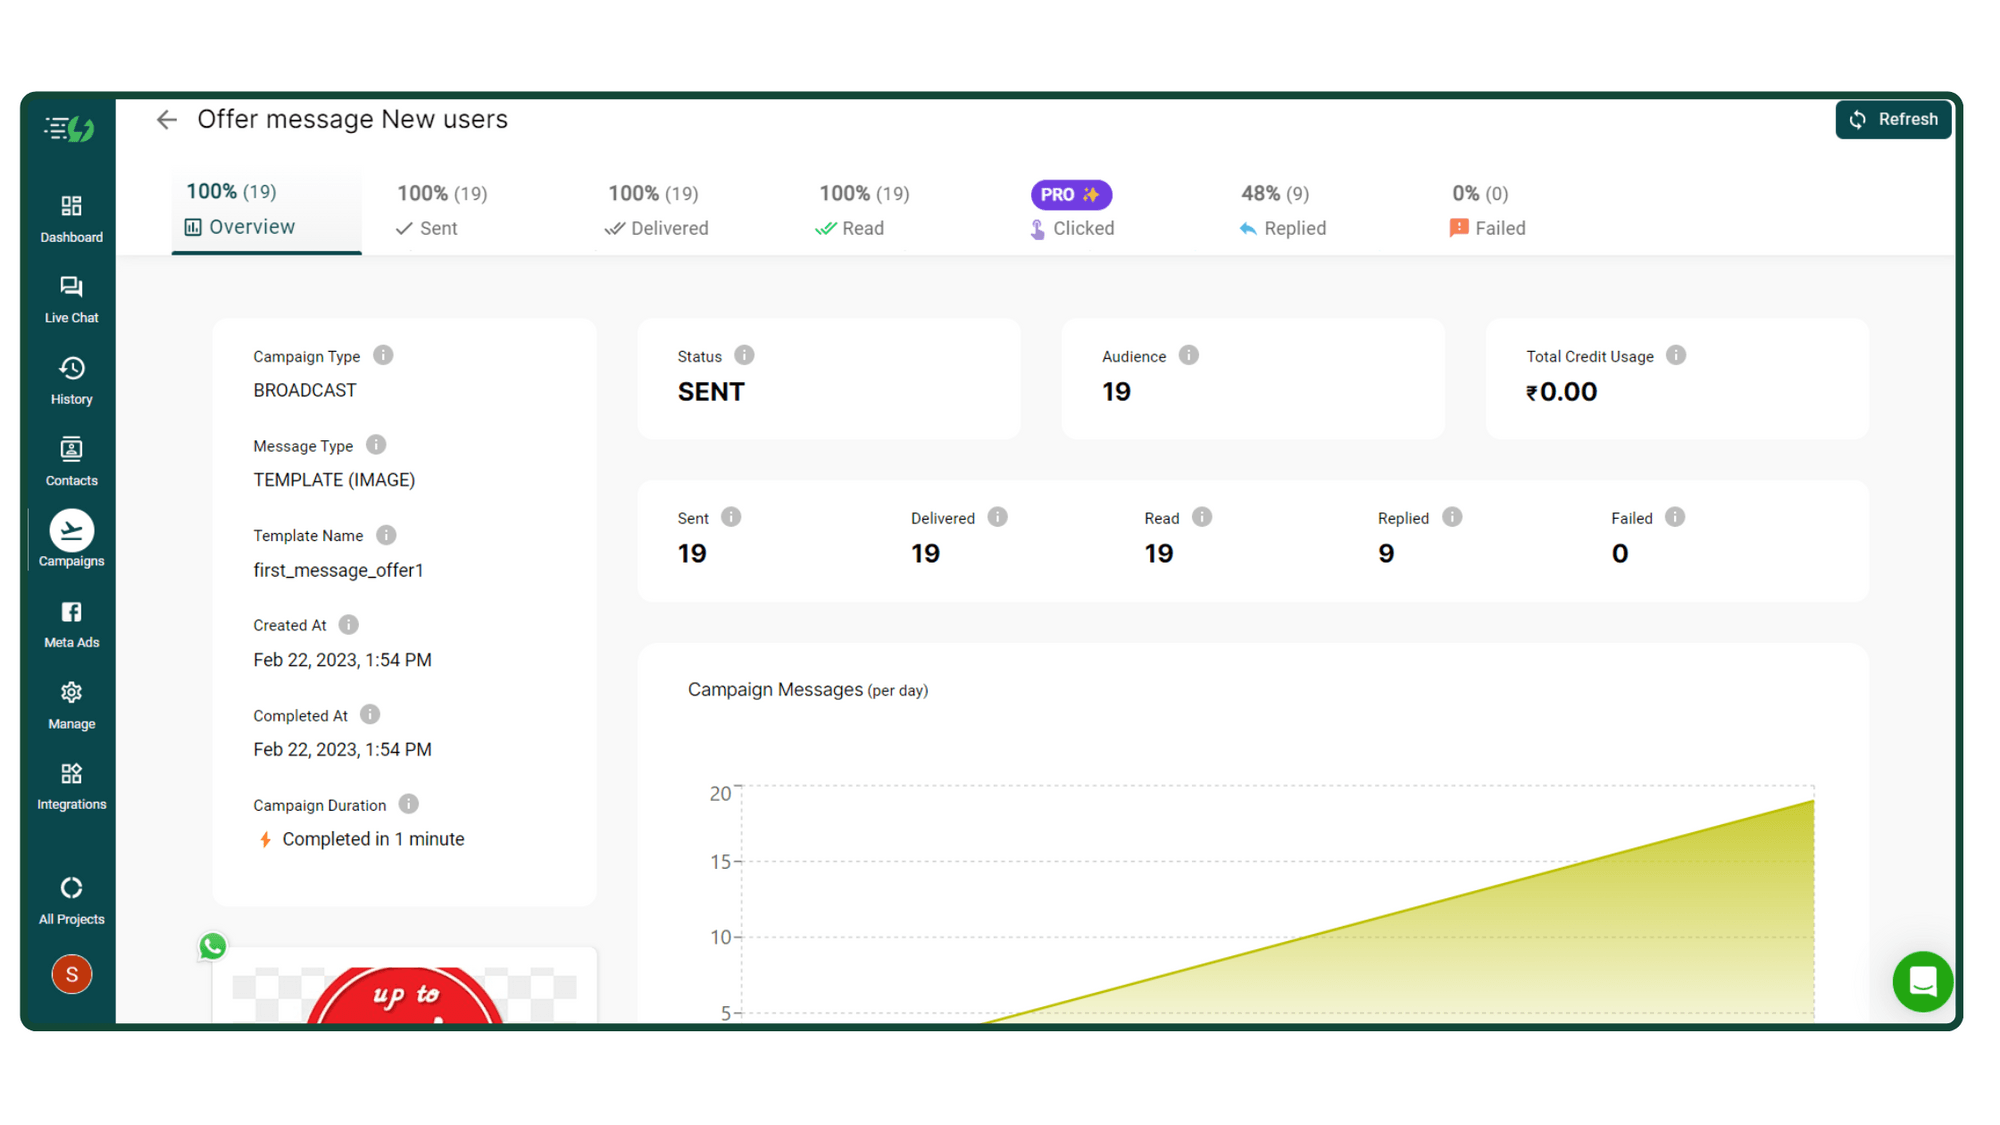
Track Campaign Analytics seamlessly
This is the Messegy Campaign analytics where you can view analytics for the number of messages that have been Sent, delivered, read, clicked (Pro plan feature), replied & failed.You can further Retarget users based on these filters for 7x higher conversions. Check out:
How to Retarget Users on WhatsApp
Ready to get Started?
Get Started for FREE. No Credit Card needed.⚡️Powered by Official WhatsApp Business API
Book a DemoStart for FREE
Ready to get Started?
Get Started for FREE. No Credit Card needed.⚡️Powered by Official WhatsApp Business API
Book a DemoStart for FREE